このページのトピック
Microsoft Entra IDを使用したSAMLシングルサインオンの設定
現在、SAMLはWorkload Securityサービスへのサインオンとアクセスに対してのみサポートされており、Trend Cloud One製品全体に対してはサポートされていません。次の地域でサポートされています。
- 米国: https://app.deepsecurity.trendmicro.com
- インド: https://workload.in-1.cloudone.trendmicro.com
- 英国: https://workload.gb-1.cloudone.trendmicro.com
- 日本: https://workload.jp-1.cloudone.trendmicro.com
- ドイツ: https://workload.de-1.cloudone.trendmicro.com
- オーストラリア: https://workload.au-1.cloudone.trendmicro.com
- カナダ: https://workload.ca-1.cloudone.trendmicro.com
- シンガポール: https://workload.sg-1.cloudone.trendmicro.com
現在、 Workload Securityでは、SAML 2.0アイデンティティプロバイダ (IdP) が開始するログインフローのHTTP POSTバインディングのみをサポートしており、サービスプロバイダ (SP) が開始するログインフローはサポートしていません。
Trend Cloud Oneで動作するようにMicrosoft Entra IDを使用したSAML SSOを設定する方法の詳細については、Azure Microsoft Entra IDセットアップガイドを参照してください。
Workload Security によるSAML標準の実装方法の詳細については、SAMLシングルサインオン(SSO)についてを参照してください。他のIDプロバイダとの設定手順については、 SAMLシングルサインオンの設定を参照してください。
プロセスに関与する管理者について
通常、SAMLシングルサインオン (SSO) にMicrosoft Entra IDを使用するようにWorkload Securityを設定するには、 Workload Security管理者とMicrosoft Entra ID管理者の2人が必要です。
Workload Security管理者には、SAMLアイデンティティプロバイダ権限を [完全]、または [カスタム] に設定し、[新規SAMLアイデンティティプロバイダを作成できます] を有効にして、Workload Securityロールを割り当てる必要があります。
Microsoft Entra IDを使用してWorkload SecurityでSAMLシングルサインオンを設定するために必要な手順と、各手順の実行者は次のとおりです。
| ステップ | 実行者 |
|---|---|
| Workload Security サービスプロバイダのSAMLメタデータドキュメントをダウンロードする。 | Workload Security 管理者 |
| Microsoft Entra IDの設定 | Microsoft Entra ID管理者 |
| Workload SecurityでSAMLを設定する | Workload Security 管理者 |
| Microsoft Entra IDでの役割の定義 | Microsoft Entra ID管理者 |
Workload SecurityサービスプロバイダのSAMLメタデータドキュメント {#Download}のダウンロード
Workload Securityコンソールで、[管理]→[ユーザ管理]→[IDプロバイダ]→[SAML] の順に選択し、[ダウンロード] をクリックします。ファイルは ServiceProviderMetadata.xmlとしてダウンロードされます。 Microsoft Entra ID管理者にファイルを送信します。
Microsoft Entra IDの設定
次の手順は、Microsoft Entra ID管理者が実行します。詳細については、「Microsoft Entra IDでのギャラリー以外のアプリケーションへのシングルサインオンの設定」を参照してください。
- ポータルで、ギャラリー以外の新しいアプリケーションを追加します。
-
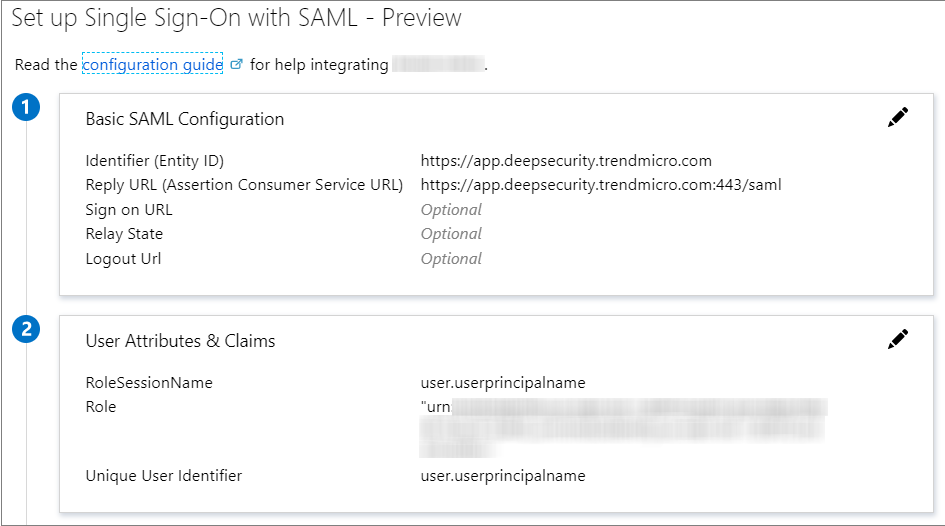
アプリケーションのシングルサインオンを設定します。 Workload Securityからダウンロードしたメタデータファイル
ServiceProviderMetadata.xmlをアップロードすることをお勧めします。または、応答URL (Workload Security URL +/saml) を入力することもできます。Workload SecurityのURLは、Trend Cloud Oneのリージョン によって異なります。
- 米国: https://app.deepsecurity.trendmicro.com
- インド: https://workload.in-1.cloudone.trendmicro.com
- 英国: https://workload.gb-1.cloudone.trendmicro.com
- 日本: https://workload.jp-1.cloudone.trendmicro.com
- ドイツ: https://workload.de-1.cloudone.trendmicro.com
- オーストラリア: https://workload.au-1.cloudone.trendmicro.com
- カナダ: https://workload.ca-1.cloudone.trendmicro.com
- シンガポール: https://workload.sg-1.cloudone.trendmicro.com
-
SAML要求を設定します。Workload Securityには、次のものが必要です。
-
https://deepsecurity.trendmicro.com/SAML/Attributes/RoleSessionNameこれは一意のユーザIDであり、 Workload Securityでのユーザ名です。たとえば、ユーザプリンシパル名 (UPN) を使用できます。 -
https://deepsecurity.trendmicro.com/SAML/Attributes/Role形式は「IDP URN,Role URN」です。 IDPはまだWorkload Securityで作成されていないため、後でMicrosoft Entra IDでの役割の定義でこのSAML要求を設定できます。
SAMLクレーム構造で説明されているように、その他の任意のクレームを設定することもできます。
-
-
Federation Metadata XML ファイルをダウンロードし、 Workload Security 管理者に送信してください。
Workload Securityで複数の役割が定義されている場合は、これらの手順を繰り返して役割ごとに個別のアプリケーションを作成します。
Workload SecurityでSAMLを設定する
Workload SecurityでSAMLを設定するには、いくつかの手順を実行する必要があります。
Microsoft Entra IDメタデータドキュメントをインポートする
- Workload Securityで、 [Administration]→[User Management]→[Identity Providers]→[SAML]に選択します。
- [ Get Started ]または[ New ]をクリックします。
- [ファイルの選択] をクリックし、Microsoft Entra IDからダウンロードしたフェデレーションメタデータXMLファイルを選択して、[次へ] をクリックします。
- IDプロバイダの名前を入力し、 [完了] をクリックして、[役割] 画面に移動します。
SAMLユーザ用の Workload Security ロールの作成
Workload Securityの [管理]→[ユーザ管理]→[役割] ページに、組織に適した役割が含まれていることを確認します。ユーザには、職務の完了に必要なアクティビティのみに制限する役割を割り当てる必要があります。役割の作成方法については、「ユーザの役割の定義」を参照してください。各Workload Securityの役割には、対応するMicrosoft Entra IDアプリケーションが必要です。
URNを取得する
Microsoft Entra ID管理者は、IDプロバイダのURNと役割のURNS (役割のWorkload SecurityのURNをMicrosoft Entra IDアプリケーションに関連付ける) を必要とします。両方に必要な情報は、 Workload Securityコンソールで確認できます。
- IDプロバイダのURNを表示するには、 [管理]→[ユーザ管理]→[IDプロバイダ]→[SAML]→[IDプロバイダ] の順に選択し、[URN]列を確認します。
- ロールURNを表示するには、 [管理]→[ユーザ管理]→[ロール] の順に選択し、[URN]列を選択します。
複数の役割がある場合は、役割ごとに個別のMicrosoft Entra IDアプリケーションが必要になるため、役割ごとにURNが必要です。
Microsoft Entra IDでの役割の定義
次の手順は、Microsoft Entra ID管理者が実行する必要があります。
Microsoft Entra IDで、前のセクションで特定したIDプロバイダのURNとロールのURNを使用して、Azureアプリケーションの「role」属性を定義します。 「IDP URN,Role URN」の形式にする必要があります。 SAMLクレーム構造 セクションの「 Workload Securityユーザの役割 (必須)」を参照してください。
Microsoft Entra IDのValidateボタンを使用して設定をテストするか、新しいアプリケーションをユーザに割り当てて動作をテストします。
サービスとIDプロバイダの設定
Workload Securityがサーバ証明書とIDプロバイダ証明書の有効期限を通知する期間、およびSAMLシングルサインオンを介して追加された非アクティブなユーザアカウントが自動的に削除されるまでの期間を設定できます。
これらの設定を変更するには、[管理]→[システム設定]→[セキュリティ]→[アイデンティティプロバイダ] に移動します。
SAMLクレームの構造
Workload Security、次のSAMLクレームがサポートされます。
Workload Security username(必須)
クレームには、Name属性がhttps://deepsecurity.trendmicro.com/SAML/Attributes/RoleSessionName``Attributeエレメントと、1つのAttributeValueエレメントが含まれるSAMLアサーションが必要です。Workload Security は、 Workload Security ユーザ名として AttributeValue を使用します。
サンプルのSAMLデータ (略語):
<samlp:Response xmlns:samlp="urn:oasis:names:tc:SAML:2.0:protocol">
  <Assertion xmlns="urn:oasis:names:tc:SAML:2.0:assertion">
    <AttributeStatement>
      <Attribute Name="https://deepsecurity.trendmicro.com/SAML/Attributes/RoleSessionName">
        <AttributeValue>alice</AttributeValue>
      </Attribute>
    </AttributeStatement>
  </Assertion>
</samlp:Response>
Workload Security ユーザの役割(必須)
クレームには、 https://deepsecurity.trendmicro.com/SAML/Attributes/Role の Name 属性を持つ Attribute 要素と1~10個の AttributeValue 要素を含むSAMLアサーションが必要です。 Workload Securityは、属性値を使用して、ユーザのテナント、IDプロバイダ、および役割を決定します。 1つのアサーションに、複数のテナントのロールを含めることができます。
サンプルのSAMLデータ (略語):
<samlp:Response xmlns:samlp="urn:oasis:names:tc:SAML:2.0:protocol">
  <Assertion xmlns="urn:oasis:names:tc:SAML:2.0:assertion">
    <AttributeStatement>
      <Attribute Name="https://deepsecurity.trendmicro.com/SAML/Attributes/Role">
        <AttributeValue>urn:tmds:identity:[pod ID]:[tenant ID]:saml-provider/[IDP name],
            urn:tmds:identity:[pod ID]:[tenant ID]:role/[role name]</AttributeValue>
      </Attribute>
    </AttributeStatement>
  </Assertion>
</samlp:Response>
AttributeValue 要素内の改行は、読みやすくするために挿入されています。クレームでは、1行で指定する必要があります。
最大セッション期間 (オプション)
Name 属性が https://deepsecurity.trendmicro.com/SAML/Attributes/SessionDuration である Attribute 要素と整数値の AttributeValue 要素を含むSAMLアサーションが要求にある場合、その時間(秒単位)が経過するとセッションは自動的に終了します。
サンプルのSAMLデータ (略語):
<samlp:Response xmlns:samlp="urn:oasis:names:tc:SAML:2.0:protocol">
  <Assertion xmlns="urn:oasis:names:tc:SAML:2.0:assertion">
    <AttributeStatement>
      <Attribute Name="https://deepsecurity.trendmicro.com/SAML/Attributes/SessionDuration">
        <AttributeValue>28800</AttributeValue>
      </Attribute>
    </AttributeStatement>
  </Assertion>
</samlp:Response>
言語設定 (オプション)
Name 属性が https://deepsecurity.trendmicro.com/SAML/attributes/PreferredLanguage である Attribute 要素と、サポートされている言語のいずれかと等しい文字列値の AttributeValue 要素を含むSAMLアサーションがクレームに含まれている場合、 Workload Securityはその値を使用してユーザの優先言語を設定します。
次の言語がサポートされます。
en-US(米国英語)ja-JP(日本語)zh-CN(簡体字中国語)
サンプルのSAMLデータ (略語):
<samlp:Response xmlns:samlp="urn:oasis:names:tc:SAML:2.0:protocol">
  <Assertion xmlns="urn:oasis:names:tc:SAML:2.0:assertion">
    <AttributeStatement>
      <Attribute Name="https://deepsecurity.trendmicro.com/SAML/Attributes/PreferredLanguage">
        <AttributeValue>en-US</AttributeValue>
      </Attribute>
    </AttributeStatement>
  </Assertion>
</samlp:Response>