Topics on this page
Check digital signatures on software packages
Before installing the agent, you should check the digital signature on the software ZIP packages and installer files. A correct digital signature indicates that the software is authentically from Trend Micro and has not been corrupted or tampered with.
- Check the signature on software ZIP packages
- Check the signature on installers (EXE, MSI, RPM or DEB file)
You can also validate the software's checksums, as well as the security updates' and agent modules' digital signature. See How Workload Security validates update integrity.
Check the signature on software ZIP packages
Deep Security Agent and online help are made available in ZIP packages. These packages are digitally signed. You can check the digital signature on the ZIP file in the following ways:
By exporting the ZIP from the manager
Export a ZIP file following the instructions in Export the agent installer.
On export, Workload Security checks the digital signature on the ZIP file. If the signature is valid, Workload Security allows the export to proceed. If the signature is invalid or missing, Workload Security disallows the action, deletes the ZIP, and logs an event.
By viewing the ZIP's properties file
- Log in to the Workload Security console.
-
Click Administration at the top.
-
On the left, expand Updates > Software > Local.
-
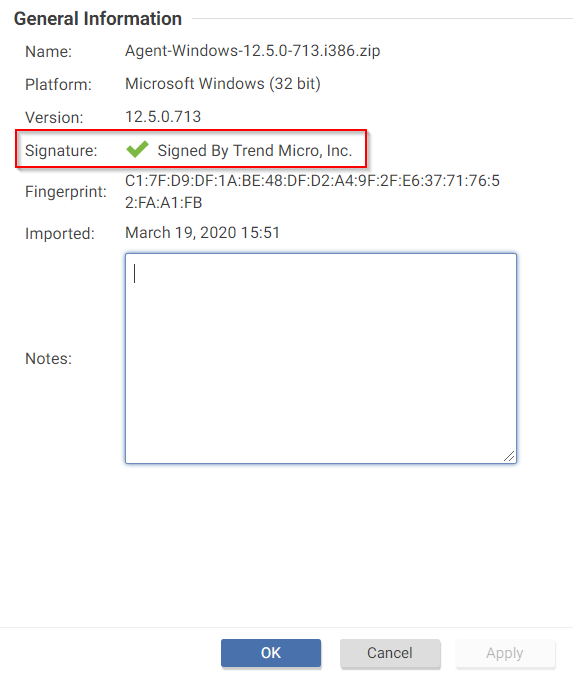
Find the ZIP package whose digital signature you want to check and double-click it.
The Properties page for the ZIP file opens, and the manager checks the digital signature. If the signature is good, you will see a green check mark in the Signature field. If the signature is not valid or does not exist, the manager deletes the ZIP and logs an event.
By using jarsigner
Use the jarsigner Java utility to check a signature on a ZIP when you cannot check it through the manager. For example, you obtained an agent ZIP package from a non-manager source, such as the Deep Security Software page, and then wanted to install the agent manually. In this scenario, you would use the jarsigner utility since the manager is not involved.
To check a signature using jarsigner:
1. Install the latest Java Development Kit on your computer.
2. Download the ZIP.
3. Use the jarsigner utility within the JDK to check the signature. Execute the following command:
jarsigner -verify -verbose -certs -strict <ZIP_file>
For example:
jarsigner -verify -verbose -certs -strict Agent-RedHat_EL7-11.2.0-124.x86_64.zip
4. Read any errors as well as the content of the certificate to determine if the signature can be trusted.
Check the signature on installer files (EXE, MSI, RPM, DEB files)
The installers for the Deep Security Agent and Deep Security Notifier are digitally signed using RSA. The installer is an EXE or MSI file on Windows, an RPM file on Linux operating systems (Amazon, CloudLinux, Oracle, Red Hat, and SUSE), or a DEB file on Debian and Ubuntu.
The following instructions describe how to check a digital signature manually on an installer file. To automate this check, you can include it in your agent deployment scripts. For more on deployment scripts, see Use deployment scripts to add and protect computers.
Follow the instructions that correspond to the type of installer file you want to check:
- Check the signature on an EXE or MSI file
- Check the signature on an RPM file
- Check the signature on a DEB file
Check the signature on an EXE or MSI file
- Right-click the EXE or MSI file and select Properties.
- Click the Digital Signatures tab to check the signature.
Check the signature on an RPM file
First, install GnuPG
Install GnuPG on the agent computer where you intend to check the signature, if it is not already installed. This utility includes the GPG command-line tool, which you need in order to import the signing key and check the digital signature.
GnuPG is installed by default on most Linux distributions.
Next, import the signing key
- Look for the
3trend_public.ascfile in the root folder of the agent's ZIP file. The ASC file contains a GPG public signing key that you can use to verify the digital signature. - Optionally, verify the SHA-256 hash digest of the ASC file using any hashing utility. The hash is:
c59caa810a9dc9f4ecdf5dc44e3d1c8a6342932ca1c9573745ec9f1a82c118d7(for Agent version 20.0.0-2593 or earlier)
bd3b00763db11cee2a6b990428d506f11cf86c68354388fe9cc41fa7e6c9ddae(for Agent version 20.0.0-2971 or later)7a7509c5458c762f6a341820a93e09f0f1b9dd3258608753e18d26575e9c730f(for Agent version 20.0.1-3180 or later) - On the agent computer where you intend to check the signature, import the ASC file. Use this command:
Commands are case-sensitive.
gpg --import 3trend_public.asc
The following messages appear:
gpg: directory '/home/build/.gnupg' created
gpg: new configuration file '/home/build/.gnupg/gpg.conf' created
gpg: WARNING: options in '/home/build/.gnupg/gpg.conf' are not yet active during this run
gpg: keyring '/home/build/.gnupg/secring.gpg' created
gpg: keyring '/home/build/.gnupg/pubring.gpg' created
gpg: /home/build/.gnupg/trustdb.gpg: trustdb created
gpg: key E1051CBD: public key "Trend Micro (trend linux sign) <alloftrendetscodesign@trendmicro.com>" imported
gpg: Total number processed: 1
gpg: imported: 1 (RSA: 1)
- Export the GPG public signing key from the ASC file:
gpg --export -a 'Trend Micro' > RPM-GPG-KEY-CodeSign - Import the GPG public signing key to the RPM database:
sudo rpm --import RPM-GPG-KEY-CodeSign - Verify that the GPG public signing key has been imported:
rpm -qa gpg-pubkey* - The fingerprints of imported GPG public keys appear. The Trend Micro one is:
gpg-pubkey-e1051cbd-5b59ac99(For Agent version include or before 20.0.0-2593)
gpg-pubkey-e1051cbd-6030cc3a(For Agent version include or after 20.0.0-2971)
The signing key has now been imported and can be used to check the digital signature on the agent RPM file.
Finally, verify the signature on the RPM file
Instead of checking the signature on the RPM file manually, as per the following description, you can have a deployment script do it. See Use deployment scripts to add and protect computers for details.
Use this command:
rpm -K Agent-PGPCore-<OS agent version>.rpm
Example:
rpm -K Agent-PGPCore-RedHat_EL7-11.0.0-950.x86_64.rpm
Make sure you run the above command on the Agent-**PGP**Core-<...>.rpm file. Running it on Agent-Core-<...>.rpm does not work. If you cannot find the Agent-PGPCore-<...>.rpm file in the agent ZIP, you need to use a newer ZIP, specifically:
- Deep Security Agent 11.0 Update 15 or a later update
or
- Deep Security Agent 12 Update 2 or later
or
- Deep Security Agent 20 or later
If the signature verification is successful, the following message appears:
Agent-PGPCore-RedHat_EL7-11.0.0-950.x86_64.rpm: rsa sha1 (md5) pgp md5 OK
Check the signature on a DEB file
First, install the dpkg-sig utility
Install dpkg-sig on the agent computer where you intend to check the signature, if it is not already installed. This utility includes the GPG command-line tool, which you need in order to import the signing key and check the digital signature.
Next, import the signing key
- Look for the
3trend_public.ascfile in the root folder of the agent's ZIP file. The ASC file contains a GPG public signing key that you can use to verify the digital signature. - Optionally, verify the SHA-256 hash digest of the ASC file using any hashing utility. The hash is:
c59caa810a9dc9f4ecdf5dc44e3d1c8a6342932ca1c9573745ec9f1a82c118d7(for agent version 20.0.0-2593 or earlier)
bd3b00763db11cee2a6b990428d506f11cf86c68354388fe9cc41fa7e6c9ddae(for agent version 20.0.0-2971 or later)
7a7509c5458c762f6a341820a93e09f0f1b9dd3258608753e18d26575e9c730f(for agent version 20.0.1-3180 or later) - On the agent computer where you intend to check the signature, import the ASC file to the GPG keyring. Use the following command:
gpg --import 3trend_public.asc
The following message appears:
gpg: key E1051CBD: public key "Trend Micro (trend linux sign) <alloftrendetscodesign@trendmicro.com>" imported
gpg: Total number processed: 1
gpg: imported: 1 (RSA: 1)
- Optionally, display the Trend Micro key information. Use the following command:
gpg --list-keys
A message similar to the following appears:
/home/user01/.gnupg/pubring.gpg
-------------------------------pub 2048R/E1051CBD 2018-07-26 [expires: 2021-07-25] uid Trend Micro (trend linux sign) <alloftrendetscodesign@trendmicro.com> sub 2048R/202C302E 2018-07-26 [expires: 2021-07-25]
Finally, verify the signature on the DEB file
Instead of verifying the signature on the DEB file manually, as per the following description, you can have a deployment script do it. See Use deployment scripts to add and protect computers for details.
Enter the following command:
dpkg-sig --verify <agent_deb_file>
where <agent_deb_file> is the name and path of the agent DEB file. For example:
dpkg-sig --verify Agent-Core-Ubuntu_16.04-12.0.0-563.x86_64.deb
A processing message appears:
Processing Agent-Core-Ubuntu_16.04-12.0.0-563.x86_64.deb...
If the signature is verified successfully, the following message appears:
GOODSIG _gpgbuilder CF5EBBC17D8178A7776C1D365B09AD42E1051CBD 1568153778