Topics on this page
Application Control Trust Entities
Trust Entities auto-authorizes software changes that match the properties of trust rules assigned to trust rulesets. Each trust rule contains one or more properties that define the parameters for auto-authorizing software changes.
By using the trust entities feature, you can proactively auto-authorize software changes on the agent thus reducing the number of software change events sent to Workload Security. For example, any agent undergoing regular OS updates creates several new software changes each time a patch is applied. By configuring appropriate trust rules and applying them to those agents, you can auto-authorize the software changes on the agent, and avoid having to manually manage them from the the Workload Security Actions tab or as Application Control security events.
To auto-authorize software changes using trust entities, you need to configure trust rules, assign them to trust rulesets, and assign rulesets to policies or computers.
For information on how to allow or block software changes that are not being auto-authorized with the trust entities feature, see View and change Application Control software rulesets.
API documentation is available for trust rulesets.
Throughout this document, source refers to the process that creates a software change, whereas target is used when referring to the software change itself.
Trust rulesets
A trust ruleset consists of one or more user-configured trust rules. If you assign a trust ruleset to a policy or computer in Workload Security, the rules contained in that ruleset are applied to the related workloads and will auto-authorize any software changes that meet its rule property requirements.
Create a trust ruleset
To create a new trust ruleset, do one of the following:
From the Workload Security Policies tab:
- Go to Common Objects > Rules > Application Control Rules > Trust Entities.
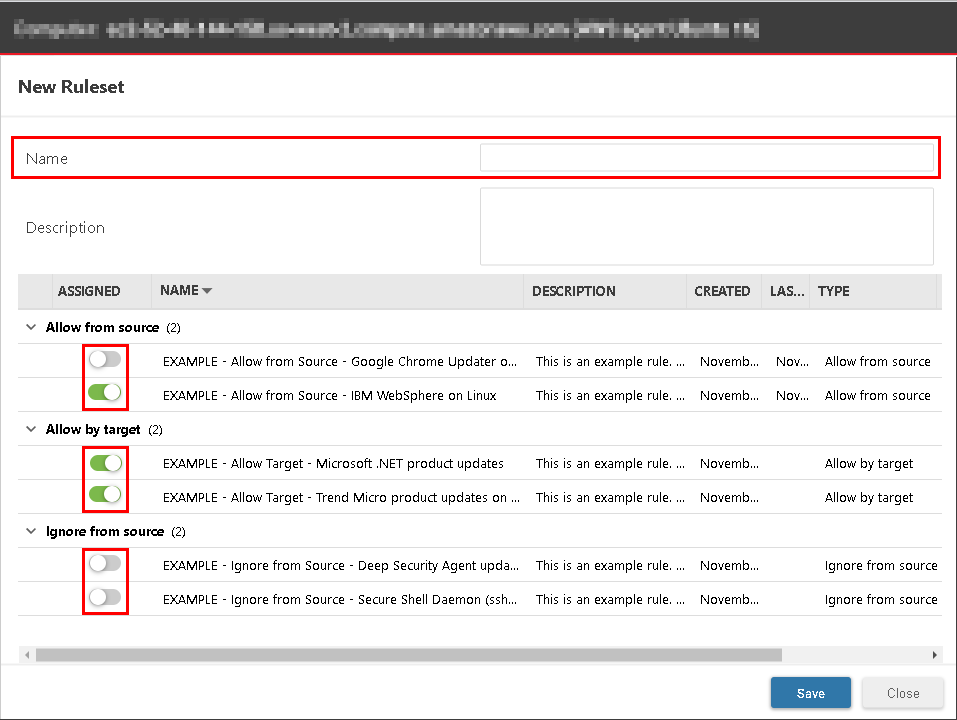
- In the Trust Rulesets section, select New.
- In the New Ruleset window, provide a name and, optionally, a description for the new ruleset.
- Select one or more of the trust rules in the list to assign them to your trust ruleset.
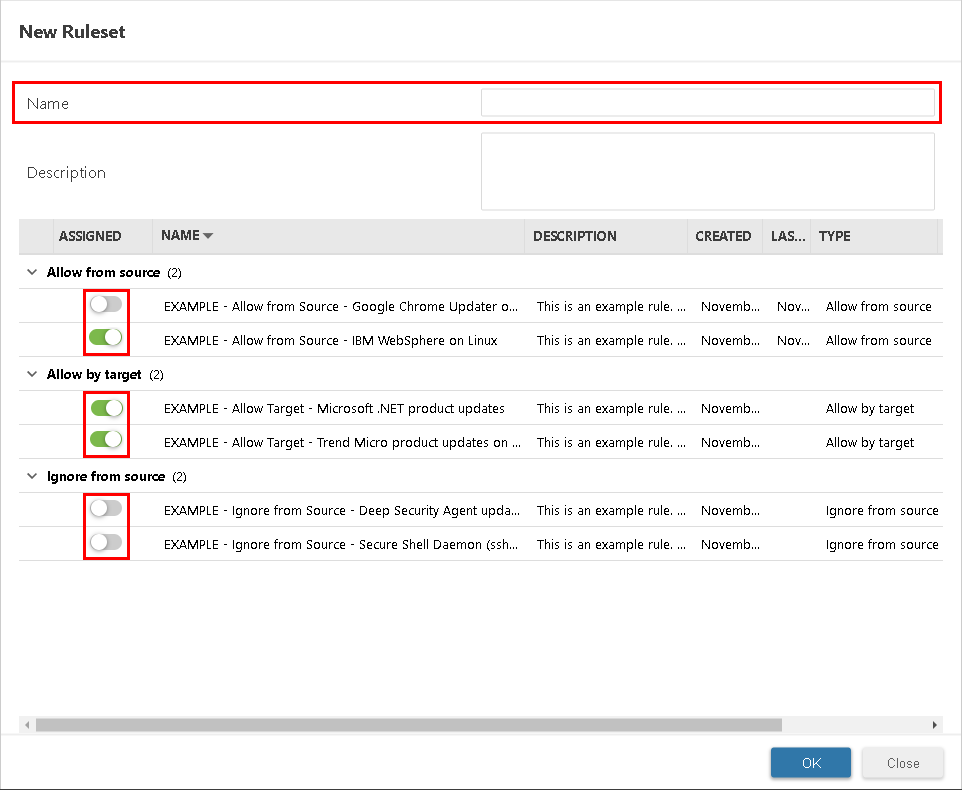
- Click OK.
The trust ruleset is created, containing any rules you assigned.
From the Workload Security Computers or Policies tab:
- Double-click a computer or policy (or right-click and select Details).
- Go to Application Control and make sure the Configuration is set to On or Inherited (On).
- In the Trust Ruleset list, select New.
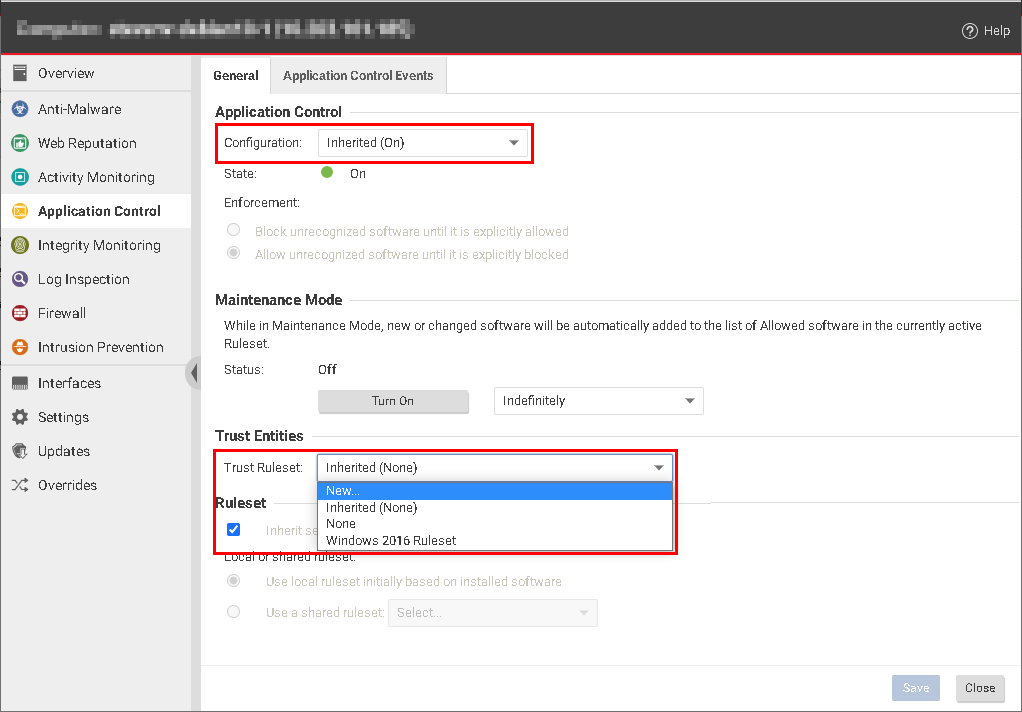
- In the New Ruleset window, provide a name and, optionally, a description for the new ruleset.
- Select one or more of the trust rules in the list to assign them to your trust ruleset and click Save to create the trust ruleset, containing any rules you assigned.
- Optionally, click Save to assign the new trust ruleset to the computer or policy.
Instead of creating a trust ruleset from scratch, you can click Duplicate on the Trust Entity Management window (Policies > Common Objects > Rules > Application Control Rules > Trust Entities) to create a copy of an existing ruleset and then configure it to meet your needs.
Assign or unassign a trust ruleset
To assign a trust ruleset:
- From the Workload Security Computers or Policies tab, double-click a computer or policy (or right-click and select Details).
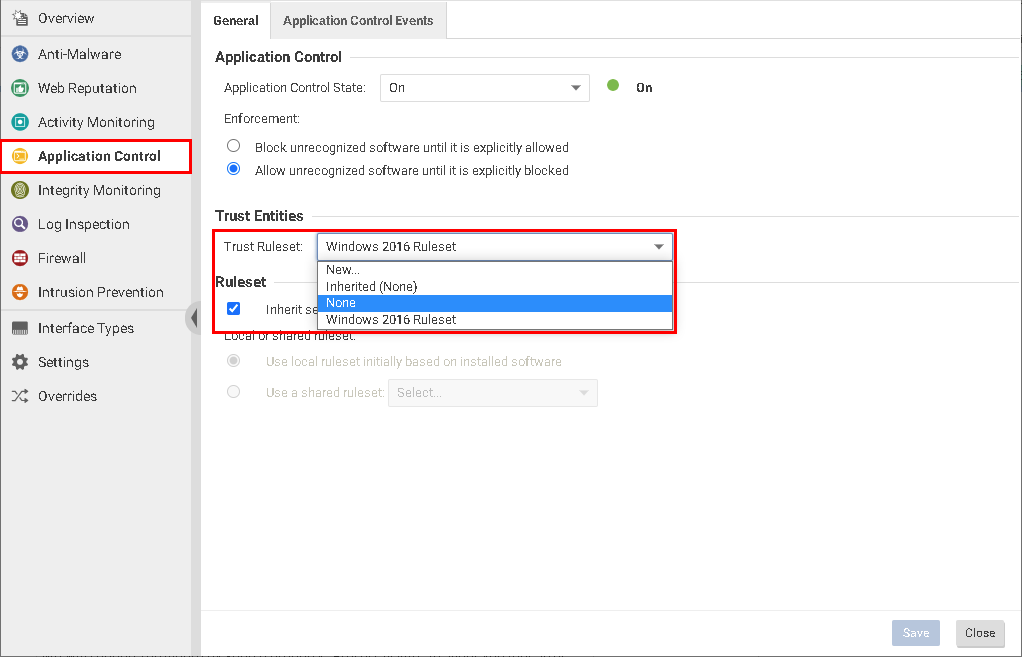
- Go to Application Control and make sure Configuration is set to On or Inherited (On).
- Select a Trust Ruleset from the list.
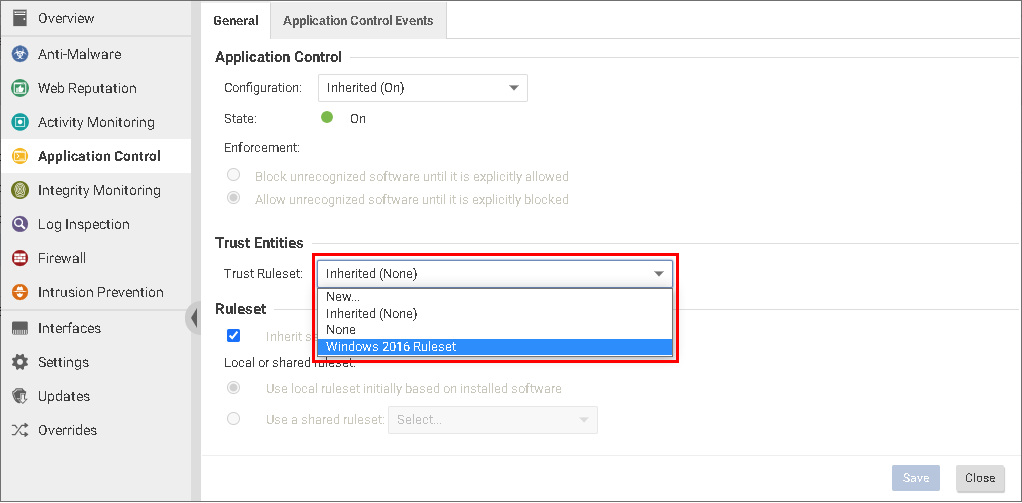
- Click Save.
The trust ruleset you selected is now assigned to the computer or policy.
To unassign a trust ruleset:
- Go to Common Objects > Rules > Application Control Rules > Trust Entities and select the trust ruleset.
- In the "Trust Ruleset Properties" window displayed on the right, select the number next to "Assignments".
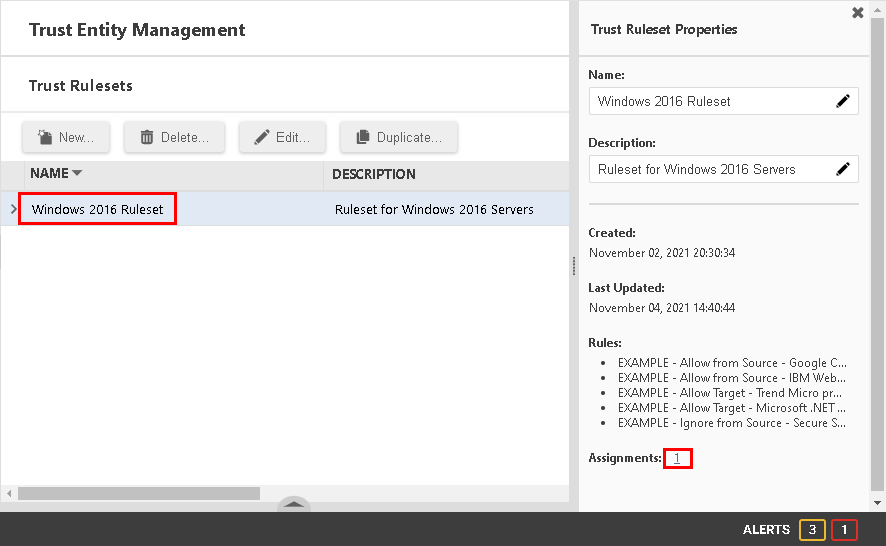
- In the "Assigned To" window, select a computer or policy.
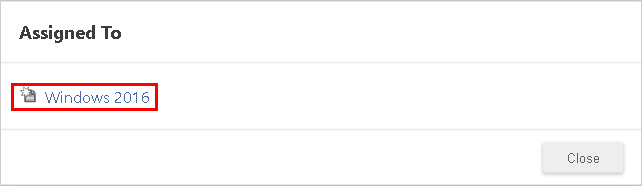
- From the Application Control tab of the computer or policy window, unassign the ruleset by selecting "None" from the "Trust Ruleset" dropdown list.
- Click Save.
The trust ruleset is no longer assigned to the computer or policy.
Delete a trust ruleset
- Go to Common Objects > Rules > Application Control Rules > Trust Entities.
- In the Trust Rulesets section, select the ruleset you want to delete and select Delete.
-
Click OK on the Delete Ruleset confirmation dialog.
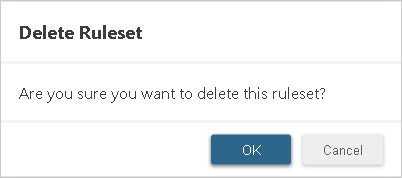
The trust ruleset is deleted.
Note that a trust ruleset cannot be deleted if it is currently inherited by or assigned to a computer or policy. You must unassign a trust ruleset before it can be deleted.
Trust rules
A trust rule contains one or more properties that determine which software changes are auto-authorized by Application Control. Software changes that match the properties of a trust rule are auto-authorized and will not create events in Workload Security.
Any empty trust rule properties are treated as wildcards. While this gives you freedom in how you customize trust rules, it could also impact the security of your system. To maximize system security and prevent any unwanted software changes from being authorized, try to fill in as many properties as possible when creating trust rules. If you are unsure of the security impact a trust rule might have, check with someone who has a good knowledge of system security or contact Trend Micro before adding it to a trust ruleset.
Currently, some trust rule properties only apply to agents on supported Windows platforms and are not yet available on Linux. For details, see Trust rule property limitations for Linux.
Types of trust rules
-
Allow from source rule permits a trusted updater or installer process to install new software on the system. Authorized executable files created by the trusted updater are automatically approved. To use this rule, you need to specify the properties of the source, such as a process or installer, in the rule. In addition, you need to restrict the process to only creating authorized software in specified directories using the paths attribute. Applying this rule minimizes software change events on the Actions page.
The Allow from source rule is evaluated during software creation and must be in place prior to running the installer.
-
Allow by target rule permits an executable file to run if it matches the specified properties. The properties you specify in the rule must match the properties of the target, such as an executable file. This rule is evaluated at the time of execution, therefore it can be applied after a security event is detected for the file on the Alerts page.
-
Block by target rule prevents an executable file from running if it matches the specified properties. The properties specified in the rule must match the properties of the target, such as an executable file. This rule is evaluated at the time of execution, therefore it can be applied after a security event is detected for the file on the Alerts page.
Block by target rules are supported for Deep Security Agent 20.0.0-3288 or later.
- Ignore from source rule sets up a process exclusion, enabling the specified process to execute or create software in designated directories without being monitored by Application Control. When the exclusion rule is removed, the exclusion is immediately lifted. If you only specify the paths with Ignore by source rules, any process can execute or create software in those directories without being monitored by Application Control. This option should only be used if Application Control scanning is causing compatibility problems (for example, performance issues or sharing violations) with some of the processes or paths. The Ignore from source rule overrides any global rules created using the Workload Security API. For more information on global rules, see Use the API to create shared and global rulesets.
Every time an Allow from source rule auto-authorizes a software change, an entry is added to the local inventory of the agent where the change occurred. This does not take place for Ignore from source rules.
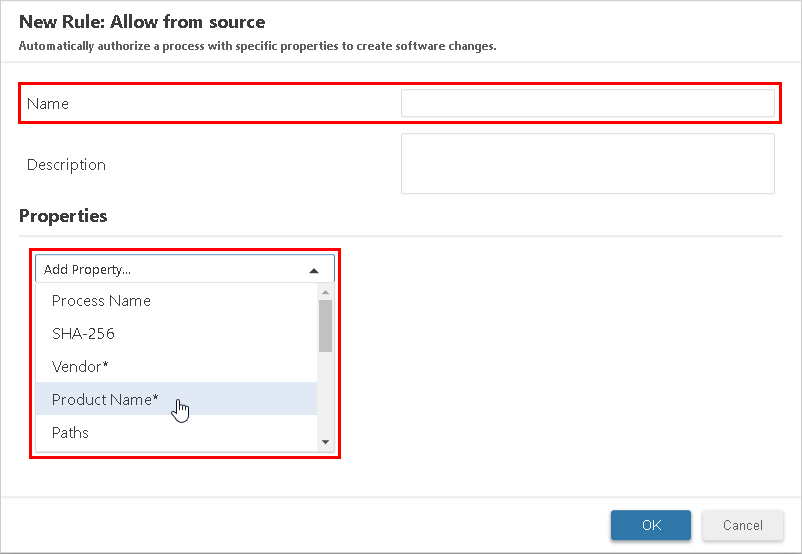
Create a trust rule
- Go to Common Objects > Rules > Application Control Rules > Trust Entities.
- In the Trust Rules section, select New, and then select one of the trust rule types from the list.
- In the New Rule window, provide a name and (optionally) a description for the new rule.
-
Select a property from the Add Property list to add it to the new rule.
-
Type the value for the property in the provided field.
-
Optionally, add more properties to this trust rule by repeating steps 4 and 5.
- Click OK.
The new trust rule is created and ready to assign to a trust ruleset.
For information on configuring trust rule property values, see Types of trust rule properties.
Select a trust rule (from Policies > Common Objects > Rules > Application Control Rules > Trust Entities) and use Assign/Unassign to define in which trust rulesets to include this trust rule. This can be especially useful if you want to quickly assign or unassign a new rule across many rulesets.
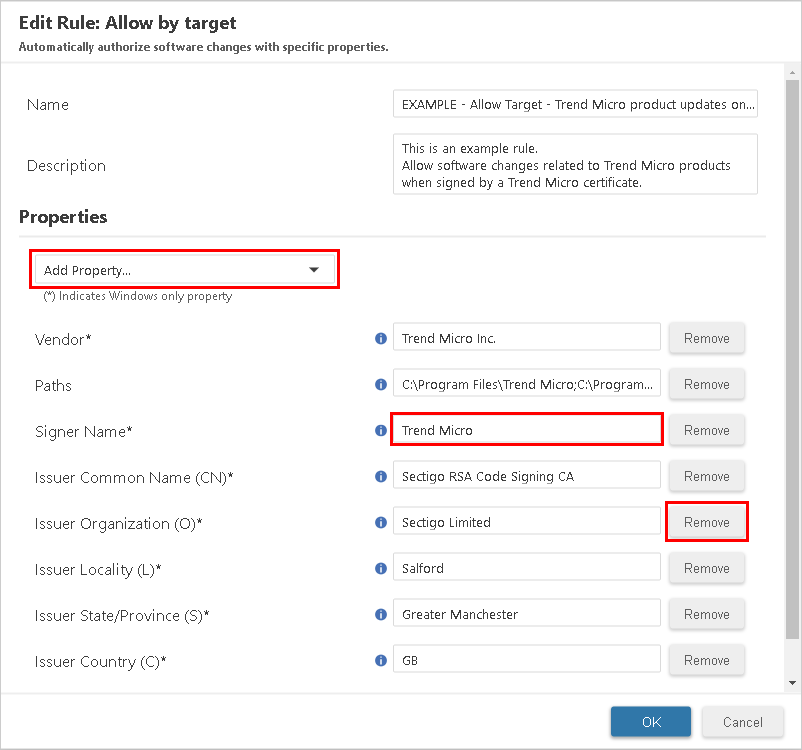
Change trust rule properties
-
From the Workload Security Trust Entities tab (Policies > Common Objects > Rules > Application Control Rules > Trust Entities), select a rule, and then select Edit (or double-click a rule).
-
In the Edit Rule window, do one of the following:
- To add a new property, select one from the Add Property list and fill in its value.
- To edit an existing property, change the value in its field.
- To remove an existing property, select Remove.
- Select OK.
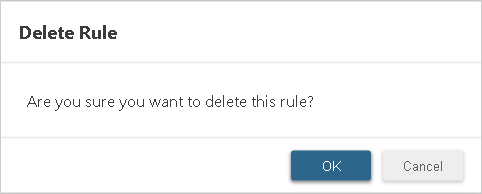
Delete a trust rule
- From the Workload Security Trust Entities tab (Policies > Common Objects > Rules > Application Control Rules > Trust Entities), select a rule and select Delete.
-
Confirm the deletion by clicking OK on the Delete Rule dialog.
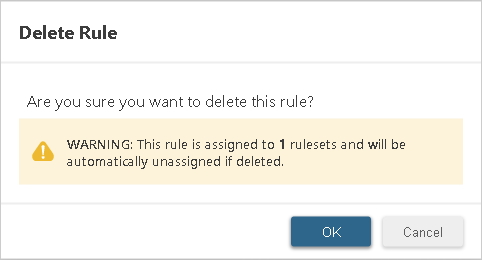
If you delete a trust rule that is currently assigned to any trust rulesets, it will automatically be unassigned from them following a warning prompt:
Types of trust rule properties
The properties and values included in a trust rule define which software changes are auto-authorized by that rule. The following sections detail the trust rule property types you can use to configure trust rules, including steps to help you find the information required to configure the property values.
Process Name
This property specifies the name of the process creating software changes. The process name must use the absolute path of the process, including its file name.
To find a process name of a software change:
- Go to Workload Security's Actions tab.
- Find and select the software change.
The process name will be displayed on the right under Changed By Process along with other details.
Deep Security Agent uses wildcards for process names. Where a process names includes the full path to the process, using globstar ** in a path matches any number of additional characters within the process name, a single asterisk or star * matches any number of additional characters within the current directory only, and a ? matches a single character. The * character will stop its search at directory path delimiters (/ and \). The ? character will not match match directory path delimiters. Drive letters are treated like any other characters in the target path and hold no special significance for matching.
When used in an Ignore from source rule, the process name property is only supported for Deep Security Agent 20.0.0-3165 or later.
Paths
This property specifies the target paths applied to a trust rule. Application Control auto-authorizes software changes if they occur within a path entered for this property, including all subdirectories. You can set multiple paths separated by a semicolon. For example, C:\Windows\;C:\Program Files\.
When entering values for paths, consider how the last slash (\ or /) in a path affects which directories are included:
- A path ending with a slash will match all sub-directories under that full path. For example,
C:\Windows\System\would match any sub-directories in theSystemdirectory. - A value specified after the last slash is treated as a regular expression wild card, and will match the specific directory as well as any other directories that start with the same value. For example,
C:\Windows\Systemwould include all directories and sub-directories that match "C:\Windows\System*" includingC:\Windows\System\,C:\Windows\System32\,C:\Windows\SystemApps\, and so on.
Deep Security Agent version 20.0.0-5137 and later supports globstar (**) wildcard on paths. Using globstar ** in a path matches any number of additional characters within the current directory and its subdirectories, a single asterisk * matches any number of additional characters within the current directory only, and a question mark ? matches a single character. The * character stops its search at directory path delimiter (/ and \). The ? character does not match directory path delimiters. Drive letters are treated like any other characters in the target path and hold no special significance for matching.
SHA-256
When used in an Allow from source rule, this specifies the checksum (SHA-256) of the source process creating a software change. When used in an Allow by target or Block by target rule, it is the checksum (SHA-256) of the software change itself.
To find the SHA256, do one of the following:
From Windows PowerShell (for source or target):
Follow instructions in the Windows PowerShell command Get-FileHash.
From Workload Security (for target only):
From Workload Security's Actions tab, find and select the software change.
The SHA256 will be displayed on the right along under "SHA256" along with other details.
Vendor
This property, which is currently only supported on Windows, specifies the software vendor.
To find the vendor, do one of the following:
From File Explorer:
- From the directory containing the process or file, right-click on one of the properties displayed at the top of File Explorer (Name, Date modified, etc.) and select More.
- Select Company and click OK.
The vendor will be displayed in the File Explorer window.
From Workload Security:
From Workload Security's Actions tab, find and select the software change.
The vendor will be displayed on the right under "Vendor" along with other details.
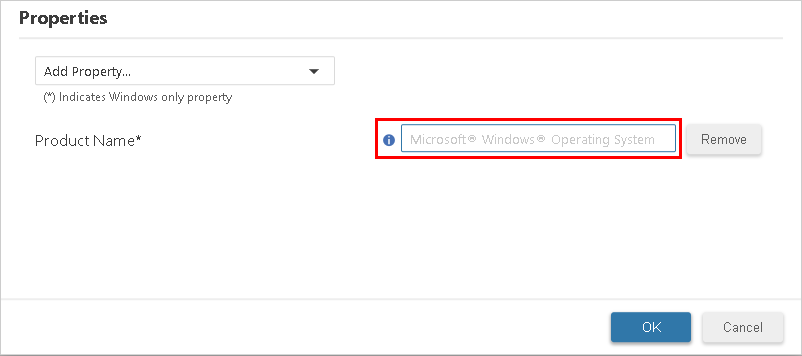
Product Name
This property, which is currently only supported on Windows, specifies the software product name.
To find the product name, do one of the following:
From file properties:
- From the directory containing the file, right-click the process or file and select Properties.
- From the Details tab, look at the value for "Product Name."
From File Explorer:
- From the directory containing the file, right-click on one of the properties displayed at the top of File Explorer (Name, Date modified, and so on) and click More.
- Select Product name and click OK.
The product name will be displayed in the Product name column.
From Workload Security:
From Workload Security's Actions tab, find and select the software change.
The product name will be displayed on the right under Product Name along with other details.
Signer Name
When used in an Allow from source rule, this specifies the signer name of the source process creating a software change. When used in an Allow by target or Block by target rule, it is the signer name in the certificate that signed the target file.
This property, which is currently only supported on Windows, specifies the name of the company that signed the software certificate.
To find the certificate signer name:
- Right-click the process or file and select Properties.
- On the Digital Signatures tab, find the name of the signer in the Signature list table.
The signer name will be displayed under Signer Name.
To eliminate the maximum amount of software change events or security events, use the signer name rule property to match all events from a specific signer.
Issuer Common Name
This property, which is currently only supported on Windows, specifies the issuer common name (CN) of the signing software certificate.
To find the issuer common name:
- Right-click the process or file, and then select Properties.
- From the Digital Signatures tab, select the first certificate you see on the signature list.
- Select the certificate and click Details.
- Select View Certificate.
- Go to the Details tab and select Issuer.
If included in the certificate, the issuer CN will be displayed under Issuer.
Issuer Organizational Unit
This property, which is currently only supported on Windows, specifies the issuer organizational unit (OU) of the software certificate.
To find the issuer organizational unit:
- Right-click the process or file and select Properties.
- From the Digital Signatures tab, select the first certificate you see on the signature list.
- Select the certificate and click Details.
- Select View Certificate.
- Go to the Details tab and select Issuer.
If included in the certificate, the issuer OU will be displayed.
Issuer Organization
This property, which is currently only supported on Windows, specifies the issuer organization (O) of the software certificate.
To find the issuer organization:
- Right-click the process or file and select Properties.
- From the Digital Signatures tab, select the first certificate you see on the signature list.
- Select the certificate and click Details.
- Select View Certificate.
- Go to the Details tab and select Issuer.
If included in the certificate, the issuer O will be displayed.
Issuer Locality
This property, which is currently only supported on Windows, specifies the issuer locality (L) of the software certificate.
To find the issuer locality:
- Right-click the process or file and select Properties.
- From the Digital Signatures tab, select the first certificate you see on the signature list.
- Select the certificate and click Details.
- Select View Certificate.
- Go to the Details tab and select Issuer.
If included in the certificate, the issuer L will be displayed.
Issuer State or Province
This property, which is currently only supported on Windows, specifies the issuer state or province (S) of the software certificate.
To find the issuer state or province:
- Right-click the process or file and select Properties.
- From the Digital Signatures tab, select the first certificate you see on the signature list.
- Select the certificate and click Details.
- Select View Certificate.
- Go to the Details tab and select Issuer.
If included in the certificate, the issuer S will be displayed.
Issuer Country
This property (currently supported on Windows only) specifies the issuer country (C) of the software certificate.
To find the issuer country:
- Right-click the process or file and select Properties.
- From the Digital Signatures tab, select the first certificate you see on the signature list.
- Select the certificate and click Details.
- Select View Certificate.
- Go to the Details tab and select Issuer.
If included in the certificate, the issuer C will be displayed.
Application Control event aggregation and analysis
Dynamic software updates on a server can cause thousands of drift events (Action page) and security events (Application Control Events page). This presents a challenge in the use of Application Control, as it is difficult to know what to approve after the fact. To mitigate the situation while using Deep Security Agent 20.0.0.5761 or later, you can create trust rules that allow you to only see atypical drift and security events. This also allows you to put your server in lockdown to prevent any unauthorized software from being executed.
Drift events are aggregated based on the process name and target path. Security events are aggregated based on the SHA256 hash and target path. For example, if the same process creates 10,000 drift items at the same path, the drift would be aggregated to a single trust rule with the processName and paths attributes.
When diagnostics are requested for the agent, the aggregated drift events and security events are stored in a trust rule format in a JSON file and included in the diagnostics. Then the Trust Rule editor can use the JSON file to add the trust rules for the server.
Drift events
A drift event in the JSON format has the following attributes:
```json
{
    "time":1615999592250,
    "eventType":"ApplicationControl",
    "uid":1063,
    "gid":1064,
    "operationType":"create",
    "user":"ribapp",
    "group":"ribapp",
    "md5":"57579EF7681147B84774F69F44783A67",
    "sha256":"90B0418DCB3B29440EE6F69FEE05BD54265CEE3BCFABDA8ED355E257FECC2939",
    "processName":"/opt/IBM/WebSphere/AppServer/java/jre/bin/java",
    "type":4,
    "rdev":0,
    "lastModificationTime":1615999090000,
    "mode":33188,"size":3984617,
    "sha1":"B226BDB9DB39AD38C4BEB6FE4F1C1C7151207848",
    "nlink":1,
    "procUser":"ribapp",
    "isAuthorized":1,
    "pid":10223,
    "fileExtension":"jar",
    "operationDate":1615999591534,
    "procUid":1063,
    "procGroup":"ribapp",
    "path":"/opt/IBM/WebSphere/AppServer/profiles/devmiesAppSrv/installedApps/devdmrhx01-cell02/IESHSRIDEVM.ear/",
    "fileName":"DC.jar",
    "recordTime":1615999592215,
    "fileSystemType":"ext4",
    "procGid":1063,
    "dev":64775,
    "source":4,
    "ino":3801778
}
```
processNameis the name of the process that created or updated the target file. In the preceding example, it is set to/opt/IBM/WebSphere/AppServer/java/jre/bin/java.pathis the location in which the process updated or created the executable file. In the preceding example, it is set to/opt/IBM/WebSphere/AppServer/profiles/devmiesAppSrv/installedApps/devdmrhx01-cell02/IESHSRIDEVM.ear/.
Trust rules for drift events
You can create a trust rule to auto-authorize the drift for an event. A trusted updater can be defined via setting trustType to 1 for this rule, and you are trusting the process to create software in any path listed in paths:
```json
"trustrules": [{
    "trustType":"1",
    "processName":"/opt/IBM/WebSphere/AppServer/java/jre/bin/java",
"paths":"/opt/IBM/WebSphere/AppServer/profiles/devmiesAppSrv/installedApps/devdmrhx01-cell02/IESHSRIDEVM.ear/"
}]
```
Processing drift events to create trust rules can be a many-to-one operation. For example, if the process named /opt/IBM/WebSphere/AppServer/java/jre/bin/java creates thousands of JAR files in path /opt/IBM/WebSphere/AppServer/profiles/devmiesAppSrv/installedApps/devdmrhx01-cell02/IESHSRIDEVM.ear/, the preceding trust rule will eliminate drift for all of these JAR files, which makes trust rules efficient at aggregating the drift.
A trust rule consists of an array of rules, with one unique process per rule. Each trust rule can have multiple paths defined in its paths attribute. For example, if a process named process1 has created drift at three distinct locations path1, path2, path3, one trust rule can capture all drift created by process1 at all of these locations:
```json
"trustrules": [{
    "trustType":"1",
    "processName":"process1",
    "paths":"path1;path2;path3"
}]
```
There is an additional attribute called hitcount whose purpose is a process hit count. You can use this attribute to determine how many times a specific trust rule has been hit.
There is also an extension hit count: extensions are tracked by incrementing each time the process updates a file with a particular extension:
```json
"trustrules": [{
    "trustType":"1",
    "processName":"process1",
    "paths":"path1;path2;path3",
    "hitcount":12342,
    ".jar":1234,
    ".py":323,
    ".":456
}]
```
The preceding example shows a process that has updated JAR files 1234 times, pi files 323 times, and files with no extensions 456 times.
Security events
A security event in the JSON format has the following attributes:
```json
{
    "time":1492100772165,
    "eventType":"ApplicationControl",
    "sha1":"066A02D230F3B16439396B049DC912DB376B96CE",
    "fileName":"svchost.exe",
    "operationType":"detectOnly",
    "blockReason":2,
    "size":311544,
    "sha256":"62EFB22F6853D73374761A0B8ED2CE40BF09AA401EC7D4AAAA0CE4D5C3380EEA",
    "type":1,
    "path":"C:\\Windows\\System32\\",
    "pid":1832,
    "operationDate":1492100772149,
    "processName":"\\device\\harddiskvolume2\\windows\\system32\\cmd.exe",
    "md5":"5F7B8544F7A20800069107FC93384F0E"
},
{
    "time":1492100772165,
    "eventType":"ApplicationControl",
    "blockReason":2,
    "sha256":"62EFB22F6853D73374761A0B8ED2CE40BF09AA401EC7D4AAAA0CE4D5C3380EEA",
    "size":311544,
    "processName":"\\device\\harddiskvolume2\\windows\\system32\\cmd.exe",
    "sha1":"066A02D230F3B16439396B049DC912DB376B96CE",
    "operationType":"detectOnly",
    "pid":1832,
    "md5":"5F7B8544F7A20800069107FC93384F0E",
    "path":"C:\\Program Files\\Trend Micro\\Deep Security Agent\\",
    "operationDate":149210077
}
```
In the preceding example, sha256 is set to 62EFB22F6853D73374761A0B8ED2CE40BF09AA401EC7D4AAAA0CE4D5C3380EEA and path is set to C:\Windows\System32\.
Trust rules for security events
You can create a trust rule to auto-authorize the drift for a security event. A trusted target can be defined via setting trustType to 2 for this rule, based on SHA256 hash, in any path listed in paths:
```json
"trustrules": [{
    "trustType":"2",
    "sha256":"62EFB22F6853D73374761A0B8ED2CE40BF09AA401EC7D4AAAA0CE4D5C3380EEA",
    "paths":"C:\\Windows\\System32\\"
}]
```
Processing security events to create trust rules is a complex operation. A trust rule consists of an array of rules with one unique SHA256 per rule. Each trust rule can have multiple paths defined in its paths attribute. For example, if a file is executed with a sha256 content hash AAAAAAAABBBBBBBBCCCCCCCCDDDDDDDDD from distinct locations, path1, path2, and path3, one trust rule can represent this as follows:
```json
"trustrules": [{
    "trustType":"2",
    "sha256":"AAAAAAAABBBBBBBBCCCCCCCCDDDDDDDDD",
    "paths":"path1;path2;path3"
}]
```
There is an additional attribute called hitcount whose purpose is a SHA256 hit count. You can use this attribute to determine how many times a specific trust rule has been hit.
There is also a file name hit count: files with different names can have the same SHA256 content hash. You can use this attribute to count the number of times a file with a specific name has been used to execute the same SHA256. In the following example, SHA256 AAAAAAAABBBBBBBBCCCCCCCCDDDDDDDDEEEEEEEE has been executed 12342 times, filename1 has been used 2342 times, and filename2 has been used 10000 times. Both filename1 and filename2 have the same content hash.
Since processes with different names can execute the same target with the same SHA256 content hash, you can also count the number of times that the process name was used to execute the same SHA256. In the following example, SHA256 AAAAAAAABBBBBBBBCCCCCCCCDDDDDDDDEEEEEEEE has been executed 12342 times, filename1 has been used 2342 times, and filename2 has been used 10000 times. Both filename1 and filename2 have the same content hash. Process name /opt/process1 was used to execute the target 12000 times and /opt/process2 was used to execute the target 342 times.
```json
"trustrules": [{
    "trustType":"2",
    "sha256":"AAAAAAAABBBBBBBBCCCCCCCCDDDDDDDDEEEEEEEE",
    "paths":"path1;path2;path3",
    "hitcount":12342,
    "filename1":2342,
    "filename2":10000
    "/opt/process1":12000,
    "/opt/process2":342
}]
```
Note that a process is represented with a full path, while the file name is included in a relative path to one of the paths.
Event analysis output
The Application Control event analysis output is directed to a file called ac_event_analysis.txt. This file has a trust rule format with additional hit count attributes and extension hit count attributes:
```json
"trustrules": [{
    "trustType":"1",
    "processName":"process1",
    "paths":"path11;path12;path13",
    "hitcount":12342,
    ".jar":12342
},
{
    "trustType":"1",
    "processName":"process2",
    "paths":"path21;path22;path23",
    "hitcount":23232,
    ".py":23232
},
{
    "trustType":"1",
    "processName":"process3",
    "paths":"path31;path32;path33",
    "hitcount":34332,
    ".exe":34322
},
{
    "trustType":"1",
    "processName":"process4",
    "paths":"path41;path42;path43",
    "hitcount":12312,
    ".":12312
}]
```
The file locations are as follows:
- On Windows:
C:\ProgramData\Trend Micro\Deep Security Agent\diag\ac_event_analysis.txt - On Linux:
/var/opt/ds_agent/diag/ac_event_analysis.txt - In the diagnostics:
agent/ac/ac_event_analysis.txt
The analysis is loaded from this file on restart so that the state is maintained after an agent restart. The analysis is cleared when Application Control is enabled after having been disabled. To view the ac_event_analysis.txt file, either use JQ or an online JSON formatter.
Debug trust rules
You can debug trust rules as follows:
-
Apply new trust rules to Deep Security Manager.
-
Stop Deep Security Agent.
-
Delete the
ac_event_analysis.txtfile. -
Start Deep Security Agent.
-
Wait a few minutes to see if the
ac_event_analysis.txtfile reappears:-
If the file no longer appears, then the trust rules are working and suppressing the event generation.
-
If the file still appears, inspect the
ac_event_analysis.txtfile for the new event information and add new trust rules accordingly. Trust type 1 rules are Allow by source rules for auto-approving drift events, whereas trust type 2 rules are Allow by target rules to allow execution of the target file.
-
-
To configure new trust rules, repeat the procedure starting from step 1.
To see how often the trust rules are being hit, execute sendCommand on the agent, as follows:
- Linux:
/opt/ds_agent/sendCommand --get TrustRules - Windows:
\program files\trend micro\deep security agent\sendCommand --get TrustRules
Consult metrics
The drift analysis and event analysis are added to the Application Control metrics, where top ten processes with the highest hit counts are included in the drift_analysis object and the top ten SHA256 with the highest counts are stored in the event_analysis object:
```json
"AC": {
    "eventReportInQueue":"0",
    "evtPreCreateProcessHandled":"17",
    "acProcessHashCount":"0",
    "acProcessBlockUnrecognized":"0",
    "engFlushDbBufferError":"0",
    "acFileProcessImgPath":"0",
    "evtFilePostClose":"249",
    "acFileErrorHash":"0",
    "acFileAllowImportingRuleset":"0",
    "evtFilePreCreateFromContainer":"0",
    "evtFilePostChmodFromContainer":"0",
    "engStopError":"0",
    "evtFilePreCreateHandled":"0",
    "ctrlInterpreterMatched":"0",
    "importCount":"0",
    "inventoryAdsVisited":"0",
    "engGetInventory":"1",
    "acFileAllow":"5",
    "acFileAllowBuilding":"0",
    "engSetConfigError":"0",
    "ctrlMsiInstallationMatched":"0",
    "ctrlDropProcessEvtReportQueueFull":"0",
    "importFail":"0",
    "eventReportDropped":"0",
    "evtFilePostChmod":"3",
    "acFileBlock":"0",
    "acFileDrift":"3",
    "engGetMetricsError":"0",
    "ctrlDropFileEvtReportQueueFull":"0",
    "inventoryFolderVisited":"0",
    "engStartError":"0",
    "evtFileCloudFileIgnore":"0",
    "engSetConfig":"1",
    "engFlushDbBuffer":"0",
    "engPurgeDbError":"0",
    "inventoryBytesInventoried":"433695822",
    "evtPreCreateProcessWithCmdLine":"0",
    "inventoryDriveVisited":"0",
    "importSuccess":"0",
    "engSetRuleset":"0",
    "eventReportSent":"3",
    "drift_analysis": [{
        "trusttype":"1",
        "processName":"/usr/bin/bash",
        "paths":"/im1"
    },
    {
        "trusttype":"1",
        "processName":"/usr/bin/cp",
        "hitcount":1,
        "paths":"/im1"
    }],
    "event_analysis": [{
        "trusttype":"2",
        "sha256":"AAAAAAAABBBBBBBBCCCCCCCCDDDDDDDDEEEEEEEE",
        "hitcount":2,
        "paths":"/im1"
    },
    {
        "trusttype":"2",
        "sha256":"EEEEEEEEEDDDDDDDDDCCCCCCCCBBBBBBBBAAAAAAAA",
        "hitcount":1,
        "paths":"/im1"
    }]
}
```
View signer information
When trust rules are enabled, both the file signer information and process signer information are included in trust rules for the drift events analysis. For security event analysis, the file signer information is included.
Trust rules are enabled (the file signer information along with the process signer information is visible in the ac_event_analysis.txt file) when a trust entity ruleset is applied to the host.
Trust rule property limitations for Linux
The following trust rule properties are not currently supported for Linux:
- Signer Name
- Product Name
- Issuer Common Name
- Issuer Organizational Unit
- Issuer Organization
- Issuer Locality
- Issuer State or Province
- Issuer Country
- Vendor
Only the following trust rule properties are currently supported for Linux:
- Process Name
- Paths
- SHA-256
Adding trust rules that are not currently supported on Linux will result in the rules not applying for any software changes.