Topics on this page
Real Time Threat Monitoring Settings
| Location | Main Dashboard > Select {Account} > Settings > Real-time monitoring settings > Update real-time settings |
The Real-Time Threat Monitoring (RTM) settings allow you to install, update and delete the required resources for RTM. Once you create the required resources, events from the cloud account appear on the RTM event monitoring dashboard, and a subset of Rules start to update based on these events. We provide both Powershell and Bash scripts to set up RTM.
The latest version of the AWS RTM install script covers the EventBridge cross-account IAM role requirement. New installations automatically create an IAM role in addition to the EventBridge resources.
Although AWS has no deadline to update existing EventBridge resources to include an IAM role, we recommended re-running the installation process to ensure you are up-to-date and secure.
For more information on sending and receiving Amazon EventBridge events between AWS accounts, see the AWS documentation.
Contents
User Access
| User Role | Can Access |
|---|---|
| Administrator | |
| Power User | |
| Custom - Full Access | |
| Read Only | |
| Custom - Read Only |
RTM for AWS
Set up Requirements
- Ensure that you have CloudTrail enabled. For help, see the Conformity Rule CloudTrail Enabled.
- Ensure that you have an up-to-date version of the AWS Command Line Interface version 2: For details, see: Installing the AWS CLI.
- Export your Access Key and Secret Access Key: For details, see: Configuring the AWS CLI.
   export AWS_ACCESS_KEY_ID=YOUR_AWS_ACCESS_KEY_ID
export AWS_SECRET_ACCESS_KEY=YOUR_AWS_SECRET_ACCESS_KEY- Alternatively, you can use the AWS CloudShell while logged in to the AWS Console, or switch your CLI AWS Profile to an existing profile with the correct credentials.
export AWS_PROFILE=your-account-profile`The user or role running the script must have access to:
- AWS CloudFormation
- AWS IAM Roles
- AWS EventBridge Rules
Minimum AWS Permissions required to run the RTM Install and Uninstall script
{
    "Version": "2012-10-17",
    "Statement": [
        {
            "Sid": "CCRTM",
            "Effect": "Allow",
            "Action": [
                "cloudformation:CreateStack",
                "cloudformation:DescribeStackEvents",
                "cloudformation:DescribeStackResources",
                "cloudformation:deleteStack",
                "cloudformation:DescribeStacks",
                "cloudformation:GetTemplate",
                "cloudformation:UpdateStack",
                "cloudformation:ValidateTemplate",
                "events:DeleteRule",
                "events:DescribeRule",
                "events:PutRule",
                "events:PutTargets",
                "events:RemoveTargets"
            ],
            "Resource": "*"
        },
        {
            "Sid": "CCRTMRole",
            "Effect": "Allow",
            "Action": [
                "iam:CreateRole",
                "iam:GetRole",
                "iam:GetRolePolicy",
                "iam:PutRolePolicy",
                "iam:TagRole"
            ],
            "Resource": { "Fn::Sub": "arn:aws:iam::${AWS::AccountId}:role/CloudConformityMonitoringRole" }
        }
    ]
}
Setting up RTM Event Monitoring for AWS
Please note the script will deploy an AWS::CloudFormation::Stack in each supported region. Each stack creates an AWS::Events::Rule, and the stack in us-east-1 also creates the required AWS::IAM::Role for Conformity's cross-account EventBridge access. Make sure that you check the script for unused regions before executing it.
-
You can set up RTM event monitoring dashboard by using either:
-
The Bash script:
-
Or the Powershell script:
-
-
To create or update Conformity Threat Monitoring,
- open a command prompt,
- copy the generated command from the RTM settings dashboard, and
- run it on your command-line interface.
- For example:
curl -L https://us-west-2.cloudconformity.com/v1/monitoring/event-bus-install.sh | bash -s
You can re-run the same command to update your stack to get the latest updates from Conformity.
-
The script creates a CloudFormation stack in each supported region, which creates an EventBridge Rule which will send management event data to Conformity to ingest and process. The stack in us-east-1 also creates an IAM role required for cross-account access.
-
After finishing the installation, open the CloudFormation console (https://console.aws.amazon.com/cloudformation) and verify that the status of CloudConformityMonitoring stack is CREATE_COMPLETE or UPDATE_COMPLETE when updating.
The stack creation might take a while to complete. -
Once complete, Conformity starts ingesting management event data from your AWS account. You can view updates on Conformity in near real-time via the Real-time monitoring dashboard of your Conformity account.
Uninstalling RTM for AWS
- To delete Conformity Threat Monitoring resources from your account, open a command prompt or shell with the required permissions and run the following command:
curl -L https://us-west-2.cloudconformity.com/v1/monitoring/uninstall.sh | bash -s
RTM for Azure
Set up Requirements
- Install the Azure Command Line Interface: For details, see Install the Azure CLI
- Sign in with Azure CLI
The user should have the following permissions to run the deployment script:
- Microsoft.Insights/ActivityLogAlerts/[Read, Write, Delete]
- Microsoft.Insights/ActionGroups/[Read, Write, Delete]
- Microsoft.Logic/workflows/[Read, Write, Delete]
- Microsoft.Resources/subscriptions/resourceGroups/[Read, Write, Delete]
- Microsoft.Resources/subscriptions/resourceGroups/deployments/[Read, Write, Delete]
Setting up RTM for Azure
- Select Install RTM tab.
If Azure RTM is not enabled, the default page is 'Install RTM' tab. No need to select.
-
Select Event Source > Activity Logs.
-
Click the Generate deployment script button. Wait until the button background color becomes green.
The deployment script expires in 15 minutes. If you want to re-run the deployment, you will need to select the event source to regenerate the deployment script and go through the setup again.
-
Open a command prompt or PowerShell. Copy the generated command line and run it on your command-line interface or Powershell.
- Once the installation is complete:
- Open Resource groups (https://azure.microsoft.com/en-au/features/resource-manager/) and verify that ‘CloudOneConformityMonitoring’ is created with the ‘cloudone-conformity-monitoring-logic-app’.
- Open Monitor service and select Alerts(https://docs.microsoft.com/en-us/azure/azure-monitor/alerts/alerts-overview).
- Click Manage alert rules and verify that the following rules are Enabled. This is required to monitor the Azure RTM events that will appear on the Conformity RTM Dashboard :
- cloudone-conformity-monitoring-activity-log-alert-administrative
- cloudone-conformity-monitoring-activity-log-alert-autoscale
- cloudone-conformity-monitoring-activity-log-alert-policy
- Cloudone-conformity-monitoring-activity-log-alert-security
Once you verify the rules, we can confirm your RTM Set up.
Uninstalling RTM for Azure
- Select Uninstall RTM tab.
- Select Event Source > Activity Logs.
-
Click the Generate uninstall script button. Wait until the button background color becomes green.
The uninstall script expires in 15 minutes please finish the following steps in valid time. We remove your API key while you click this button, so the script cannot be generated second time. If you don't finish the following script in time, you can also delete the resource group listed in step 5 in your Azure Portal manually.
-
Open a command prompt or PowerShell. Copy the generated command line and run it on your command-line interface or Powershell.
- Once the uninstallation is complete, Open Resource groups (https://azure.microsoft.com/en-au/features/resource-manager/) and make sure that 'CloudOneConformityMonitoring' is deleted.
RTM for GCP
- Install the GCP Command Line Interface: For details, see Install the gcloud CLI
- Sign in with gcloud CLI
- Run
gcloud config set account <PRINCIPAL>using the desired account with sufficient permissions detailed below. - Run
gcloud config set project <PROJECT_ID>using the project id of the desired GCP project for RTM installation. - Run
gcloud config listto confirm you are authenticated with the desired account and project.
- Run
Prerequisites for Principal User Permissions
The principal (user or service account authenticated with gcloud) should have the Cloud Composer API Service Agent role with following permissions to run the deployment script:
  * storage.buckets.create
  * storage.buckets.delete
  * storage.objects.list
  * storage.objects.get
  * storage.objects.create
  * storage.objects.delete
  * deploymentmanager.deployments.create
  * deploymentmanager.deployments.get
  * deploymentmanager.deployments.delete
  * deploymentmanager.operations.get
  * deploymentmanager.resources.list
  * deploymentmanager.manifests.get
To verify the Principal role permissions:
- Go to IAM & Admin > IAM under Permissions, select the principal you used in the previous step to identify its granted role under this project.
- Go to IAM & Admin > Roles to verify all the roles granted to the principal collectively and have the required permissions.
Service Account Role Prerequisites
To ensure that the principal has been granted the Cloud Composer API Service Agent role, that includes all the permissions listed above, the service account [PROJECT_NUMBER]@cloudservices.gserviceaccount.com must have the following roles to run the deployment script:
  * Editor
  * Logging Admin
  * Pub/Sub Admin
To verify the required roles for service account:
- Go to IAM & Admin > IAM under Permissions,
- Ensure that the option Include Google-provided role grants is selected
- Filter for "PROJECT_NUMBER@cloudservices.gserviceaccount" and check that the service account includes the required roles to run the script.
Please note [PROJECT_NUMBER]@cloudservices.gserviceaccount.com may not be present if Compute Engine API is not enabled.
Enable APIs
In addition to the prerequisites, the project must have the following APIs enabled:
Setting up RTM for GCP
- Select Event Source > Cloud Logging
- Click the Generate deployment script button. Wait until the button background color becomes green.
The deployment script expires in 15 minutes. If you want to re-run the deployment, you will need to select the event source to regenerate the deployment script and go through the setup again.
- Open a command prompt or PowerShell. Copy the generated command line and run it on your command line interface or Powershell.
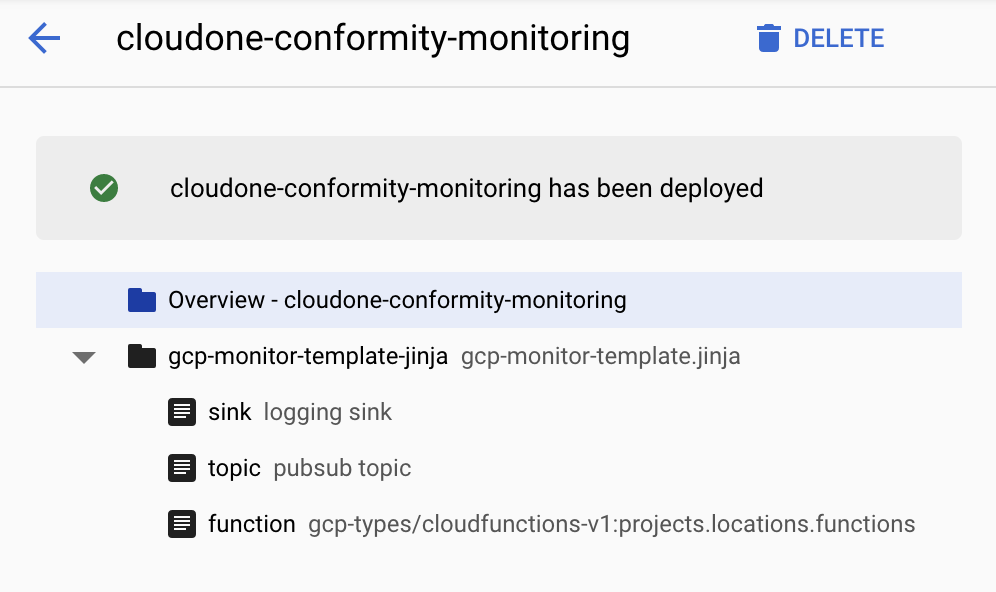
- Once the installation is complete, open Deployment Manager (https://console.cloud.google.com/dm/deployments) and verify that ‘cloudone-conformity-monitoring’ deployment is created with the following resources: