Topics on this page
Getting Started with Conformity Custom Rules
Currently available in Preview
Conformity Custom Rules is a flexible API-only framework for building customizable checks in Conformity.
The workflows included in this guide are examples and are designed to flow on from one another to help you get comfortable building and testing custom rules.
The first few workflows assume the account platform is AWS, but the custom rules framework can be applied to all platforms and services provided by Conformity.
For more info, see: Custom Rules Overview.
Prerequisites
- Basic understanding of REST API endpoints.
- Familiarity with JSON format: custom rules use
JSONandjsonpathto help identify and evaluate resource data. - Administrator-level access to a Conformity environment.
Initial Set-Up
-
To activate Custom Rules for your organization, request access by sending an email to alloftrendproduct-conformity@trendmicro.com and please provide the following details with your request:
- Name of the Organization account in Conformity
- Whether access is via Cloud One or Conformity Standalone (i.e. cloudconformity.com)
- List key contacts
- Ensure you are an Administrator user, and have an API key set up.
- To get comfortable with the Custom Rules API, we highly recommend using an API management tool (e.g., Postman) to more easily save, reuse, and manage API payloads during testing and implementation.
- For more complete usage examples and details of API endpoints available, refer to the Custom Rules API documentation.
-
Create an API key - as an Administrator.
-
Download Postman (or equivalent program) to manage API requests - https://www.postman.com/downloads/ - this is highly recommended to easily test, format and troubleshoot issues with your custom rules.
-
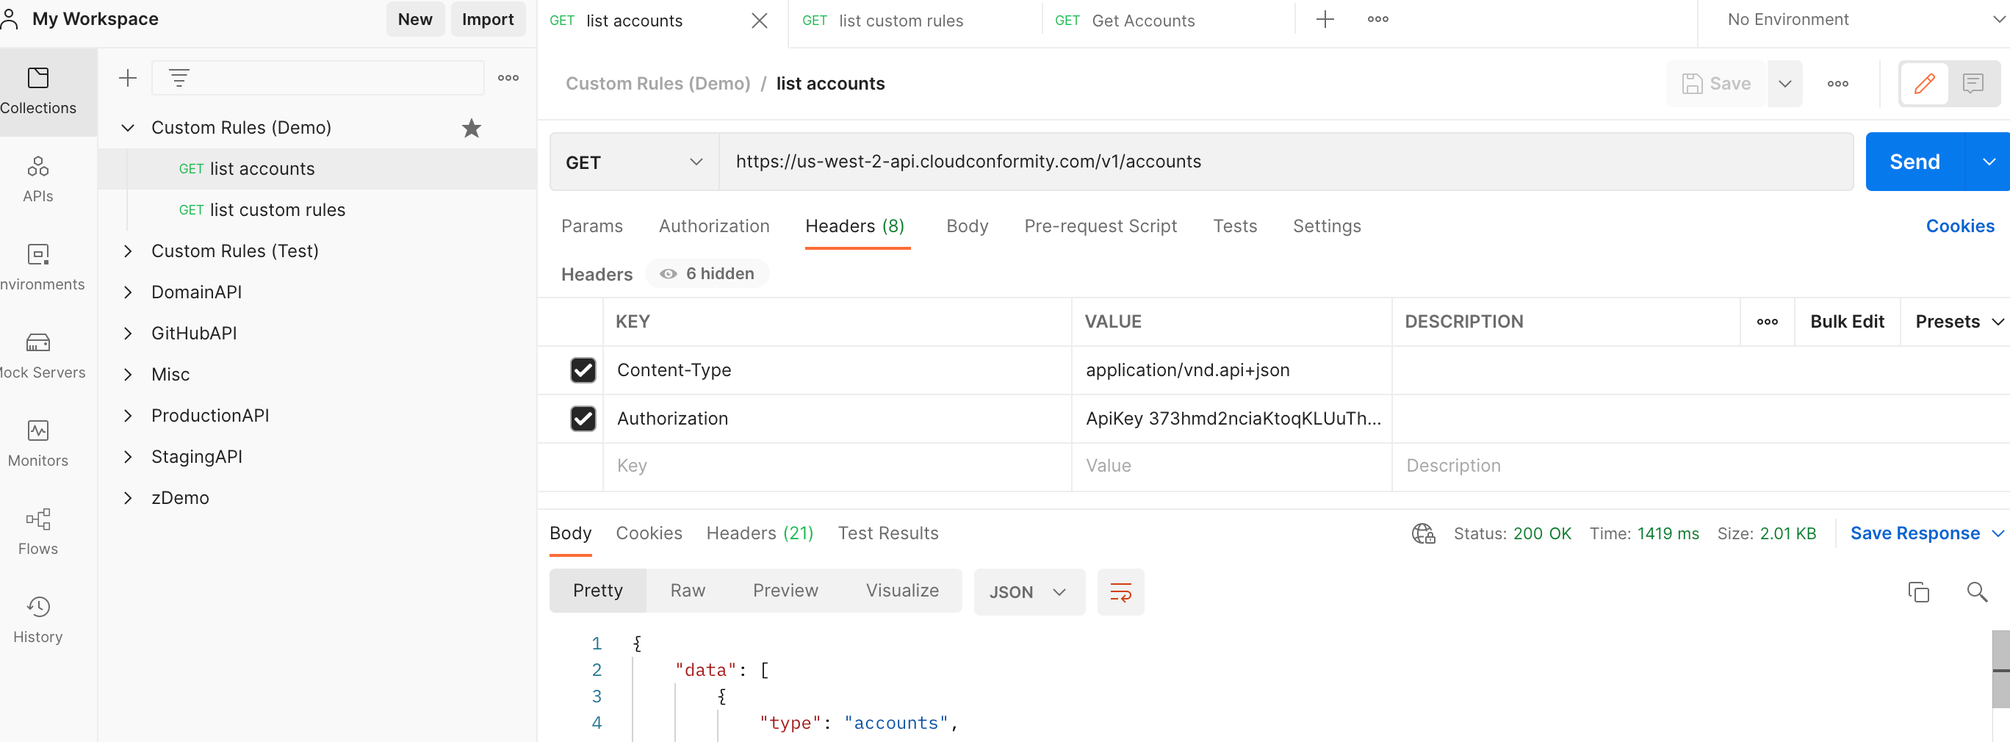
In Postman, create a new workspace called ‘Custom Rules Demo’ > open the drop-down > click ‘Add a request’ to add your first request in Postman. Name the request ‘List accounts’ - we will use this List Accounts request to prove the basic set up is working and we are getting a valid response.
-
Under Headers, include Content-Type = application/vnd.api+json and Authorization = ApiKey XYZ123, replacing XYZ123 with your API key.
-
Note the URL of your Conformity organization - this includes the region/environment and the organization and/or account id.
-
In your postman query, save the accounts endpoint URL depending on your region, e.g. https://us-west-2-api.cloudconformity.com/v1/accounts and click Send. If all is configured correctly you should receive a response with data about the Conformity accounts in your organization.
-
In your Postman workspace, click on the ellipsis (3 dots) and duplicate your successful query (most of the configuration can be re-used).
-
Rename the new query ‘list custom rules’, and change the URL to /custom-rules, e.g. https://us-west-2-api.cloudconformity.com/v1/custom-rules, click save and send. You should receive a successful but empty response - we have not yet saved any custom rules.
-
You should now have the basic Postman/API set up complete and tested. You are ready to dive deeper into using custom rules.
Workflow 1: creating, running, updating and deleting a custom rule
Saving and running your first custom rule (with Conformity Bot)
Before building your own custom rules, we recommend using one of our templates to demonstrate the key functionality.
-
Duplicate your successful ‘list custom rules’ request. Change to ‘POST’ request type, rename as ‘save basic rule’ and click Save. This will be a POST command to an endpoint such as https://us-west-2-api.cloudconformity.com/v1/custom-rules.
-
Under the ‘Body’ header in Postman, select raw, ensure JSON format is selected, paste the below custom rule template and click save. Postman also allows you to ‘Beautify’ the request body. This rule is a basic demo rule to check for S3 bucket encryption.
{ "name": "S3 bucket has any Encryption", "description": "We want to demonstrate Custom Rules V1", "service": "S3", "resourceType": "s3-bucket", "severity": "MEDIUM", "enabled": true, "provider": "aws", "categories": [ "security" ], "remediationNotes": "To remediate, follow these steps:\n1. Step one \n2. Step two\n", "attributes": [ { "name": "bucketEncryption", "path": "data.Encryption", "required": true } ], "rules": [ { "conditions": { "all": [ { "fact": "bucketEncryption", "operator": "notEqual", "value": null } ] }, "event": { "type": "Bucket has encryption enabled" } } ] } -
Click save and send. If successful, the response will return the rule data including the rule’s id. You have now saved the custom rule to your organization. The rule will now automatically run against the resource data in each of your relevant cloud accounts (in this case AWS) as part of the regular Conformity Bot process.
-
To verify, click back to the previous ‘list custom rules’ query and run that request again. You should now see data returned in the response detailing the saved rule.
-
Optional (environment and time dependent - otherwise skip to the next section): You can let the Conformity Bot run on one of your accounts. The saved custom rule will automatically be picked up in the next Conformity Bot run and will produce checks in the same format as any other rule - with the exception of including a ‘Resolve’ button (which is addressed by having the remediationNotes field).
-
Recommended (troubleshooting note): If you want to see the checks in the console, refresh the browser window after you have created the custom rule to ensure the Conformity web application loads the necessary data to display the checks correctly. The Conformity application may not load all the necessary data to display the checks correctly without this refresh.
-
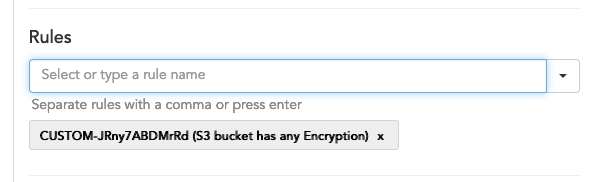
After refreshing the browser, click on ‘Browse All Checks’ and filter based on the custom rule id. You will see your first custom rule live in and active in your account:

Dry-run an existing saved rule
To test the result of a rule, you can ‘dry-run’ a rule using the API. A dry-run request can feed in existing resource data from an account in the organization and return an immediate response (without having to wait for Conformity Bot to complete).
Note: The resource data used below is stored by Conformity, and may not reflect the latest state of your cloud environment. This depends on when Conformity Bot or Real-Time Monitoring last updated the resource data.
-
Duplicate the previous POST query named ‘save basic rule’ and re-name ‘dry-run saved rule’
-
Append “/run” to the URL. The result should be a POST query to a URL like: https://us-west-2-api.cloudconformity.com/v1/custom-rules/run
-
Get the account Id of one of the accounts your would like to dry run your rule against. You can get this from the response “list accounts” query. You need to identify an account so the custom rules framework knows which set of data to run against.
-
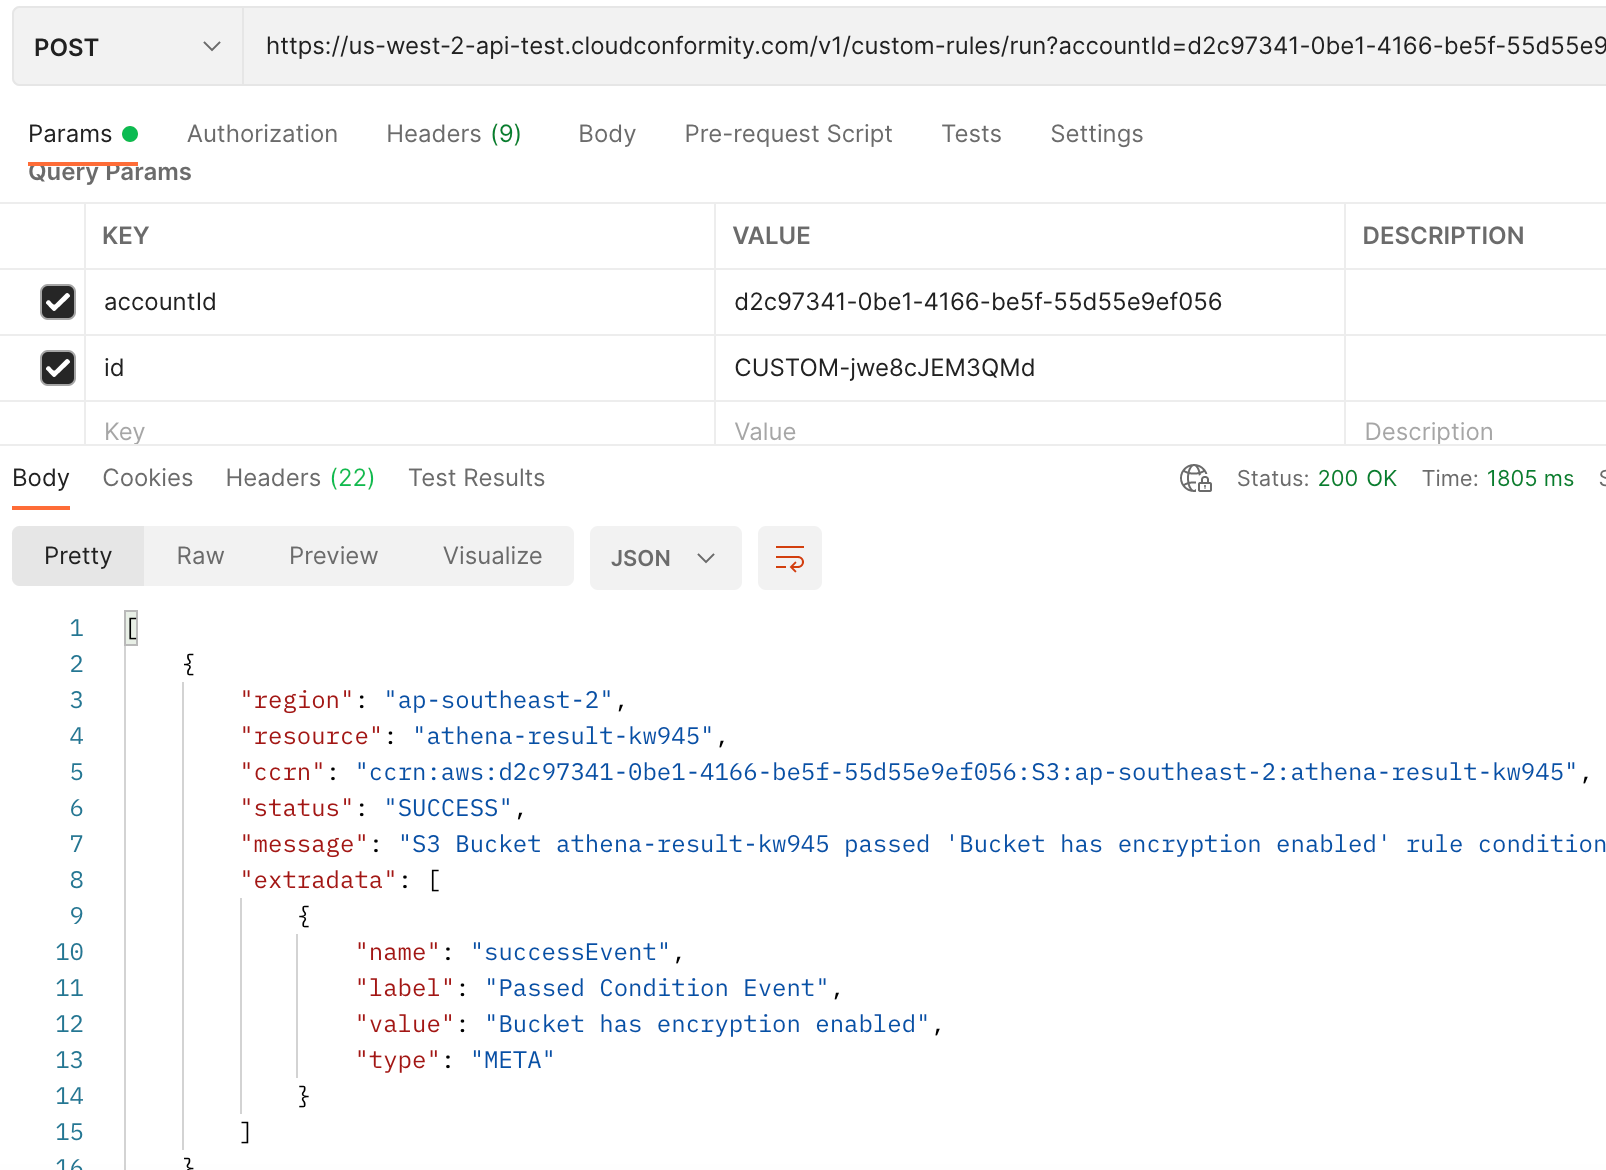
Under the Params tab, enter KEY accountId with VALUE
, and KEY id with VALUE . This will automatically update your request URL string, e.g: https://us-west-2-api.cloudconformity.com/v1/custom-rules/run?accountId=d2c91234-1234-abcd-zxcv-12345qwerty&id=CUSTOM-ENC12346UE -
You can clear the ‘Body’ of the request, click save and send. This will ‘dry run’ the saved rule against existing S3 data stored by Conformity from the chosen account, and will return SUCCESS and/or FAILURE results for each S3 bucket’s resource data, e.g.
Update, test, disable, and delete an existing saved custom rule
Saved custom rules can be updated, disabled, and permanently deleted. Updating rules can include basic configuration changes (e.g., severity or category), or more substantial changes including rule logic. Updated rules will retain checks until the latest logic is run.
Note: Deleting rules will NOT immediately alter any related data e.g., deletion/removal of related checks. It is recommended to first disable the rule, i.e., enabled: false, and allow for Conformity Bot to run for one cycle before deleting. This will allow for Conformity Bot to remove related checks and complete any related tasks, e.g., update statistics, close created JIRA/ServiceNow tickets, etc.
-
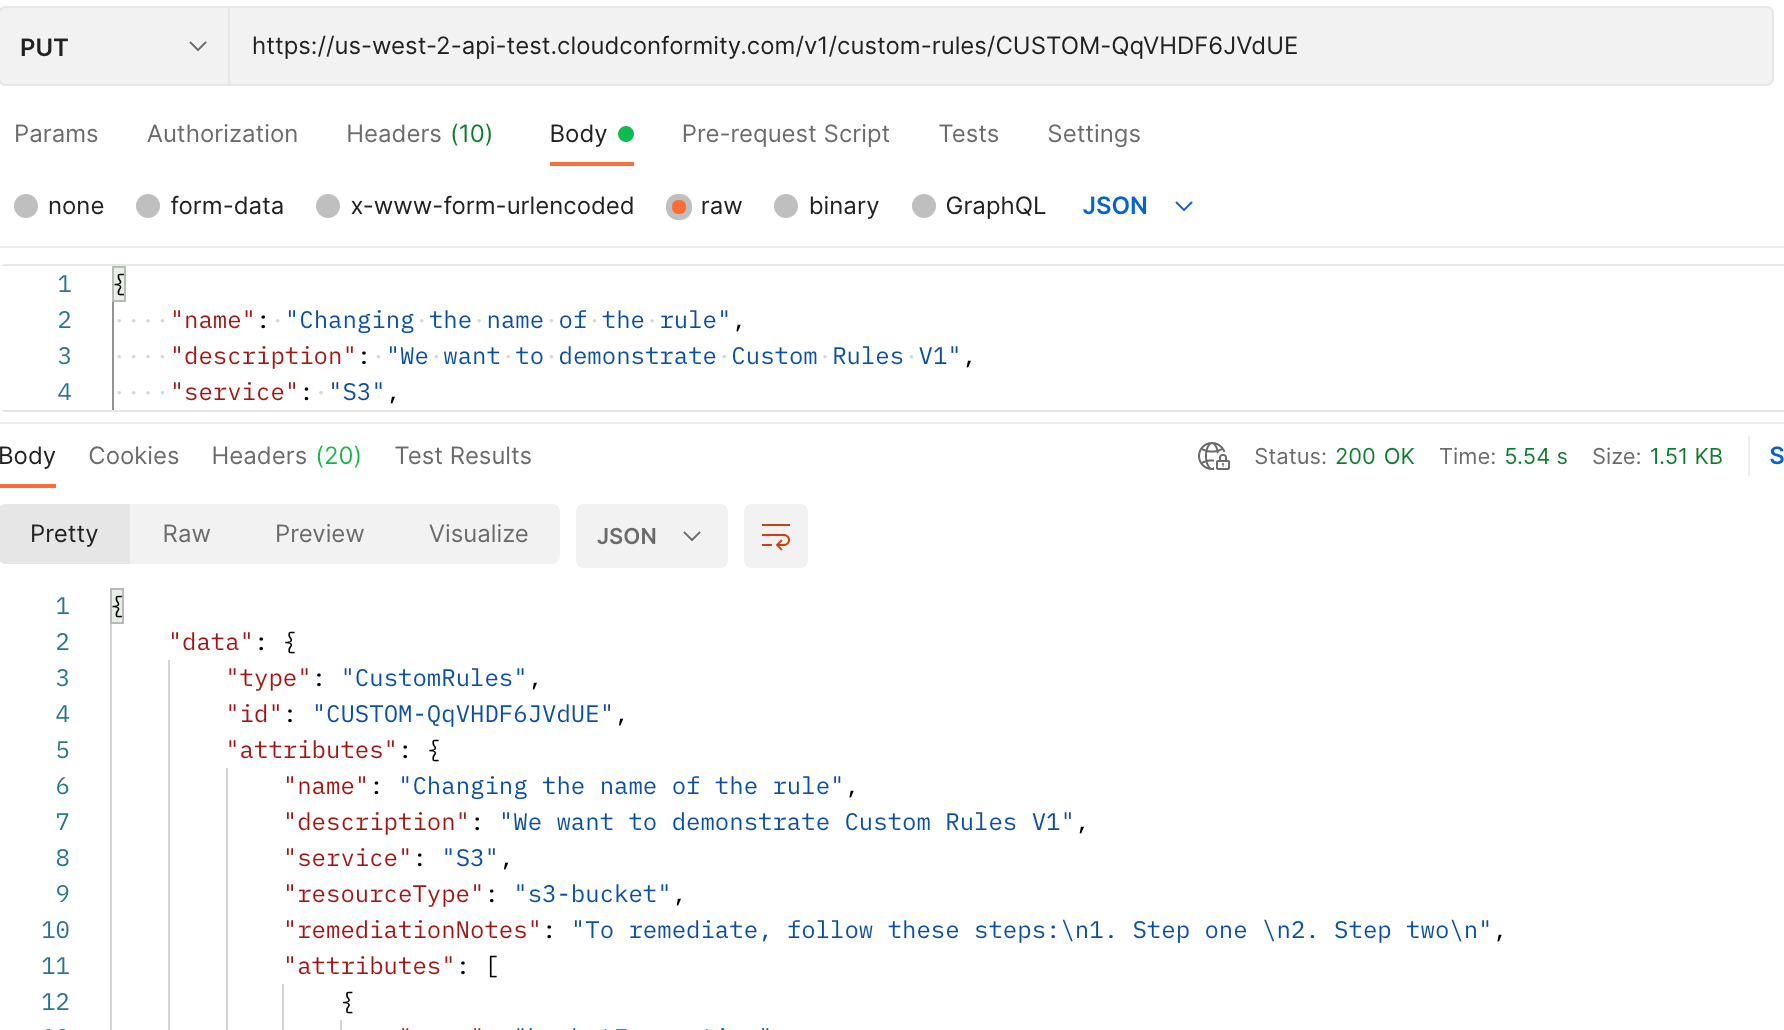
Duplicate the POST query named ‘save basic rule’, change it to a PUT request and re-name ‘update saved rule’.
-
Append /
to the URL, e.g. https://us-west-2-api.cloudconformity.com/v1/custom-rules/CUSTOM-QqVHDF6JVdUE -
Modify the body of the rule template by changing. a. Values for name (call the rule whatever you like) and severity (e.g. change to LOW). b. Under rules → conditions → all → operator, change notEqual to equal (this will invert the rule logic).
-
Click save and send. The existing rule will be updated, shown in the response. You can confirm by re-running ‘list custom rules’.
-
Test the newly updated rule by running dry run saved rule - you should notice a SUCCESS check where previously there was a FAILURE. If you were to let the rule run with Conformity Bot, you would see the checks' data updated.
-
As a final clean up, we will prepare to disable and delete the saved rule. We will first disable the saved rule, which will allow Conformity Bot to handle tasks related to the removal of checks e.g., delete related checks, update statistics, close created JIRA/ServiceNow tickets, etc. If no checks have been created for the custom rule, then proceed to step 8 to permanently delete the custom rule. Modify the body of the PUT request ‘update saved rule’ and change the enabled property to false.
-
Click send. The existing rule will be updated, shown in the response. You can confirm by re-running ‘list custom rules’ or GET
/custom-rule/{ruleId}. -
Allow Conformity Bot to run a complete cycle across accounts related to your custom rule.
-
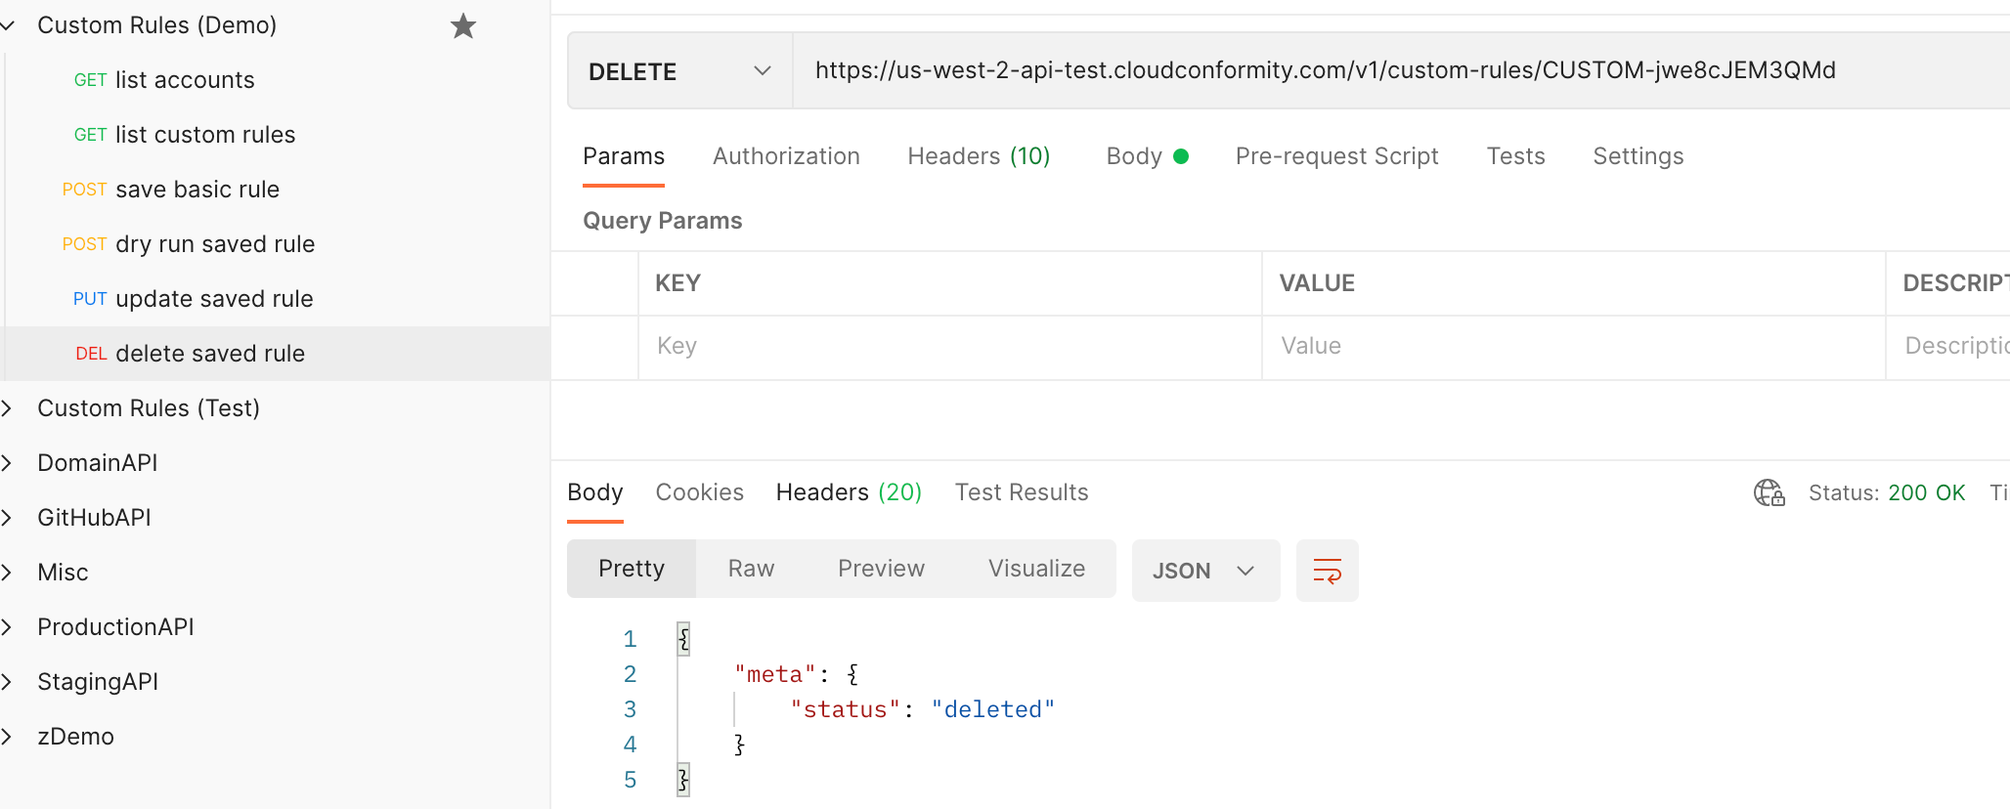
Duplicate the PUT request ‘update saved rule’, change it to a DELETE request and rename the new request ‘delete saved rule’.
-
You can clear the body (although not required), ensure the URL includes the custom rule id you want to delete from your organization, click save and send. You can re-check by re-running the ‘list custom rules’ query to see if the array of custom rules is now empty.
Workflow 2: Working with the ‘Dry Run’ feature to build out a rule
Dry-running a draft rule configuration against an account
In Workflow 1 we saved a custom rule straight to the organization as a demonstration - this is not the normal or recommended development flow: instead, you should make use of testing and dry-running a rule with dummy data prior to saving. This workflow will show how to dry run by passing a rule configuration in the request body and returning an output from the existing account resource data.
-
Duplicate the POST query named ‘dry run saved rule’ and rename ‘dry run configuration’.
-
Under 'Params', you should remove the ‘id’ (this rule is now deleted) and leave the 'accountId' as is. The resulting query string will be something like https://us-west-2-api.cloudconformity.com/v1/custom-rules/run?accountId=d2c91234-1234-1234-1234-123456786.
-
The run endpoint can identify a request body that wraps a rule using 'configuration'. Under 'Body', save the following configuration:
{ "configuration": { "name": "S3 bucket logging enabled", "description": "S3 buckets have logging enabled", "service": "S3", "resourceType": "s3-bucket", "attributes": [ { "name": "bucketLogging", "path": "data.LoggingEnabled", "required": true } ], "rules": [ { "conditions": { "all": [ { "value": null, "operator": "notEqual", "fact": "bucketLogging" } ] }, "event": { "type": "Bucket has logging enabled" } } ], "severity": "MEDIUM", "categories": [ "security" ], "provider": "aws", "enabled": true } } -
Click save and send. The response will be the check outcomes of the rule configuration against the resource data in the chosen account - in the above example you should see a FAILURE or SUCCESS check for each S3 bucket. In workflow 1 we used the dry run feature to run a rule we already saved to the account, but the power of this alternate approach is you do not need to save the configuration first, speeding up the development and testing process.
-
As a test, change the "operator" from "notEqual" to "equal" and click send again - you will see the check results change based on the new rule logic.
Returning Resource Data using the Run Endpoint
When writing rule attributes of a custom rule, a key challenge is knowing the structure of the resource data so you can correctly define the path. To help you with this, Conformity Custom Rules offers enables a user to query resource data of a single resource and return it in the check response from the run endpoint.
To do this, a user needs to define a specific resource id in the rule configuration, and apply the request parameter resourceData=true.
-
Duplicate the POST query ‘dry run configuration’ and rename ‘dry run get resource data’.
-
Under the ‘Params’ tab, enter a key resourceData with the value true, and keep the accountId parameter. The final request URL will be something like https://us-west-2-api.cloudconformity.com/v1/custom-rules/run?accountId=d2c97341-0be1-4166-be5f-55d55e9ef056&resourceData=true.
-
Inside the ‘Body’, add a parameter within configuration called resourceId, with the value being the name of an S3 bucket in your account you want to return the resource data for. If you are unsure of the resource ID, you can check examples from the previous responses or run a separate query to the checks endpoint for some ideas.
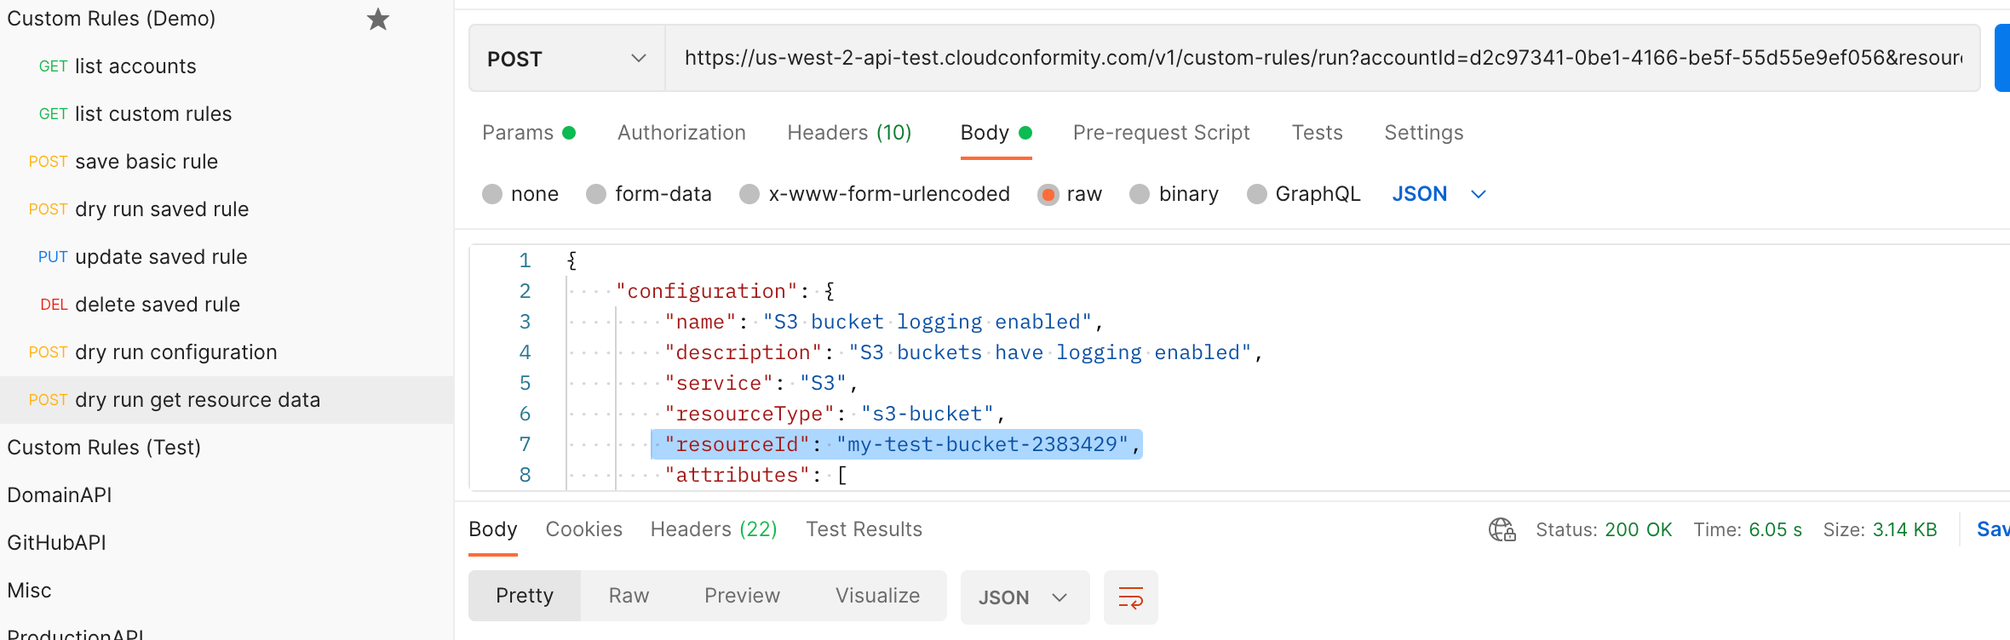
The body of the request will be something like:
{ "configuration": { "name": "S3 bucket logging enabled", "description": "S3 buckets have logging enabled", "service": "S3", "resourceType": "s3-bucket", "resourceId": "<INSERT S3 BUCKET NAME>", "attributes": [ { "name": "bucketLogging", "path": "data.LoggingEnabled", "required": true } ], "rules": [ { "conditions": { "all": [ { "value": null, "operator": "notEqual", "fact": "bucketLogging" } ] }, "event": { "type": "Bucket has logging enabled" } } ], "severity": "MEDIUM", "categories": [ "security" ], "provider": "aws", "enabled": true } } -
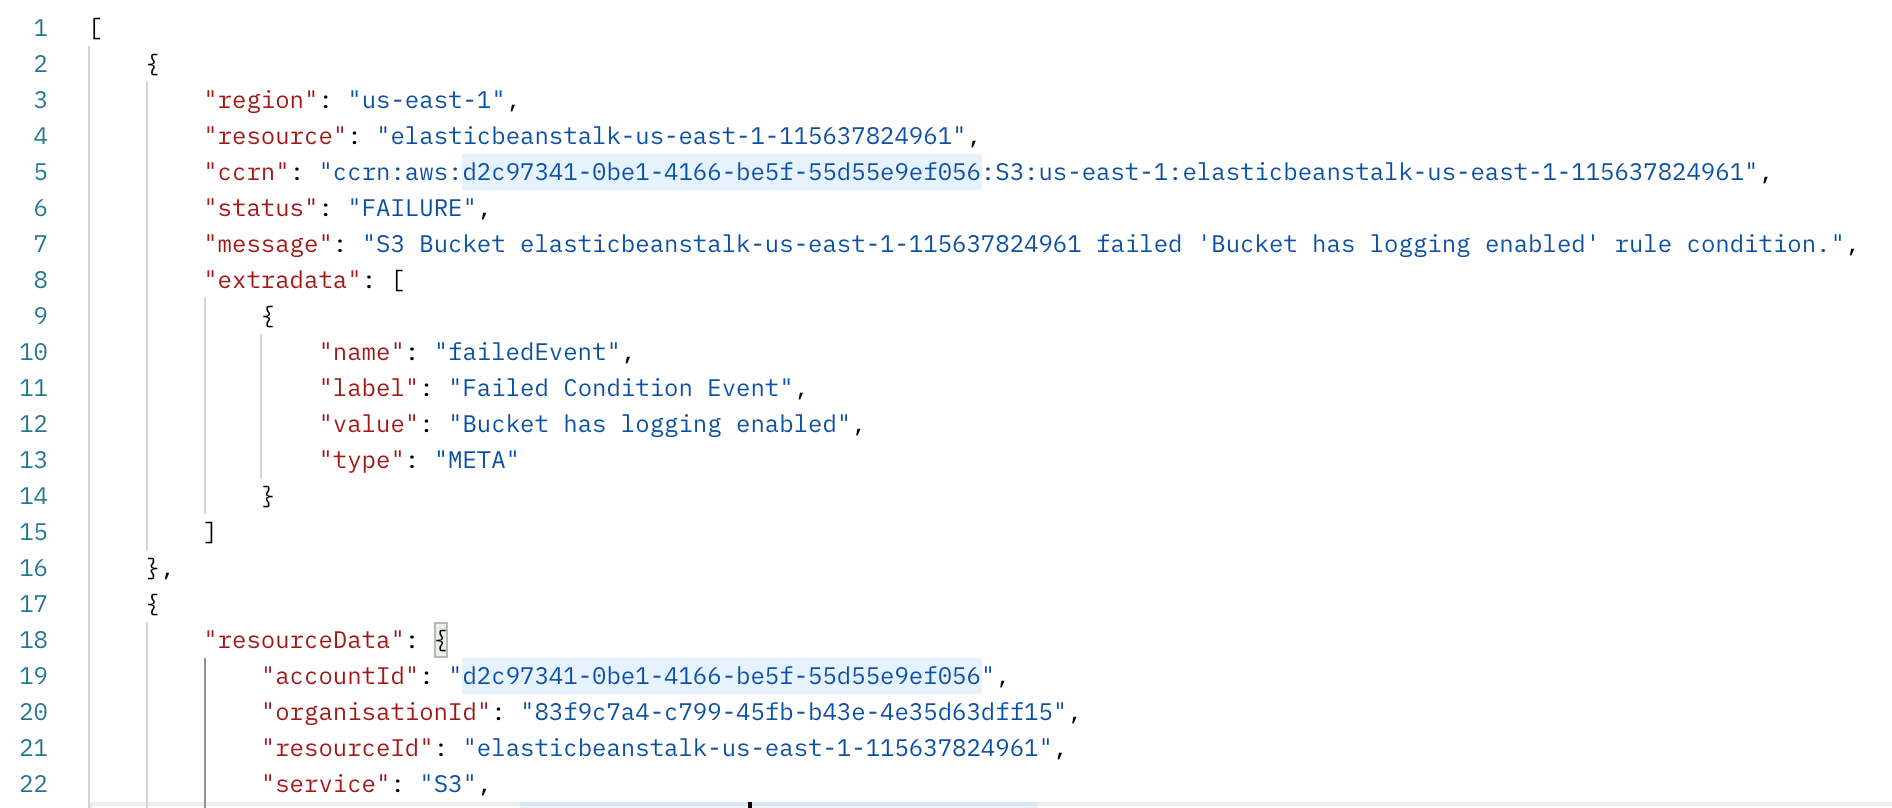
Click save and send. The response will include the check result for your chosen rule configuration, followed by the resource data for that resource. You can use this resource data to help build out new rules you want to create for the chosen service.
Note: If you do not enter a single resource ID, the request will return a 422 error.
Testing a new custom rule template using dummy data
Conformity Custom Rules also allows you to pass in dummy resource data as part of the request body. This allows the user to test custom rules for different scenarios without using real resource data from an account.
-
Duplicate the previous query or create a new POST query and name ‘dry run with dummy data’.
-
Remove parameters such that the query string results in something like: https://us-west-2-api.cloudconformity.com/v1/custom-rules/run.
-
In the body of the request, enter the following. This contains both the rule configuration, and the resource data which will be passed in to the rule logic:
{ "configuration": { "name": "S3 bucket logging enabled", "description": "S3 buckets have logging enabled", "service": "S3", "resourceType": "s3-bucket", "categories": [ "security" ], "attributes": [ { "name": "bucketLogging", "path": "data.LoggingEnabled", "required": true } ], "rules": [ { "conditions": { "all": [ { "value": null, "operator": "notEqual", "fact": "bucketLogging" } ] }, "event": { "type": "Bucket has logging enabled" } } ], "severity": "HIGH", "provider": "aws", "enabled": true }, "resource": { "accountId": "wonKey-", "organisationId": "DonNke3", "resourceId": "auto-remediate-v1-serverlessdeploymentbucket-154y8zf51bnh2", "service": "S3", "ccrn": "ccrn:aws:iwonKey-:S3:us-west-2:auto-remediate-v1-serverlessdeploymentbucket-154y8zf51bnh2", "region": "us-west-2", "descriptorType": "s3-bucket", "data": { "Name": "auto-remediate-v1-serverlessdeploymentbucket-154y8zf51bnh2", "CreationDate": "2020-09-08T00:44:14.000Z", "region": "us-west-2", "resourceId": "auto-remediate-v1-serverlessdeploymentbucket-154y8zf51bnh2", "Grants": [ { "Grantee": { "DisplayName": "aws.sandbox", "ID": "69a55bbb9669d3276014662091a21e9b3577353e2a3912f02117d22f95d944ce", "Type": "CanonicalUser" }, "Permission": "FULL_CONTROL" } ], "Owner": { "DisplayName": "aws.sandbox", "ID": "69a55bbb9669d3276014662091a21e9b3577353e2a3912f02117d22f95d944ce" }, "Policy": null, "Encryption": { "Rules": [ { "ApplyServerSideEncryptionByDefault": { "SSEAlgorithm": "AES256" } } ] }, "Lifecycle": null, "LoggingEnabled": { "TargetBucket": "cf-templates-fw8u6fo2nupv-us-west-2", "TargetGrants": [], "TargetPrefix": "" }, "BucketVersioning": {}, "ObjectLockConfiguration": null, "BucketAccelerateConfiguration": {}, "BucketWebsite": null, "Tags": [ { "Key": "STAGE", "Value": "v1" }, { "Key": "service", "Value": "auto-remediate" } ], "PublicAccessBlockConfiguration": null }, "name": "S3 Bucket", "link": "https://s3.console.aws.amazon.com/s3/buckets/auto-remediate-v1-serverlessdeploymentbucket-154y8zf51bnh2/?region=us-west-2&tab=overview", "linkTitle": "auto-remediate-v1-serverlessdeploymentbucket-154y8zf51bnh2", "provider": "aws", "lastModifiedDate": 1602099955645, "lastModifiedBy": "SYSTEM" } } -
Click save and send. The response will be a simple check response based on whether the given resource is evaluated as a success or failure.
[ { "region": "us-west-2", "resource": "auto-remediate-v1-serverlessdeploymentbucket-154y8zf51bnh2", "ccrn": "ccrn:aws:iWdNVKe-:S3:us-west-2:auto-remediate-v1-serverlessdeploymentbucket-154y8zf51bnh2", "status": "SUCCESS", "message": "S3 Bucket auto-remediate-v1-serverlessdeploymentbucket-154y8zf51bnh2 passed 'Bucket has logging enabled' rule condition.", "extradata": [ { "name": "successEvent", "label": "Passed Condition Event", "value": "Bucket has logging enabled", "type": "META" } ] } ] -
As a user, you could enter your own resource data based on the response from the previous resource data workflow. This allows you to make small, quick changes to the request body to assess the expected result, without having to rely on creating resources in your environment and have the specific resource data ingested and stored via a Conformity bot run. As a developer, you might choose to collect a small library of dummy resource data objects to help with developing similar rules in future. This could further speed up custom rule development by avoiding frequent queries for example resource data.
Building a new custom rule for another service
So far, we have only used AWS S3 for our examples. To build a custom rule for another platform and/or service, it is recommended to first build a simple ‘dummy’ rule configuration and combine it with the run endpoint and resourceData=true, so you can learn the structure of the resource data and inform your path definitions. You will need a few parameters to get the resource data including a resourceId from the chosen service, as well as the descriptorType value which is equivalent to "resource-types" in Conformity's data.
The following example uses Azure Virtual Machines data. You must have an Azure subscription hosting an Azure Virtual Machine resource integrated with Conformity for this example, but the process could be applied to any service or resource type that is supported by Conformity.
-
Refer to the following link to reference possible values for service and descriptorType (descriptorType in Custom Rules framework maps to values for "resource-types" from the resource-types endpoint): https://us-west-2.cloudconformity.com/v1/resource-types
-
Using ctrl+f or cmd+f identify the resource-types values for an Azure Virtual machine. You should identify the following from the previous endpoint:
109: type: "resource-types" id: "virtual-machines" attributes: name: "Virtual Machine" relationships: service: data: type: "services" id: "VirtualMachines" -
To build out a rule against Azure data, first run the Conformity Checks APIto get an example resource ID. Create a new GET API query called ‘get azure check data’. In the parameters, include the accountIds field with your chosen Azure subscription (you can get this from re-running the 'list accounts' query or by selecting the chosen subscription in the Conformity UI and viewing the ID in the browser URL). You should also use a filter to limit the response. For example, the query string might look like: https://us-west-2-api.cloudconformity.com/v1/checks?accountIds=40220033-1234-1234-1234-12349976fc65&filter[services]=VirtualMachines.
-
Save and send the above GET query, and note the value for an example resourceId for a given check where the descriptorType = virtual-machine. For Azure virtual machines, you will likely see a long resourceId like "/subscriptions/1abc1234-1234-1234-1234-abcd1d821234/resourceGroups/my-resource-group/providers/Microsoft.Compute/virtualMachines/my-special-virtual-machine"
-
Create a new POST query to dry run the data using resourceData=true to return resource data and name it ‘dry run get azure vm data’ - an example query string: https://us-west-2-api.cloudconformity.com/v1/custom-rules/run?accountId=40220033-1234-1234-1234-12349976fc65&resourceData=true
-
For the body of the POST query, construct a simple dummy rule using the appropriate resourceId, service and descriptorType from the data. The following example is a rule which checks if the resourceId field is populated, a simple proxy check for whether the data exists - which is sufficient for the goal of returning the resource data:
{ "configuration": { "name": "Check if resource exists", "description": "Simple check if resource data exists for given resource", "resourceId": "/subscriptions/27b11718-e2c4-4336-b3d6-ac291d8299d3/resourceGroups/CFX-WALLACE-RG/providers/Microsoft.Compute/virtualMachines/double-encrypted-vm", "service": "VirtualMachines", "resourceType": "virtual-machines", "severity": "LOW", "enabled": true, "provider": "azure", "categories": [ "security" ], "remediationNotes": "Check if resource exists", "attributes": [ { "name": "exists", "path": "resourceId", "required": true } ], "rules": [ { "conditions": { "all": [ { "fact": "exists", "operator": "notEqual", "value": null } ] }, "event": { "type": "Resource exists" } } ] } } -
Click save and send. The response should include the resource data of an Azure Virtual Machine, which you can now use as a reference to construct a more advanced rule based on a given json.path value in the data. Using the below example data, to create a condition that checks for the vmSize, I could reference the json.path data.hardwareProfile.vmSize in my custom rule condition statement.
Workflow 3: Exploring more advance custom rules logic
Check out the Rule Anatomy
Multiple and/or Nested conditions
The examples provided so far use very simple logic with only one condition. Using the JSON rules engine, there is no hard limit on the number of nested or combined conditions for custom rules.
See here for several examples of more complex rules.
Workflow 4: Building rules for specific accounts or applying exceptions
Custom Rules only allows SUCCESS, FAILURE, ERROR results and is designed to strip back the complex business logic of Conformity’s existing check framework. (Note: ERROR results represent issues with resource data and/or rule logic and are not saved by Conformity Bot but are returned by the run endpoint to aid in development.)
There are ways to implement equivalents to exceptions by building conditions that automatically pass SUCCESS for a resource that matches certain parameters.
Here is an example of a configuration which checks both S3 encryption and public access block, but automatically succeeds for any bucket whose name contains ‘test'.
{
  "configuration": {
    "name": "S3 encrypted and public access block - with safelist for 'test'",
    "description": "Check S3 has encryption AND public access block, but safelist 'test' buckets",
    "service": "S3",
    "resourceType": "s3-bucket",
    "severity": "HIGH",
    "enabled": true,
    "provider": "aws",
    "categories": [
      "security"
    ],
    "remediationNotes": "To remediate, follow these steps:\n1. Do as you wish \n2. Step two\n",
    "attributes": [
      {
        "name": "bucketEncryption",
        "path": "data.Encryption",
        "required": true
      },
      {
        "name": "publicAccessBlockConfiguration",
        "path": "data.PublicAccessBlockConfiguration",
        "required": true
      },
      {
        "name": "safeList",
        "path": "data.resourceId",
        "required": true
      }
    ],
    "rules": [
      {
        "conditions": {
          "any": [
            {
              "fact": "safeList",
              "operator": "pattern",
              "value": ".*test.*"
            },
            {
              "all": [
                {
                  "fact": "bucketEncryption",
                  "operator": "notEqual",
                  "value": null
                },
                {
                  "fact": "publicAccessBlockConfiguration",
                  "operator": "notEqual",
                  "value": null
                }
              ]
            }
          ]
        },
        "event": {
          "type": "Bucket has encryption enabled"
        }
      }
    ]
  }
}