Topics on this page
Add an Azure Account
| Location | Main Dashboard >Select Add an account |
Let's get started!
By adding your Microsoft Entra ID and Subscriptions to Conformity, your organization will be able to create holistic multi-cloud views of your security and governance posture.
User Access
| User Role | Can Access |
|---|---|
| Administrator | |
| Power User | |
| Custom - Full Access | |
| Read Only | |
| Custom - Read Only |
- Set up access to Azure
- Add a Microsoft Entra ID
- Remove a Microsoft Entra ID
- Add an Azure China Subscription - Currently in Preview
Set up access to Azure
You can access Azure through an Azure App registration, providing Conformity's Rule engine the necessary read-only permissions to run the rule checks against subscription resources you want to add to your Conformity organization. Depending on your preference, choose your setup type as Automated or Manual.
Automated mode (recommended)
The Conformity Azure onboarding script provides an automated way of setting up all the necessary resources and permissions enabling you to onboard a Microsoft Entra ID and Subscriptions onto Conformity.
For instructions on how to run the script see, Conformity Azure onboarding script on Github.
Manual mode
Create an App registration
- Select Microsoft Entra ID.
- Select App registrations.
- Click New registration (app ID).
- Give the App registration a name e.g. Conformity Azure Access.
- Supported account types: 'Accounts in this organization only' (single tenant).
- Redirect URL: not required.
- Click Register.
Configure Certificates and secrets
- Select Certificates & secrets.
- Select Client secrets and click +New client secret.
- Add a description.
- Choose any expiry period.
- Click Add.
Save your new secret according to your organization's security protocol. You will need the secret later when adding your subscriptions to Conformity.
When you configure Certificates and Secrets, you also create your Application Key.
If you no longer have access to this key, you can create it again following the same steps above.
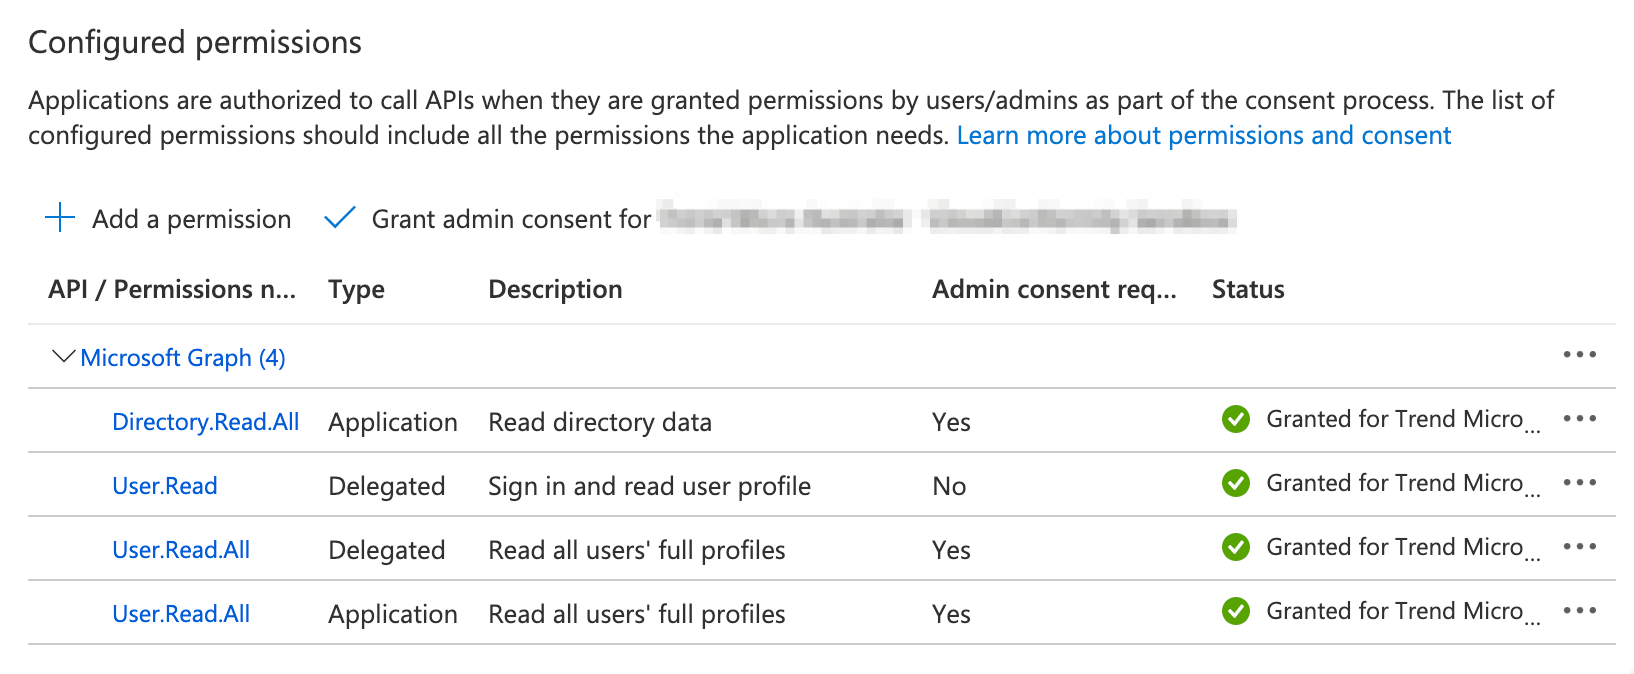
Add API Permissions
You will need to configure API permissions for ActiveDirectory checks to enable Conformity to access ActiveDirectory resources for running ActiveDirectory rules.
- From App registrations, click on the app that you registered with Conformity during onboarding e.g. Conformity Azure Access.
- Navigate to API permissions in the left hand menu.
- Click + Add a permission.
- Under Commonly used Microsoft APIs, select Microsoft Graph.
- Set Delegated permissions to:
- User.Read
- User.Read.All
- Set Application permissions to:
- User.Read.All
- Directory.Read.All
- Click Add permissions.
- On the API Permissions page, click Grant admin consent for [Microsoft Entra ID name] to give admin the consent for all the permissions.
Once complete, your configured API Permissions should look like this:
Create a Custom Role
- Go to Subscriptions.
- Select Access Control (IAM).
- Click Add > Add Custom Role.
- Select the JSON tab and click on the Edit button.
-
Remove the content of the template and then Copy and Paste the following JSON into the template.
{ "properties": { "roleName": "Custom Role - Cloud One Conformity", "description": "Subscription level custom role for Cloud One Conformity access.", "assignableScopes": [], "permissions": [ { "actions": [ "Microsoft.AppConfiguration/configurationStores/ListKeyValue/action", "Microsoft.Network/networkWatchers/queryFlowLogStatus/action", "Microsoft.Web/sites/config/list/Action" ], "notActions": [], "dataActions": [], "notDataActions": [] } ] } } -
Click Save.
- Select the Assignable Scopes tab > Add assignable Scope.
- Select your subscription(s) and click Add.
- Click Review + Create, and then click Create.
It may take several minutes for the role to be available for use in the system.
Create a Tenant Scope Custom Role (Optional)
- Go to Management groups.
- Select Tenant Root Group.
- Select Access Control (IAM).
- Click Add > Add Custom Role.
- Select the JSON tab and click on the Edit button.
-
Remove the content of the template and then Copy and Paste the following JSON into the template.
{ "properties": { "roleName": "Custom Role - Cloud One Conformity (Tenant scope)", "description": "Tenant level custom role for Cloud Conformity access.", "assignableScopes": [], "permissions": [ { "actions": [ "Microsoft.Management/managementGroups/read" ], "notActions": [], "dataActions": [], "notDataActions": [] } ] } } -
Click Save.
- Select the Assignable Scopes tab > Add assignable Scope.
- Select your Tenant Root Group and click Select.
- Click Review + Create, and then click Create.
Create Role Assignments
Reader role
- From the Access Control (IAM) page click Add → Add Role Assignment.
- Under the Role drop-down select Reader.
- Ensure that Assign Access is set to User, group or service principal.
- From the Select drop-down search for your Conformity App registration, eg Conformity Azure Access.
- Click Save.
- Repeat for any additional subscriptions.
Custom role
- From the Access Control (IAM) page click Add → Add Role Assignment
- Under the Role drop-down search for the Role you added in step 1 eg Custom Role - Cloud One Conformity.
- Ensure that Assign Access is set to User, group or service principal.
- From the Select drop-down search for your Conformity App registration, eg Conformity Azure Access.
- Click Save.
- Repeat for any additional subscriptions.
Custom role (Tenant scope) (Optional)
- Navigate to Management groups and select Tenant Root Group.
- From the Access Control (IAM) page click Add → Add Role Assignment
- Under the Role drop-down search for the Role you added in step 1 eg Custom Role - Cloud One Conformity (Tenant scope).
- Ensure that Assign Access is set to User, group or service principal.
- From the Select drop-down search for your Conformity App registration, eg Conformity Azure Access.
- Click Save.
Add a Microsoft Entra ID
To add an Microsoft Entra ID (and Subscriptions), you will first need to Create an App registration for each Microsoft Entra ID you want to add to your Conformity organization.
Once your Azure App registration is set up, you are ready to add your Microsoft Entra ID.
- Sign in to Conformity.
- From Conformity's Main Dashboard, click on Add an account.
- Click on Azure Subscription, then click Next.
- Populate Microsoft Entra ID Name and Microsoft Entra ID Tenant ID, then click Next
- Microsoft Entra ID Name: will be the reference name of your Microsoft Entra ID in Conformity. This name will display in the Conformity accounts menu and does not need to match any names used in your Azure console.
- Microsoft Entra ID Tenant ID: identifies your Microsoft Entra ID for Conformity.
To get Microsoft Entra ID Tenant ID from Azure: 1. Select Microsoft Entra ID. 2. Select Properties. 3. Copy to clipboard the Tenant ID.
-
To allow Conformity access to your Azure Subscriptions, you will use the Azure App registration created in the previously setup. This will allow the Conformity rule engine to run Rule checks against Subscriptions within your Microsoft Entra ID. You will need to supply both the:
-
App registration Application ID To get App registration ID from Azure:
- Select Microsoft Entra ID.
- Select App registrations.
- Select the application i.e. Conformity Azure Access or whatever you named this application.
- Copy the App registration Application ID.
-
Application registration Key that was generated for your Azure App registration.
- Your application registration key is created when you Configure certificates and secrets during the setup of your Azure App registration.
- If you do not have this key, you can create it again following the same steps in Configured certificates and secrets.
-
After clicking Next, you will have the option to select subscriptions you want to add to your Conformity organization.
You will only see subscriptions that you have provided Conformity access to in your Azure App registration setup.
If you can't see your subscription you will need to enable access settings for this subscription in Azure following the instructions: Assign access to the App registration for a Subscription
-
Click Next, and wait a moment as Conformity checks your subscription resources for rule failures.
-
Success! Once Conformity has finished running all the rules, you will be returned to the Main Dashboard where you will see your added Microsoft Entra ID.
The accounts navigation will be organized to group together Cloud Providers of the same type.
Remove a Microsoft Entra ID
Click Delete... on existing Microsoft Entra ID.
A Microsoft Entra ID can only be deleted once all their subscriptions have been removed.
Add an Azure China Subscription (Currently in Preview)
Request Azure China for your organization
To add an Azure China subscription to your Conformity account, you will need to email alloftrendproduct-conformity@trendmicro.com with the following details:
- Name of your Organization’s account in Conformity
- Whether you access Conformity via the Cloud One Platform or Conformity Standalone (i.e. www.cloudconformity.com)
- A list of your organizations’ key contacts
Add China Cloud
- Login to the Conformity organisation for which the ‘azure-china’ feature has been enabled.
- Click Add an account.
- Select Azure Subscription.
- Select Add new Microsoft Entra ID for this new subscription and click Next.
- To enter the information for the Microsoft Entra ID located in China.
- Select the China Cloud option under Azure Cloud Environment.
- Follow the steps to Set up Access to Azure.