Topics on this page
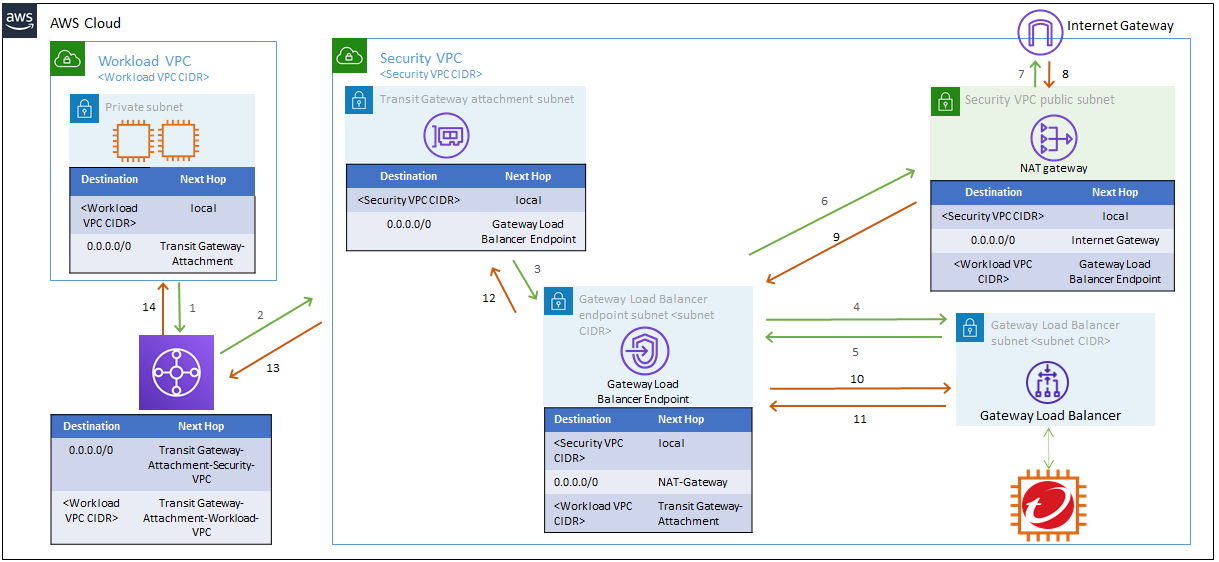
Option 3: Deploy a centralized virtual appliance with Gateway Load Balancer
**Dynamic auto-scaling is not yet supported for Gateway Load Balancer in Network Security. **
Complete the following steps to deploy protection for egress traffic with Transit Gateway routing architecture for Gateway Load Balancer in your AWS environment.
Create the Macro template stack
- Log in to your AWS account.
- Click this link to create the Macro CloudFormation stack.
- Leave any parameters on their default settings, then click Create stack.
Create the Security VPC template stack
-
Log in to your AWS account.
-
Click the following link to create the Security VPC CloudFormation stack: Trend Micro Cloud One accounts.
-
On the Specify stack details page, enter the following parameters:
- Availability Zones (AZ): Choose all of the availability zones used in your Workload VPC.
- Security VPC CIDR Block: Enter a VPC CIDR for the Security VPC. This CIDR must be unique in your environment.
- SSH Key Pair: Select the name of your SSH key.
- Trend Micro Cloud One appliance deployment token: Enter your Trend Micro Cloud One appliance deployment token. Learn more.
- Network Security Instance AMI: Enter the latest Network Security AMI ID. Make sure the correct region is selected for the AMI ID. Learn more.
- Number of instances: Select the number of Network Security instances that you want to create in each AZ.
- Instance Type: Leave the default setting.
- Enable Inspection logs: If enabled, NSVA Inspection Logs are published to the CloudWatch log group
network_security_logs.
-
Follow the rest of the steps for the stack options, then click Create stack.
-
After the stack is created, click Stack details and then click Outputs.
-
Copy the value for the Gateway Load Balancer Endpoint service name to use when you create the Gateway Load Balancer Endpoint in the Security VPC.
If you created the Security VPC stack before September 5th, 2023, we recommend that you manually update the Python runtime to version 3.10 and Node.js runtime to version 20.x for your AWS Lambda functions.
To manually update Python and Node.js runtime versions in the AWS console:
- Navigate to the Lambda service page.
- Select your Lambda function from the list.
- Scroll down to Runtime Settings and click Edit.
- Select Python 3.10 and Node.js 20.x from the drop-down menu of available runtimes, and then click Save.
Modify the Security VPC
After you deploy the Security VPC stack, make the following adjustments to the Security VPC configuration.
If you do not already have a Transit Gateway in your environment, create a Transit Gateway before continuing. Learn more.
Create subnets
- Transit Gateway attachment subnet: Create a subnet for each AZ that needs a Transit Gateway attachment. We recommend that you use a small CIDR block, like /28.
- Gateway Load Balancer Endpoint subnet: Create a subnet for each AZ with a Gateway Load Balancer Endpoint. We recommend that you use a small CIDR block, like /28.
Create a Transit Gateway attachment
Create Transit Gateway attachment to connect your Workload VPCs with your Security VPC. When you create the attachment, select the Transit Gateway attachment subnet in each availability zone that you created in the previous section. Learn more.
Create a Gateway Load Balancer Endpoint for each AZ
- From the AWS Management Console, navigate to the VPC Dashboard.
- Under Virtual Private Cloud, click Endpoints, and then click Create Endpoint.
- For Service category, select Find service by name.
- Enter the value that you copied for the Gateway Load Balancer Endpoint service name when you created the Security VPC stack.
- For VPC, select your Security VPC and the Gateway Load Balancer Endpoint subnet.
- Click Create endpoint.
Create or modify your route tables
Navigate to the VPC Dashboard, and click Route Tables to create new route tables or modify existing route tables.
1. Create Transit Gateway attachment subnet route table
Name tag: Transit Gateway attachment subnet route table
VPC: Security VPC
Create this route table for each AZ in your environment.
Edit routes
| Destination | Target |
|---|---|
0.0.0.0/0 |
Select the Gateway Load Balancer endpoint ID in the corresponding AZ. |
Create subnet association
Select the Transit Gateway attachment subnet route table, click on the Subnet Associations tab, click Edit subnet associations, and select the Transit Gateway attachment subnet that you created. Create an association for each Transit Gateway attachment subnet route table that you create for each AZ.
2. Create the Gateway Load Balancer Endpoint subnet route table
Name tag: Gateway Load Balancer Endpoint subnet route table
VPC: Security VPC
Create this route table for each AZ in your environment.
Edit routes
| Destination | Target |
|---|---|
<WORKLOAD_VPC_CIDR> |
Transit Gateway ID |
0.0.0.0/0 |
NAT Gateway ID for the corresponding AZ |
Create subnet association
Select the Gateway Load Balancer Endpoint subnet route table, click on the Subnet Associations tab, click Edit subnet associations, and select the Gateway Load Balancer Endpoint subnet that you created for each corresponding AZ in your environment.
3. Modify the Security VPC public subnet route table
A Security VPC public subnet route table is created during CloudFormation. You will need a separate Security VPC public subnet route table for each AZ in your environment. Use the steps below to modify each Security VPC public subnet route table.
Name tag: Security VPC public subnet route table
VPC: Security VPC
Ensure that you have a Security VPC public subnet route table for each AZ in your environment.
Edit routes
| Destination | Target |
|---|---|
<WORKLOAD_VPC_CIDR> |
Select the Gateway Load Balancer endpoint ID in the corresponding AZ. |
0.0.0.0/0 |
Internet Gateway ID |
Create subnet association
Create an association for each Security VPC public subnet route table that you create for each AZ. Select a Security VPC public subnet route table, click on the Subnet Associations tab, click Edit subnet associations, and select the Security VPC public subnet for the corresponding AZ.
Create or modify your Transit Gateway route tables
To create Transit Gateway route tables, scroll to the bottom of the VPC dashboard, and then click Transit Gateway Route Tables → Create Transit Gateway Route Table.
Ingress traffic route table
Association: Workload VPC
| CIDR | Attachment | Resource type | Route type |
|---|---|---|---|
0.0.0.0/0 |
Security VPC Transit Gateway attachment | VPC | Static |
Egress traffic route table
Association: Security VPC
| CIDR | Attachment | Resource type | Route type |
|---|---|---|---|
<Workload VPC IP CIDR> |
Workload VPC Transit Gateway attachment | VPC | Propagated |
Removing the Security VPC CloudFormation stack
Before removing a Security VPC CloudFormation stack, we recommend the following:
- Change the Auto Scaling Group settings to 0 for the minimum, maximum, and desired capacity. This will automatically delete the Network Security virtual appliance instances and unregister them from Trend Micro Cloud One.
- Delete the Gateway Load Balancer Endpoint.
To remove the Security VPC CloudFormation stack
- From the AWS management console, navigate to the EC2 dashboard.
- Under Auto Scaling, click Auto Scaling Groups.
- Select the check box next to your Auto Scaling group. A split pane that shows information about the selected group opens at the bottom of the Auto Scaling groups page.
- On the Details tab, change the current settings for minimum, maximum, and desired capacity to 0. The Auto Scaling group status will change to
Updating capacity. - After the
Updating capacitystatus clears, delete the CloudFormation stack.