Topics on this page
Option 1: Edge protection deployment
Follow these steps to manually deploy the Edge protection deployment option in your AWS environment. This option can also be automatically deployed using the Get Started wizard and the Deploy Protection wizard in the Network Security management interface. Learn more.
This deployment option only requires one VPC and inspects traffic between the VPC and the Internet as well as the VPC and a VPN gateway.
For this deployment, create a new VPC or identify an existing VPC in your AWS Cloud network that you want to protect.
- Create a new VPC: Navigate to the VPC Dashboard by searching for VPC under Services, and then click Your VPCs → Create VPC. We do not recommend that you use the VPC Wizard to create your VPCs because the wizard auto-generates several network components at once. Instead, create each network component individually.
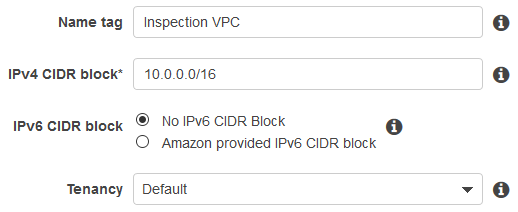
We recommend that this new VPC includes a minimum of a /26 CIDR for each availability zone (AZ). Make sure there is space in the VPC CIDR range to create at least two subnets needed for this deployment.
We also recommend that you give this VPC a unique name, like Inspection VPC, to distinguish it from other VPCs in your network.
The following image shows an example of a VPC.
- Identify an existing VPC: An existing VPC must include an unused /27 CIDR for each AZ. Make sure there is space in the VPC CIDR range to create at least two subnets needed for this deployment.
We also recommend that you rename this VPC to give it a unique name, like Inspection VPC, to distinguish it from other VPCs in your network.
NOTE
We recommend that you print the deployment checklist to take notes as you work through the deployment process.
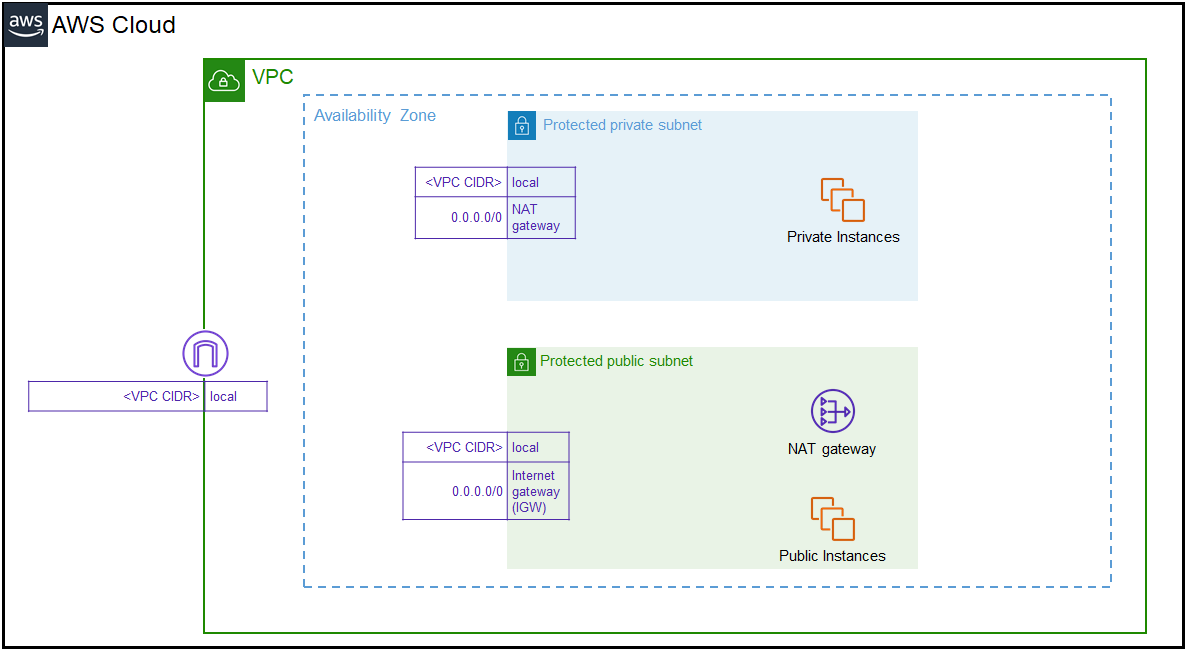
The image below shows a detailed view of what your network environment should look like for this deployment scenario before you insert the Network Security instances. Until you create and configure the Network Security instance, the traffic is not inspected. View how your complete network environment will look when you start inspecting traffic.
1. Create subnets
Create the following subnets for your VPC in each AZ. From the VPC Dashboard, click Subnets → Create subnet.
NOTE
Use a different IPv4 CIDR block for each subnet that you create. The subnet CIDR block is dependent on the CIDR that you used for the VPC. Learn more about subnet CIDR blocks.
Select the VPC and AZ where your public and private workloads are located when you create or identify each of these subnets.
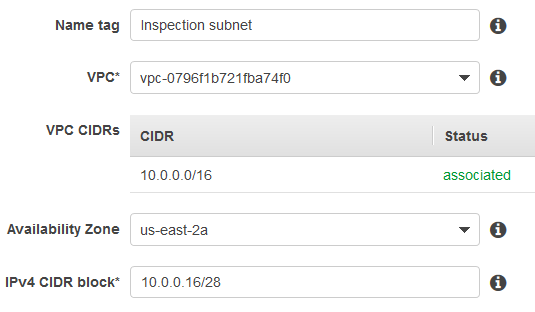
- Inspection subnet: Used for the Elastic Network Interface (ENI) traffic that is sent to the Network Security instance for inspection. We recommend that you use the smallest possible IPv4 CIDR block for this subnet.
- Management subnet: Contains the management port for the Network Security instance. As with the previous subnet, we recommend that you use a small CIDR block.
- Protected-public subnet: Create or identify all existing subnets that contain any public instances, public load balancers, or NAT Gateways that you want to protect. If you select an existing subnet, we recommend editing the name to protected-public subnet so that it is easy to identify when you create the route tables.
- Protected-private subnet: Create or identify all existing subnets that contain any private instances, private load balancers, or other applications without public IP addresses. This subnet is necessary if you have private instances or applications behind an Elastic Load Balancer (ELB). If you select an existing subnet, we recommend editing the name to protected-private subnet so that it is easy to identify when you create the route tables. If you create a new subnet, we recommend that you use a small CIDR block.
The following image shows an example of a subnet.
2. Create gateways
Create the following gateways. Keep any default settings if not specified below.
Internet Gateway
The Internet Gateway gives your VPC access to or from the Internet.
From the VPC Dashboard, click Internet Gateways → Create Internet Gateway. Select the new gateway, click Actions, and Attach to VPC to attach it to your VPC.
NAT Gateway
The NAT Gateway gives your private instances and applications access to the Internet.
Create or identify a NAT Gateway in each AZ. From the VPC Dashboard, click NAT Gateways → Create NAT Gateway. Use the protected-public subnet when you create the NAT Gateway.
If you do not have an allocated Elastic IP, create one when you create the new gateway.
NOTE
After you create the NAT Gateway, click Close. You will create the route tables in the next section.
Virtual Private Gateway
Create or identify a Virtual Private Gateway to connect your data center or your on-premise network to your VPC and inspect that traffic. Learn more about Virtual Private Gateways.
From the VPC Dashboard, click Virtual Private Gateways → Create Virtual Private Gateway.
3. Create route tables
These route tables configure the network traffic to bypass the Network Security instances. After you create the Network Security instance, modify the tables to route traffic to Network Security for inspection.
- From the VPC Dashboard, click Route Tables → Create route table.
- Select the new table and click the Routes tab and Edit routes.
- Use the following information to edit the routes for each route table.
- Create the same set of route tables for each AZ in your VPC.
1. Create the external access route table
Used to associate the inspection subnet with your VPC. Create an external access route table for each VPC.
- Name tag: External access route table
- VPC: Inspection VPC
Edit routes
| Destination | Target |
|---|---|
<VPC CIDR> |
Local |
0.0.0.0/0 |
Internet Gateway |
Create subnet association
Select the external access route table, click on the Subnet Associations tab, click Edit subnet associations, and select all inspection subnets for every AZ in the VPC.
2. Create the VPC access route table
Used to associate your Internet Gateway and any Virtual Private Gateways with your VPC. Create a VPC access route table for each AZ in your VPC.
- Name tag: VPC access route table
- VPC: Inspection VPC
Edit routes
| Destination | Target |
|---|---|
<VPC CIDR> |
Local |
Create edge association
No subnet associations are required for this route table. Instead, create an edge association. Select the VPC access route table, and click on the Edge Associations tab. Click Edit edge associations, and under Associated gateways, select the Internet Gateway and any Virtual Private Gateways that you want to inspect from the drop down list.
3. Create the protected-public route table
Used to associate the protected-public subnet with your VPC. Create a protected-public route table for each AZ in your VPC.
- Name tag: Protected-public route table
- VPC: Inspection VPC
Edit routes
| Destination | Target |
|---|---|
<VPC CIDR> |
Local |
0.0.0.0/0 |
Internet Gateway |
Create subnet association
Select the protected-public route table, click on the Subnet Associations tab, click Edit subnet associations, and select the protected-public subnet.
4. Create the protected-private route table
Used to associate the protected-private subnet with your VPC. This route table is only necessary if you created a protected-private subnet. Create a protected-private route table for each AZ in your VPC.
- Name tag: Protected-private route table
- VPC: Inspection VPC
Edit routes
| Destination | Target |
|---|---|
<VPC CIDR> |
Local |
0.0.0.0/0 |
NAT Gateway |
ON PREM CIDRs |
Virtual Private Gateway |
Create subnet association
Select the protected-private route table, click on the Subnet Associations tab, click Edit subnet associations, and select the protected-private subnet.
5. Create the management route table
Used to associate the management subnet with your VPC. Create a management route table for each AZ in your VPC.
- Name tag: Management route table
- VPC: Inspection VPC
Edit routes
| Destination | Target |
|---|---|
<VPC CIDR> |
Local |
0.0.0.0/0 |
NAT Gateway |
ON PREM CIDRs |
Virtual Private Gateway |
Create subnet association
Select the management route table, click on the Subnet Associations tab, click Edit subnet associations, and select the management subnet.
After you finish setting up your VPCs, subnets, gateways, and route tables, you can create and configure the Network Security instances.