Topics on this page
Add Azure stacks
After deploying File Storage Security, you might want to add more stacks.
Topics:
- How many stacks should I add?
- Where can I add stacks?
- Add an all-in-one stack
- Add a scanner stack
- Add a storage stack
How many stacks should I add?
Storage stacks
You'll need one storage stack per Protecting storage account.
There is no limit to the number of storage stacks you can add, but keep in mind that costs will go up as the number of stacks increases. If you have a lot of files to scan that are spread across many storage accounts, consider deploying just one storage stack, and transferring files into its associated storage account to scan and then back out after scanning. We provide a sample Azure function that automates some of this work. See Post-Scan Action: Promote or Quarantine on GitHub for details.
The number of storage stacks you deploy will not affect performance, so deploy as many or as few as you want.
Scanner stacks
Typically, you'll only need one scanner stack for your entire deployment regardless of size. This is because the scanner stack auto-scales to handle increases in load. (For details on performance, see How long do scans take?)
Where can I add stacks?
Unless otherwise noted below, you can add stacks anywhere in Azure, including: under separate Azure subscriptions, in separate Azure regions, or under the same Azure subscription. The storage stacks are aware of their respective scanner stack through an identifier of Azure Resource Group.
Restrictions, stipulations, and recommendations
- The stacks must reside in a supported Azure region. For details, see What regions are supported?
- The storage stack must reside in the same region as your Protecting storage account
- For optimal performance, the storage and scanner stacks should reside in the same continental region, like the Americas.
- Each scanner stack or storage stack must be deployed in a standalone Azure Resource Group. Deploying other resources to the stack's resource groups is not recommended.
Add an all-in-one stack
To add an all-in-one stack, see Deploy the all-in-one stack.
Add a scanner stack
To add a scanner stack, read these sections:
- Step 1: Add the scanner stack
- Step 2: Configure the scanner stack's Tenant ID and Resource Group ID
- Next steps (add storage)
Step 1: Add the scanner stack
Add the scanner stack following the instructions below.
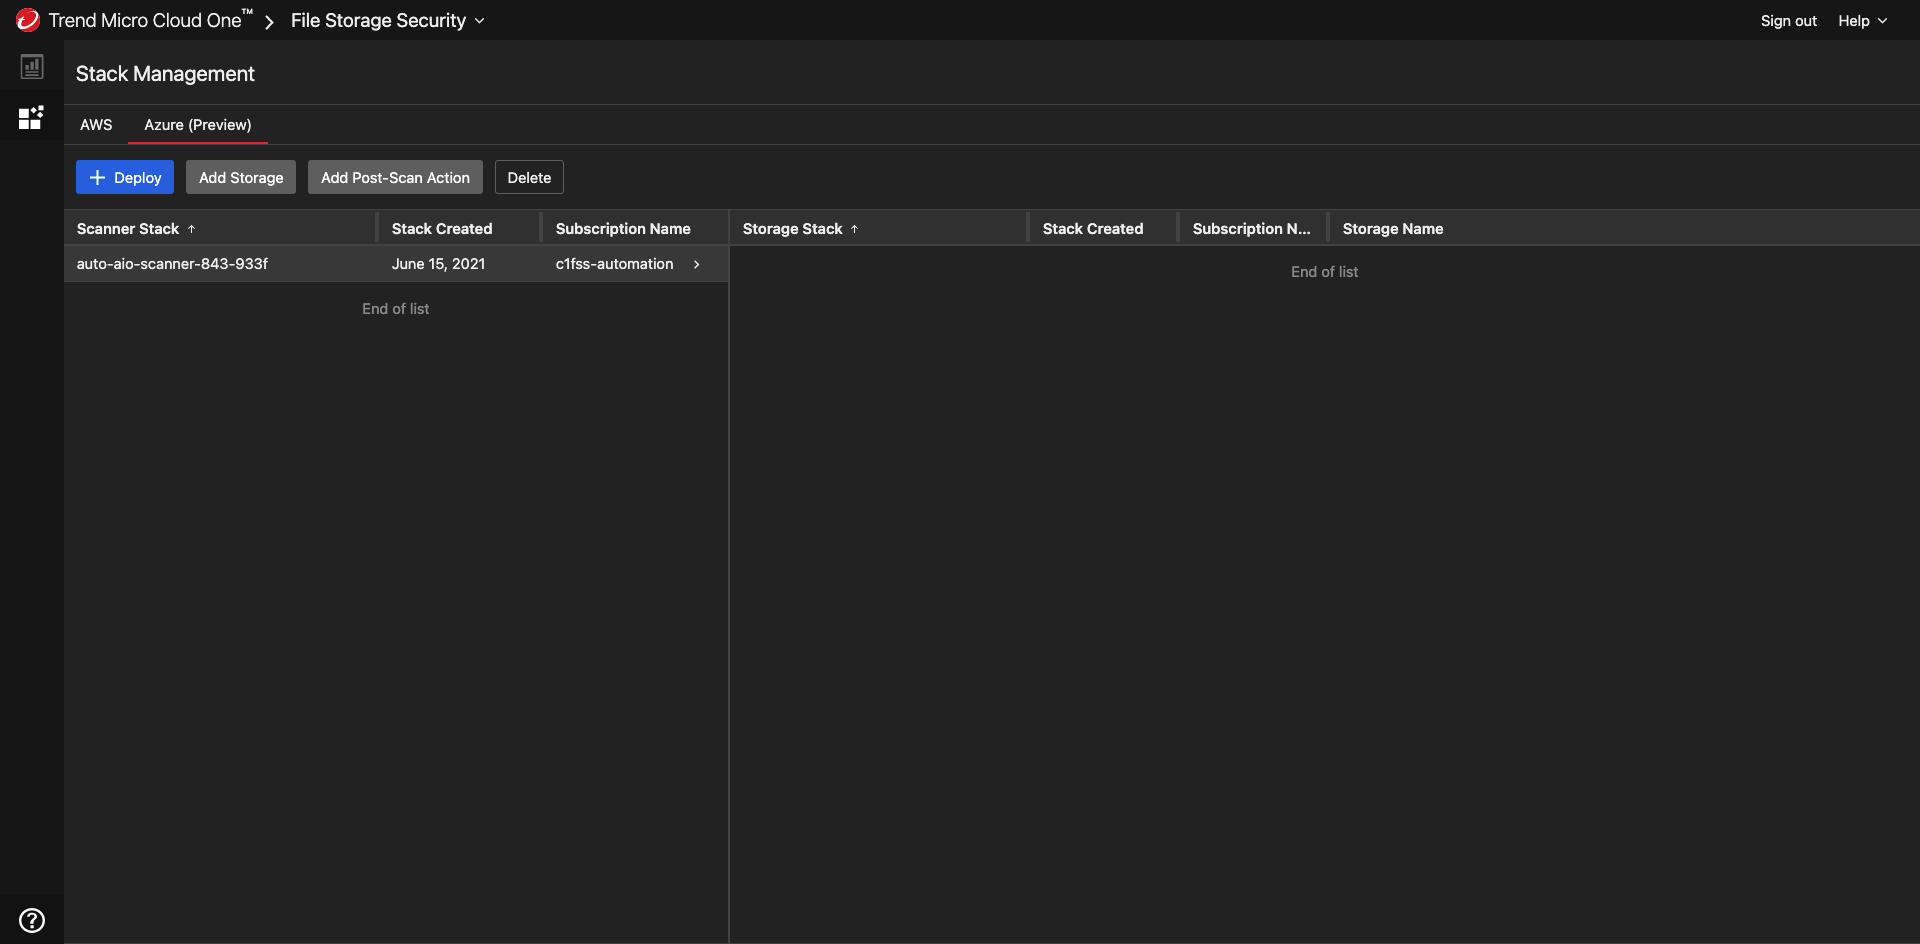
- Sign in to File Storage Security, then select the Stack Management page.
- Select the Azure tab.
-
Select Deploy.
The Deploy dialog box appears.
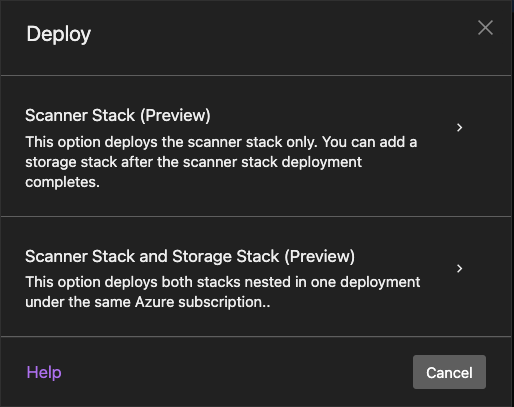
-
Select Scanner Stack.
The Deploy Scanner Stack dialog box appears.
-
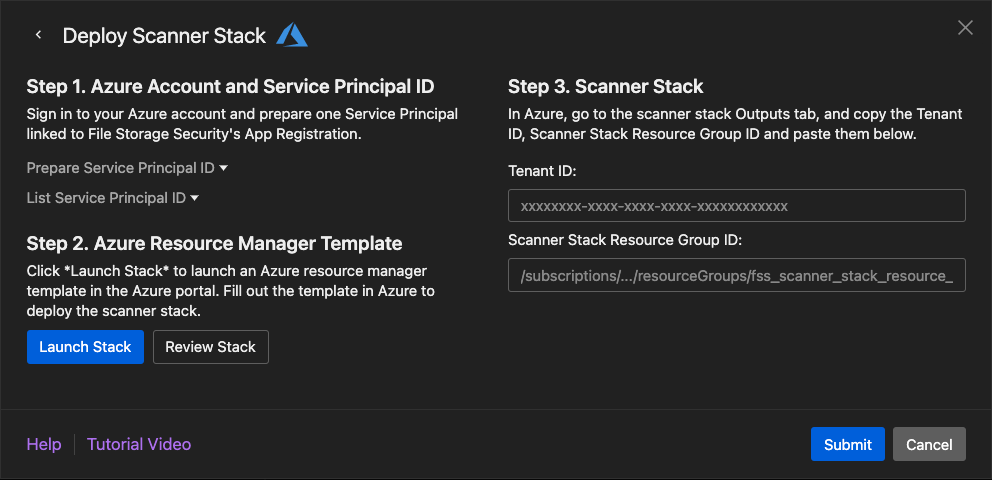
On the Deploy Scanner Stack dialog box:
- For Step 1:
- Make sure you're signed in to your Microsoft Entra ID on Azure portal. Retrieve the Service Principal ID by executing the List Service Principal ID Azure CLI command. If the service principal does not exist, create the service principal by executing the Prepare Service Principal ID Azure CLI command. To deploy the stack in Azure, you must use the Service Principal linked to File Storage Security's App Registration. For details on creating the service principal, see the Prepare Azure Service Principal
- For Step 2:
- (Optional) Select Review Stack to view the contents of the scanner stack before launching it.
- Select Launch Stack.
You are redirected to the Azure Custom deployment page.
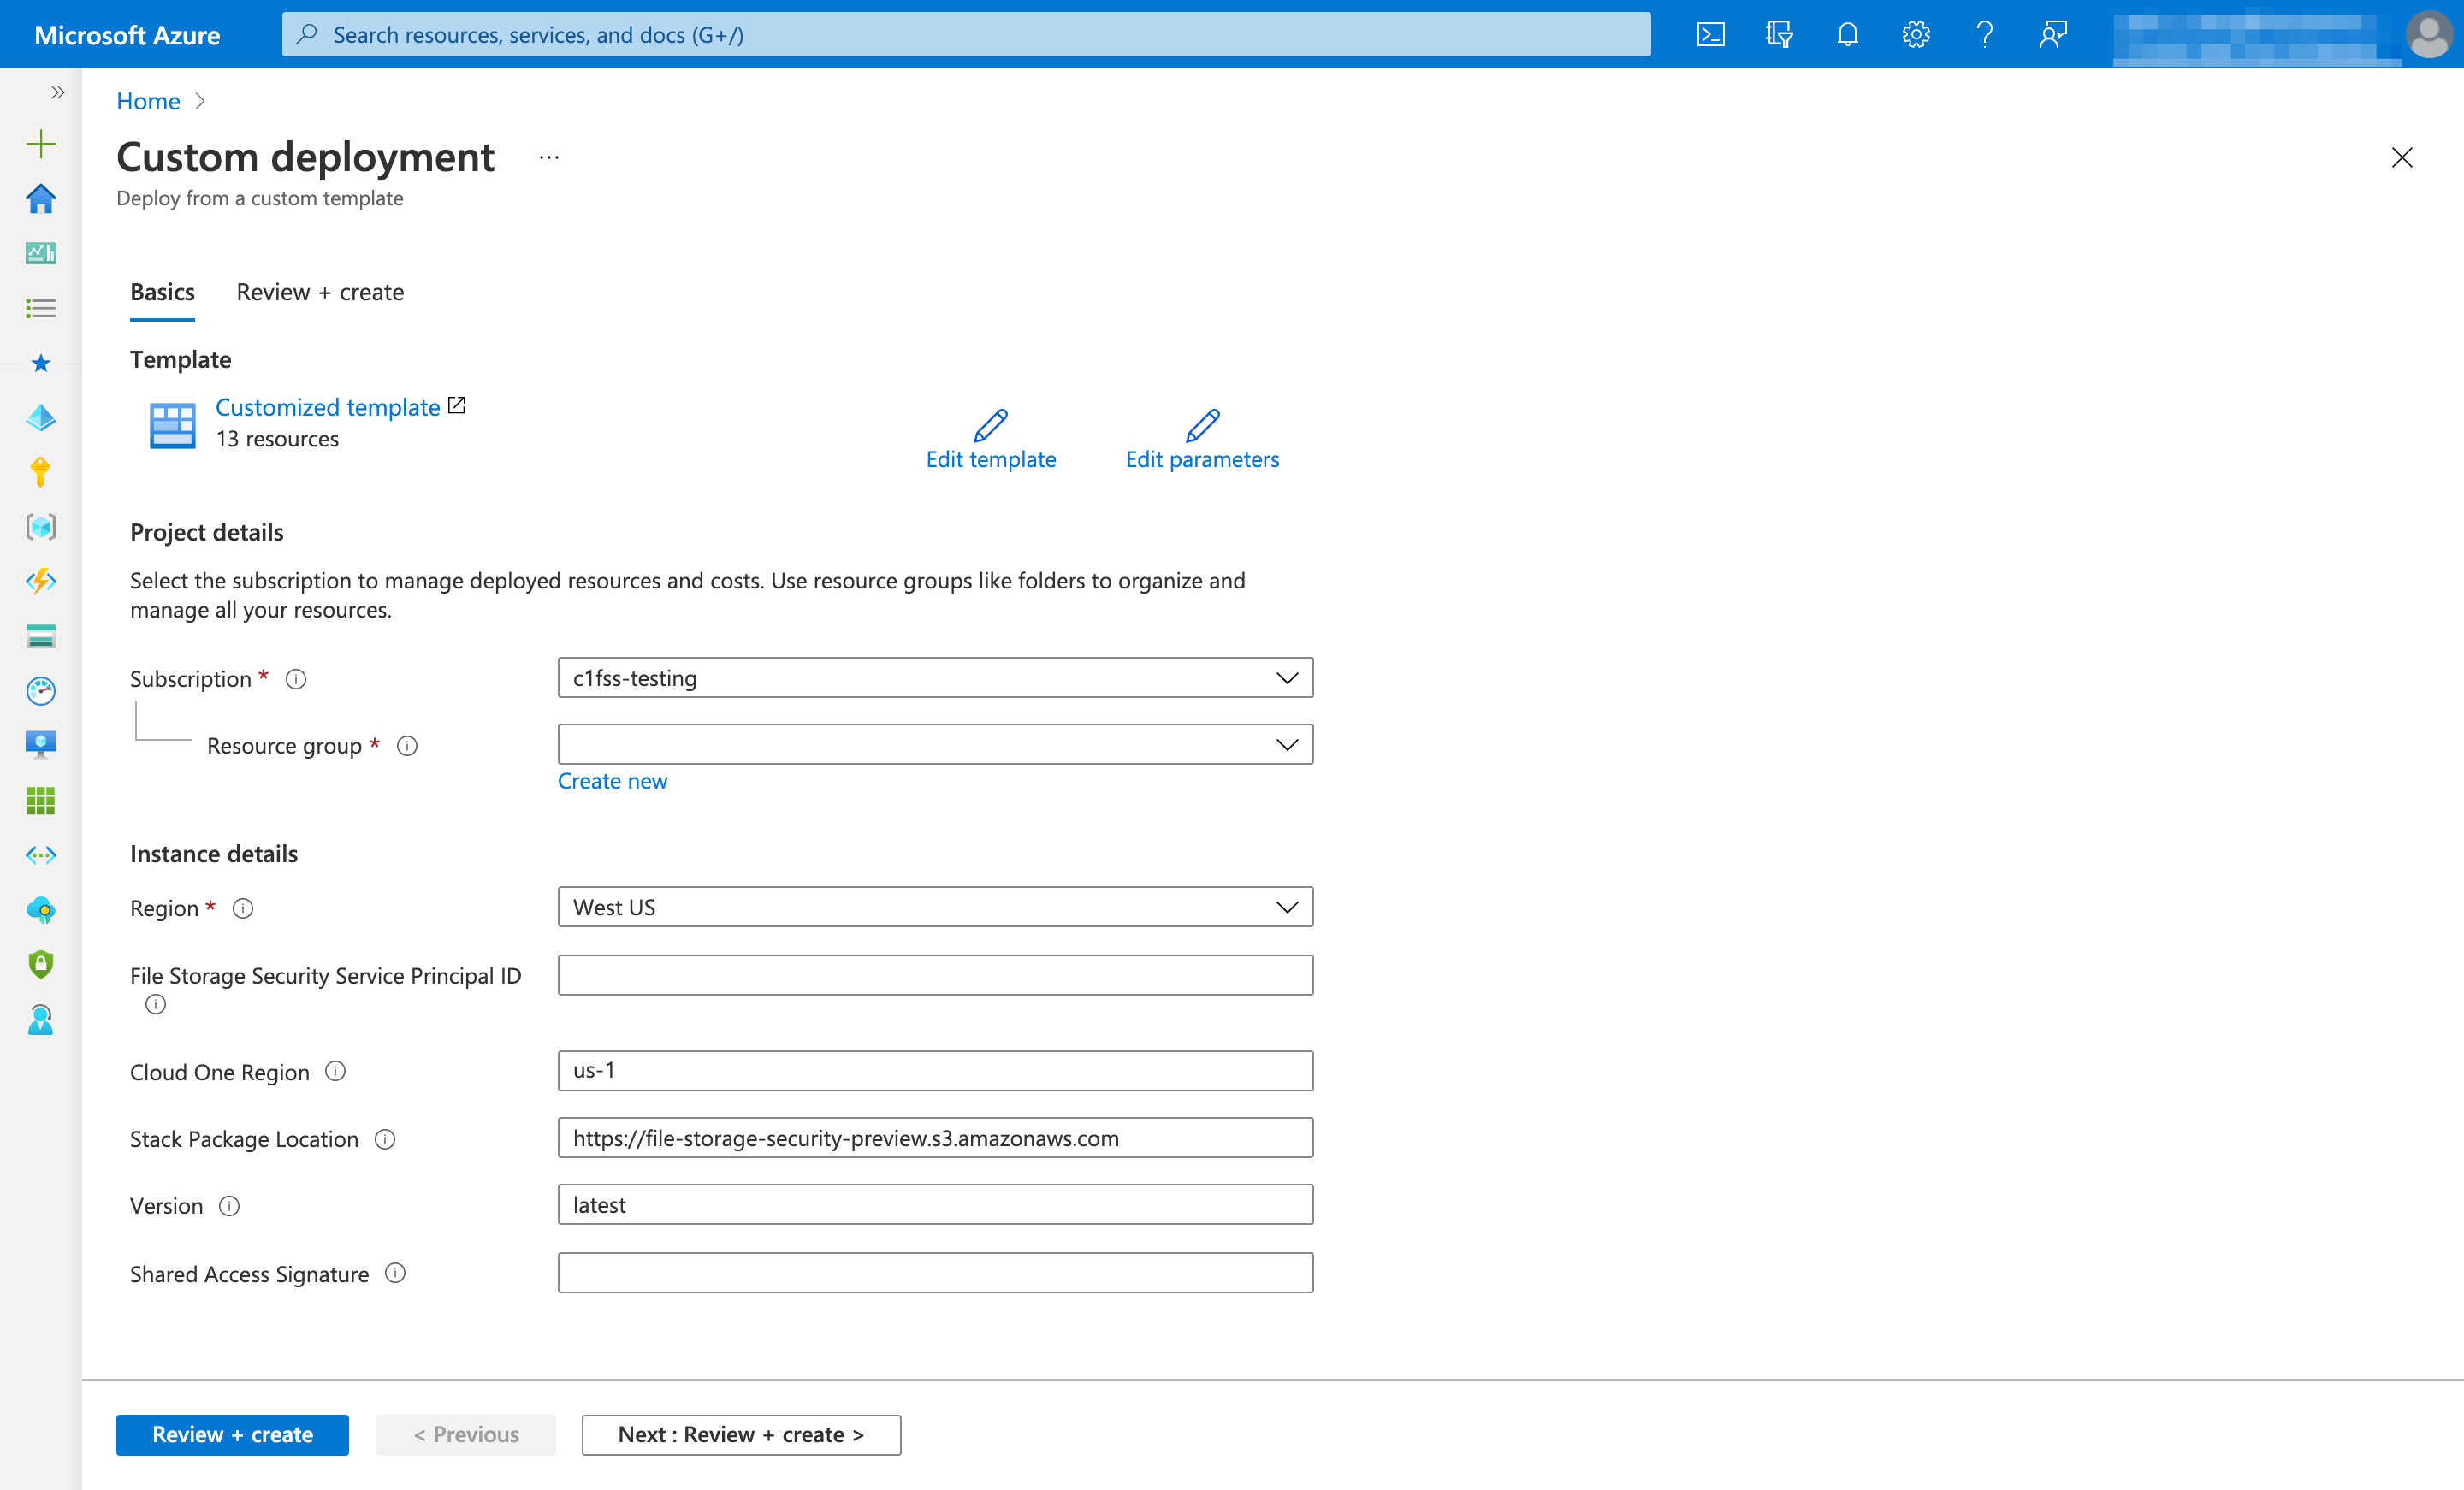
- For Step 1:
-
Fill out the Custom deployment page as follows:
- Subscription: Specify the subscription to which to deploy the stack.
- Resource group: Select the name of the scanner stack from the dropdown list. If the desired resource group does not exist, click Create new to create one.
Example:
Scanner-TM-FileStorageSecurity. - Region: Select the Azure region where you want to deploy the scanner stack. The region must be supported by File Storage Security. For details, see What regions are supported?
-
File Storage Security Service Principal ID: Specify the service principal ID retrieved in Step 1. You'll be granting this service principal permission to manage your scanner stack. More specifically, this service principal has permission to:
- Obtain the storage and scanner stacks' function logs.
- Update the functions and license in the stacks.
- Send some of your organization's data to File Storage Security backend service. For details on the data we collect, see our Data collection disclosure.
-
Cloud One Region: Specify the region to which the scanner and storage stacks will connect to for Cloud One services such as the File Storage Security console, event management services, and telemetry services. For more information, see Cloud One regions.
- Stack Package Location: Leave this field as-is. It is for internal use by File Storage Security.
- Version: Leave this field as-is. It is for versioning.
- Shared Access Signature: Leave this field as-is. It is for accessing Stack Package Location when it resides in Azure storage account.
- Select Review + create.
- Confirm the information are correct and select Create.
-
Wait while the stacks are installed. This could take several minutes. You'll know when everything is installed when you see Your deployment is complete message for the File Storage Security scanner stacks.
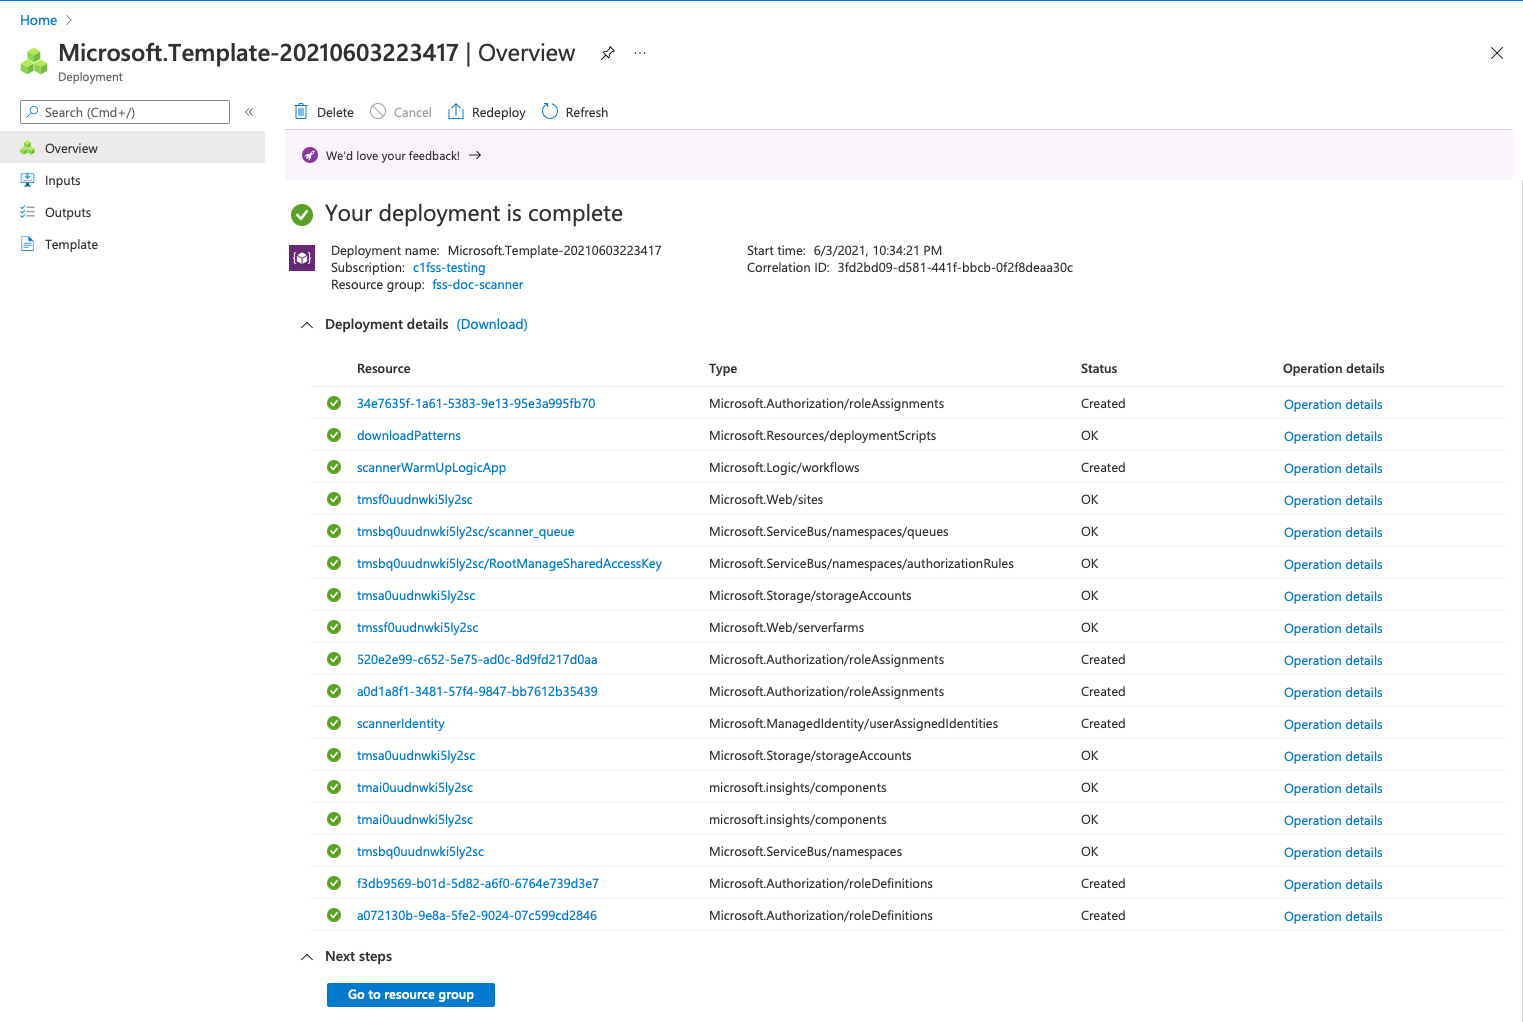
You have now installed the scanner stack. You are now ready to configure the Tenant ID and Resource Group ID.
Step 2: Configure the scanner stack's Tenant ID and Resource ID
You must configure the scanner stack's Tenant ID and Resource Group ID in the File Storage Security console.
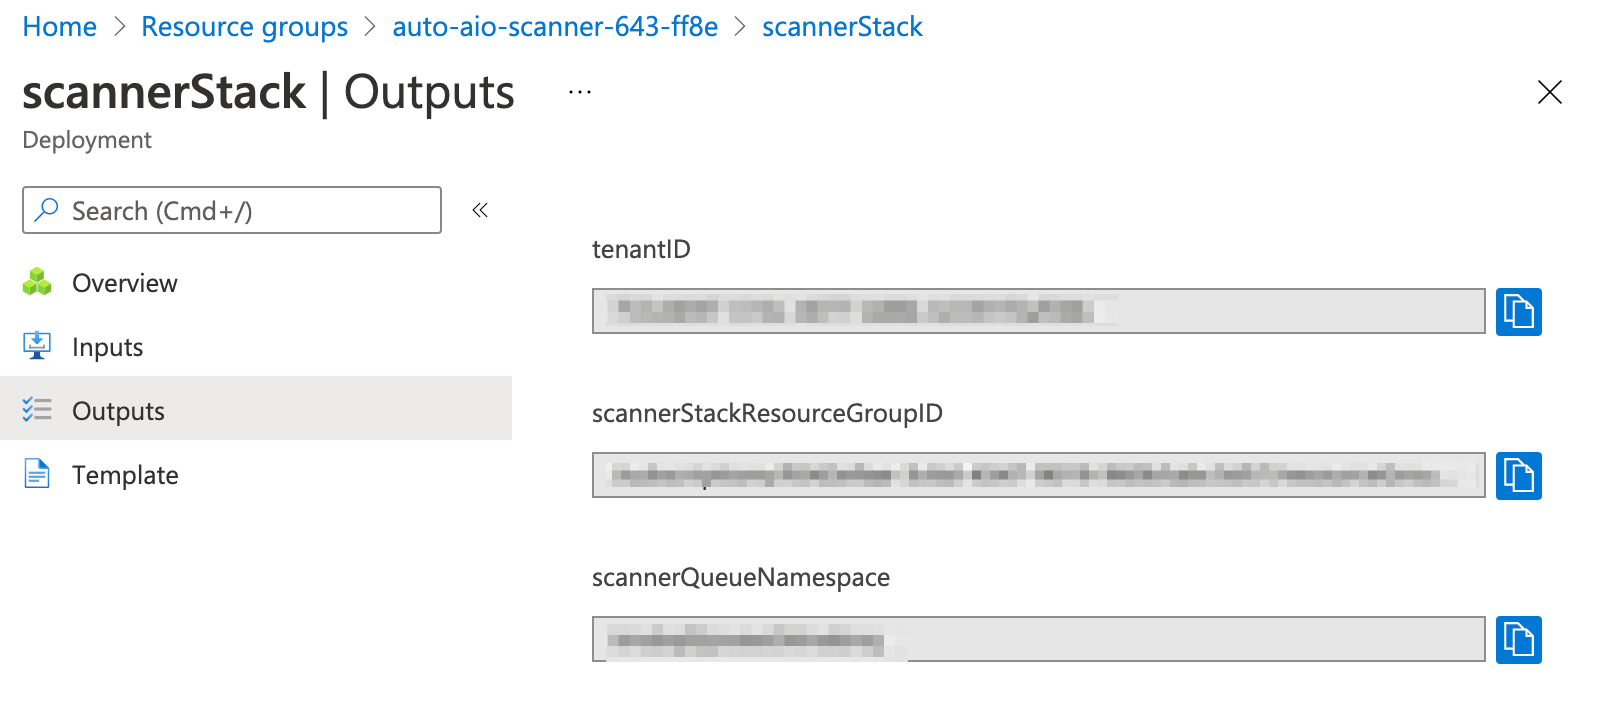
- In Azure Portal, go to Resource groups > your scanner stack > Deployments > your scanner stack deployment, if you're not there already.
-
In the left menu pane, select the Outputs tab.
-
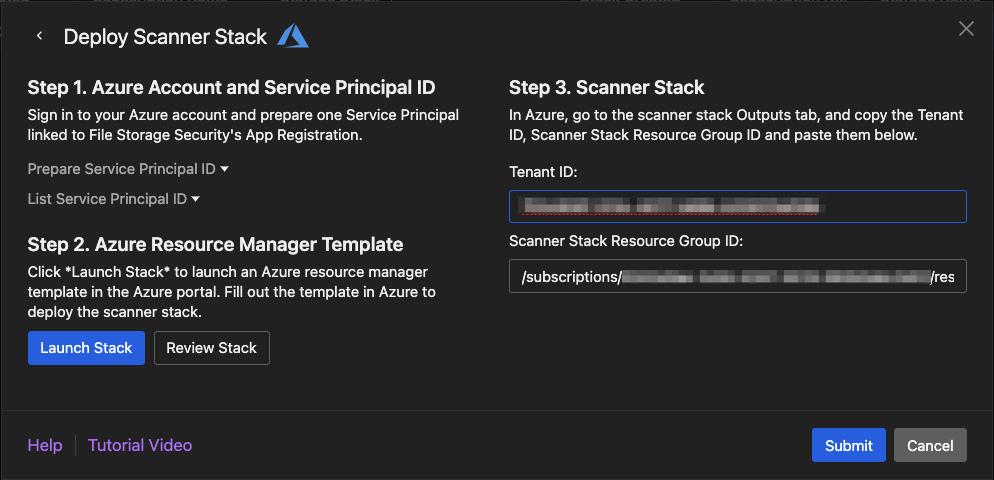
Copy and paste the tenantID and scannerStackResourceGroupID value into the File Storage Security console.
If the dialog box is not visible, select Deploy > Scanner Stack again to see it.
-
Select Submit.
You have now specified the scanner stack's Tenant ID and Resource Group ID.
Next steps (add storage)
At this point, the scanner stack is fully installed, but is not associated with any storage stacks, so no scanning will take place. To associate the scanner stack with a storage stack and get scanning working, you'll need to add a storage stack.
Add a storage stack
To add a storage stack, read these sections:
- Multi-stack architecture
- Step 1: Add the storage stack
- Step 2: Configure the storage stack's Tenant ID and Resource Group ID
- Step 3: Test the storage stack installation
Multi-stack architecture
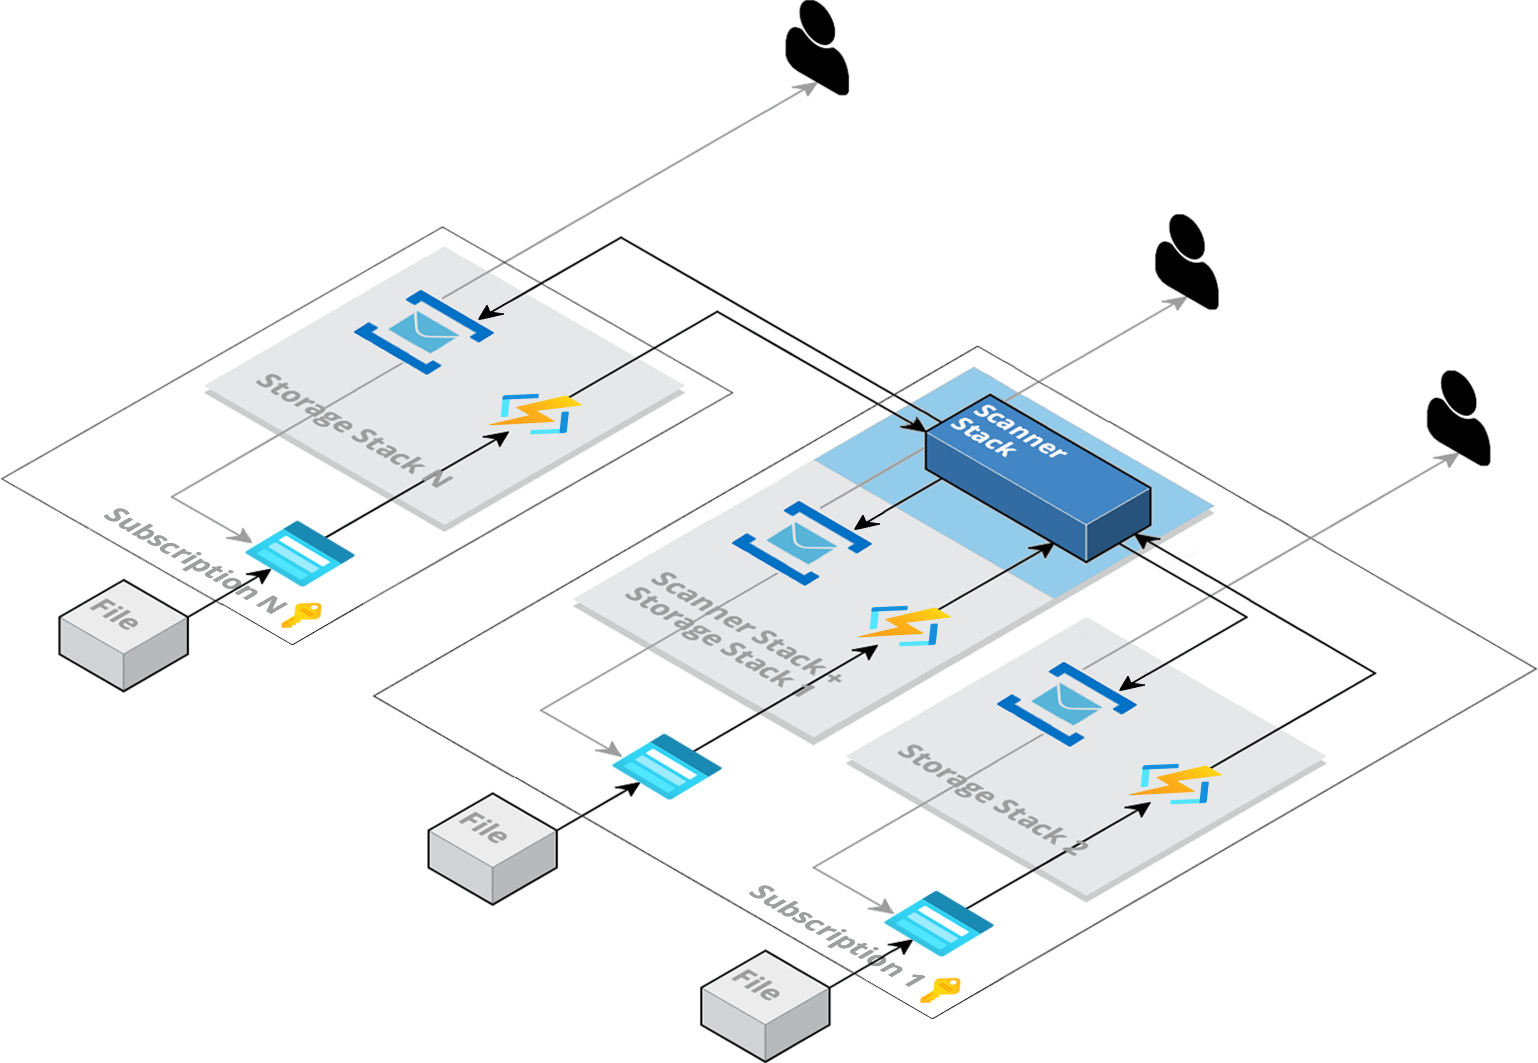
The illustration below shows a typical multi-stack architecture. You can see that there are multiple storage stacks spread across several Azure subscriptions, all connected to the same scanner.
Because all scanning is completed within a single Azure subscription, security activities such as audits and configurations are more manageable.
Step 1: Add the storage stack
After reviewing the multi-stack architecture, you are ready to add the storage stack. Follow the instructions below.
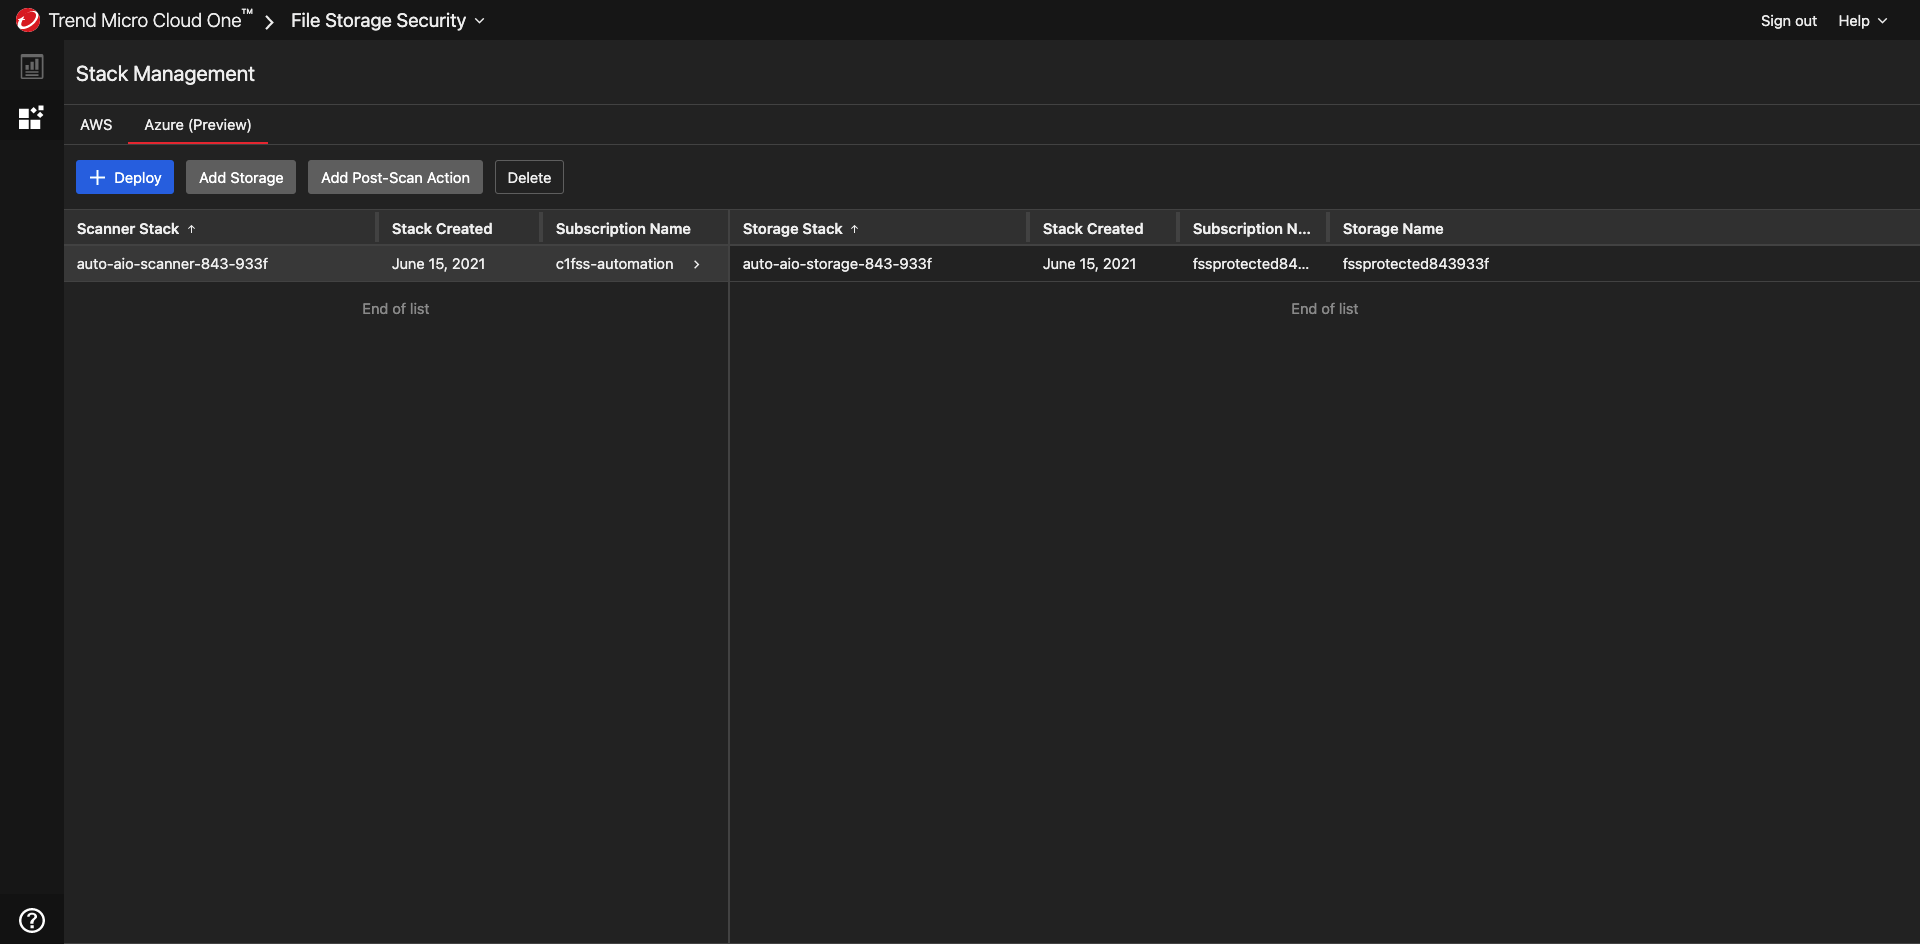
- Sign in to File Storage Security, then select the Stack Management page.
- Select the Azure tab.
-
On the left, select the scanner stack to associate with the new storage stack.
-
Select Add Storage.
The Add Storage dialog box appears.
-
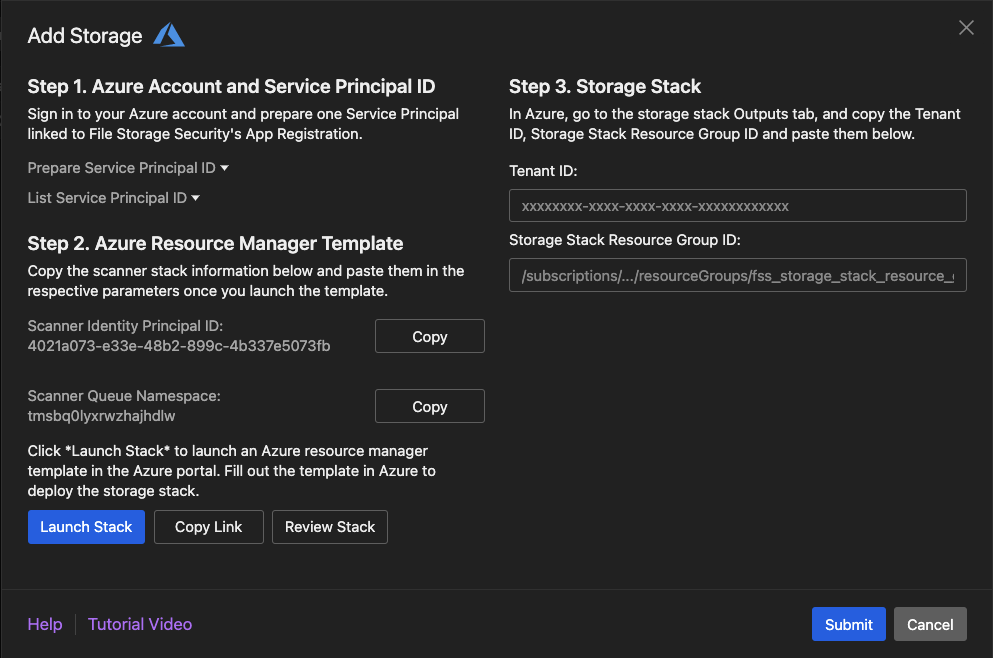
On the Add Storage dialog box:
- For Step 1:
- Make sure you are signed in to the Microsoft Entra ID where you want to install the storage stack.
- For Step 2:
- (Optional) Select Review Stack to view the contents of the storage stack before launching it.
- (Optional) Select Copy Link to obtain a link to the storage stack's Azure Resource Manager template in Azure. You can share this link with others who need an additional storage stack either under the same Azure subscription or a different subscription.
- Select Launch Stack.
You are redirected to the Azure Custom deployment page.
- For Step 1:
-
Fill out the Custom deployment page as follows:
- Subscription: Specify the subscription to which to deploy the stack.
- Resource group: Select the name of the storage stack from the dropdown list. If the desired resource group does not exist, click Create new to create one.
Example:
FSSStorage2 - Region: Select the Azure region where you want to deploy the scanner stack. The region must be supported by File Storage Security. For details, see What regions are supported?
-
File Storage Security Service Principal ID: Specify the service principal ID retrieved in Step 1. You'll be granting this service principal permission to manage your scanner stack. More specifically, this service principal has permission to:
- Obtain the storage and scanner stacks' function logs.
- Update the functions and license in the stacks.
- Send some of your organization's data to File Storage Security backend service. For details on the data we collect, see our Data collection disclosure.
-
Cloud One Region: Specify the region to which the scanner and storage stacks will connect to for Cloud One services such as the File Storage Security console, event management services, and telemetry services. For more information, see Cloud One regions.
- Scanner Identity Principal ID: Copy the value of
Scanner Identity Principal IDon the Add Storage dialog box and paste the value in the field. - Scanner Queue Namespace: Copy the value of
Scanner Queue Namespaceon the Add Storage dialog box and paste the value in the field. -
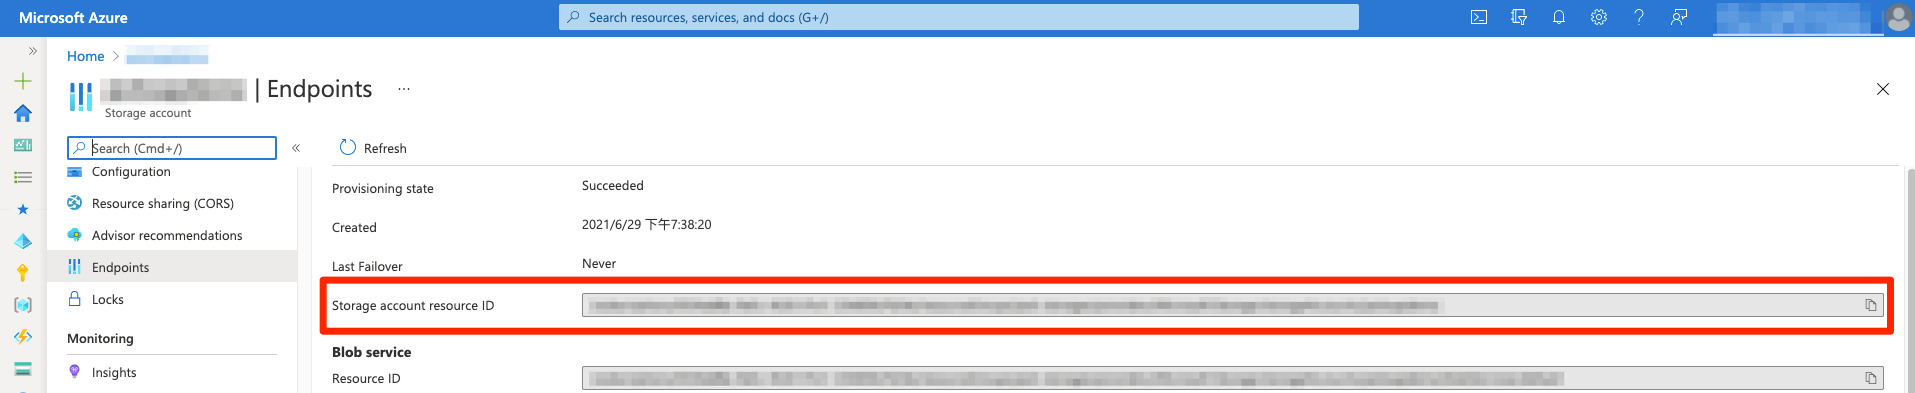
Blob Storage Account Resource ID: Specify the resource ID of your protecting storage account. You can only specify one storage account. For supported storage account types, see What services are supported?. Example:
/subscriptions/1234abcd-3c6d-4347-9019-123456789012/resourceGroups/storage-resource-group/providers/Microsoft.Storage/storageAccounts/protectingstorageaccountThe storage account resource ID can be found in Endpoints tab of the storage account's page.
-
Blob System Topic Exist: Select Yes if the system topic of the protecting storage account is already created. Select No to deploy a new system topic.
- Blob System Topic Name: The existing system topic name or the name of system topic to be created.
- Update Scan Result To Blob Metadata: Select Yes to update the blob metadata and index tag with the scan result. Select No to update only the blob index tag. If you are using premium block blob storage account that doesn't support index tags, we suggest that you select Yes to see the scan results on blob metadata.
- Report Object Key: Select Yes to report the object keys of the scanned objects to File Storage Security backend services. File Storage Security can then display the object keys of the malicious objects in the response of events API.
- Stack Package Location: Leave this field as-is. It is for internal use by File Storage Security.
- Version: Leave this field as-is. It is for versioning.
- Shared Access Signature: Leave this field as-is. It is for accessing Stack Package Location when it resides in Azure storage account.
- Select Review + create.
- Confirm the information are correct and select Create.
-
Wait while the stacks are installed . This could take several minutes. You'll know when everything is installed when you see Your deployment is complete messages for the File Storage Security stacks.
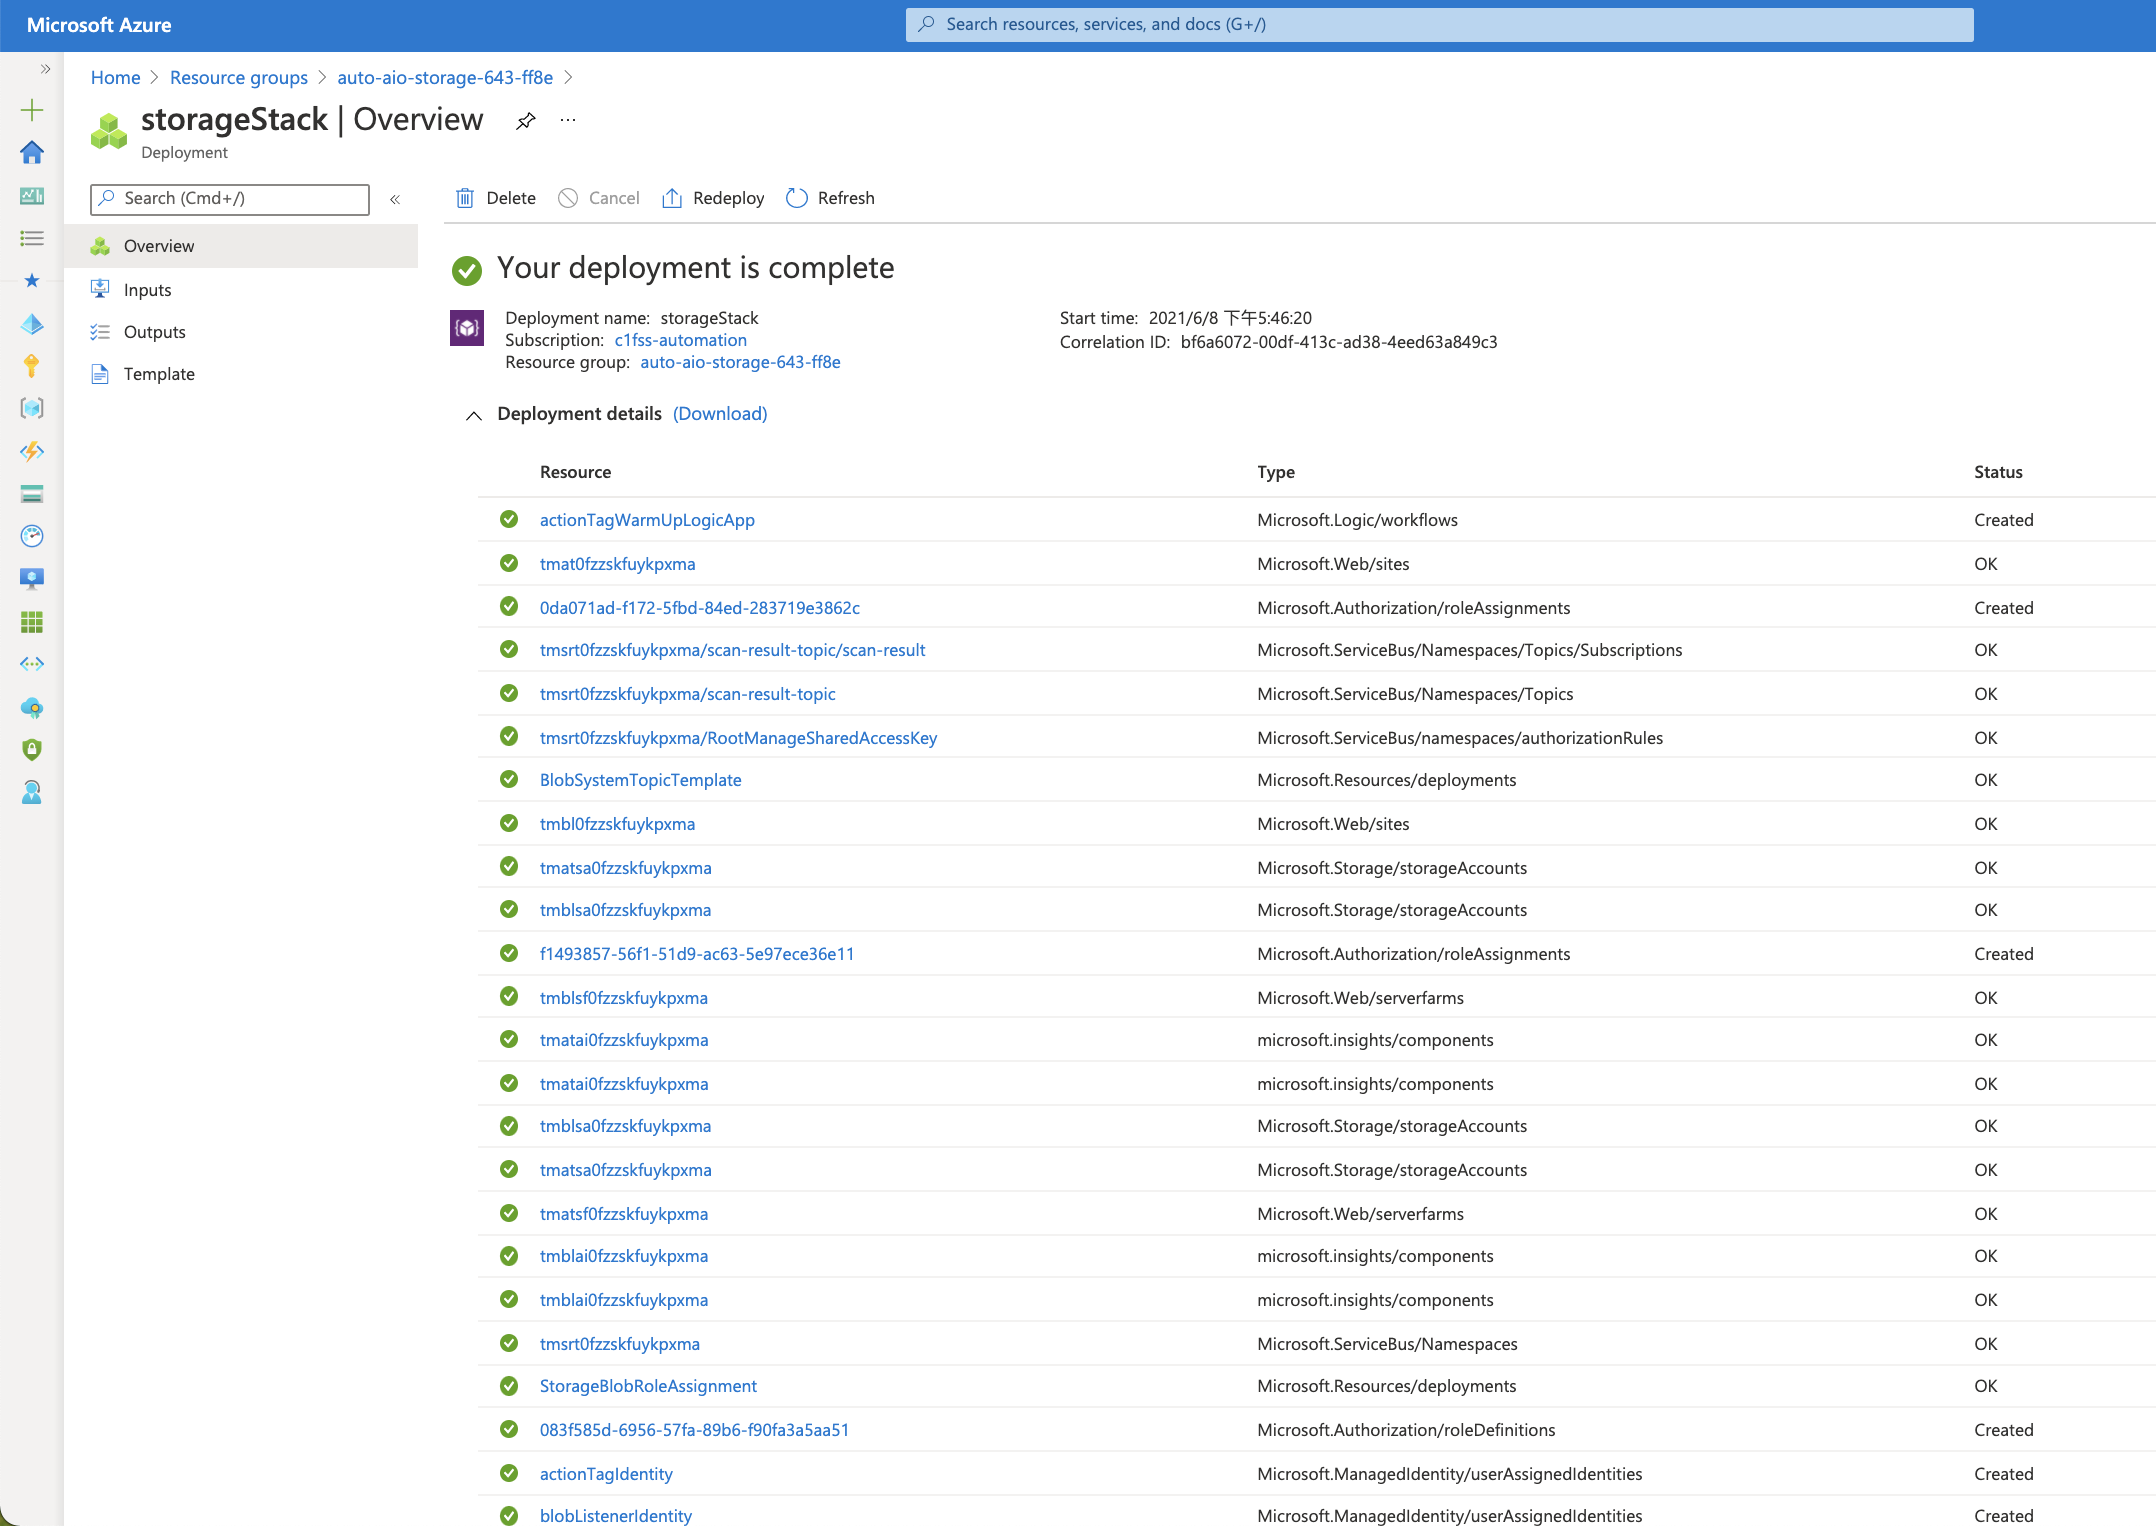
You have now installed the storage stack. You are now ready to configure the Tenant ID and Resource Group ID.
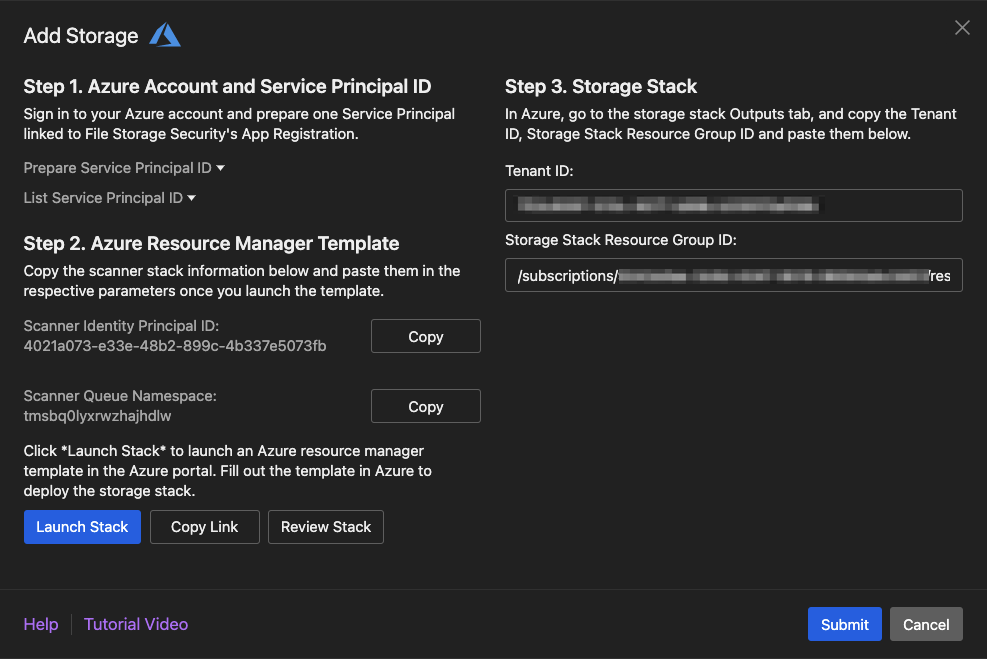
Step 2: Configure the storage stack's Tenant ID and Resource Group ID
You must configure the storage stack's Tenant ID and Resource Group ID in the File Storage Security console. The Resource Group ID ties the storage stack to its designated scanner stack.
- In Azure Portal, go to Resource groups > your storage stack > Deployments > your storage stack deployment, if you're not there already.
-
In the left menu pane, select the Outputs tab.
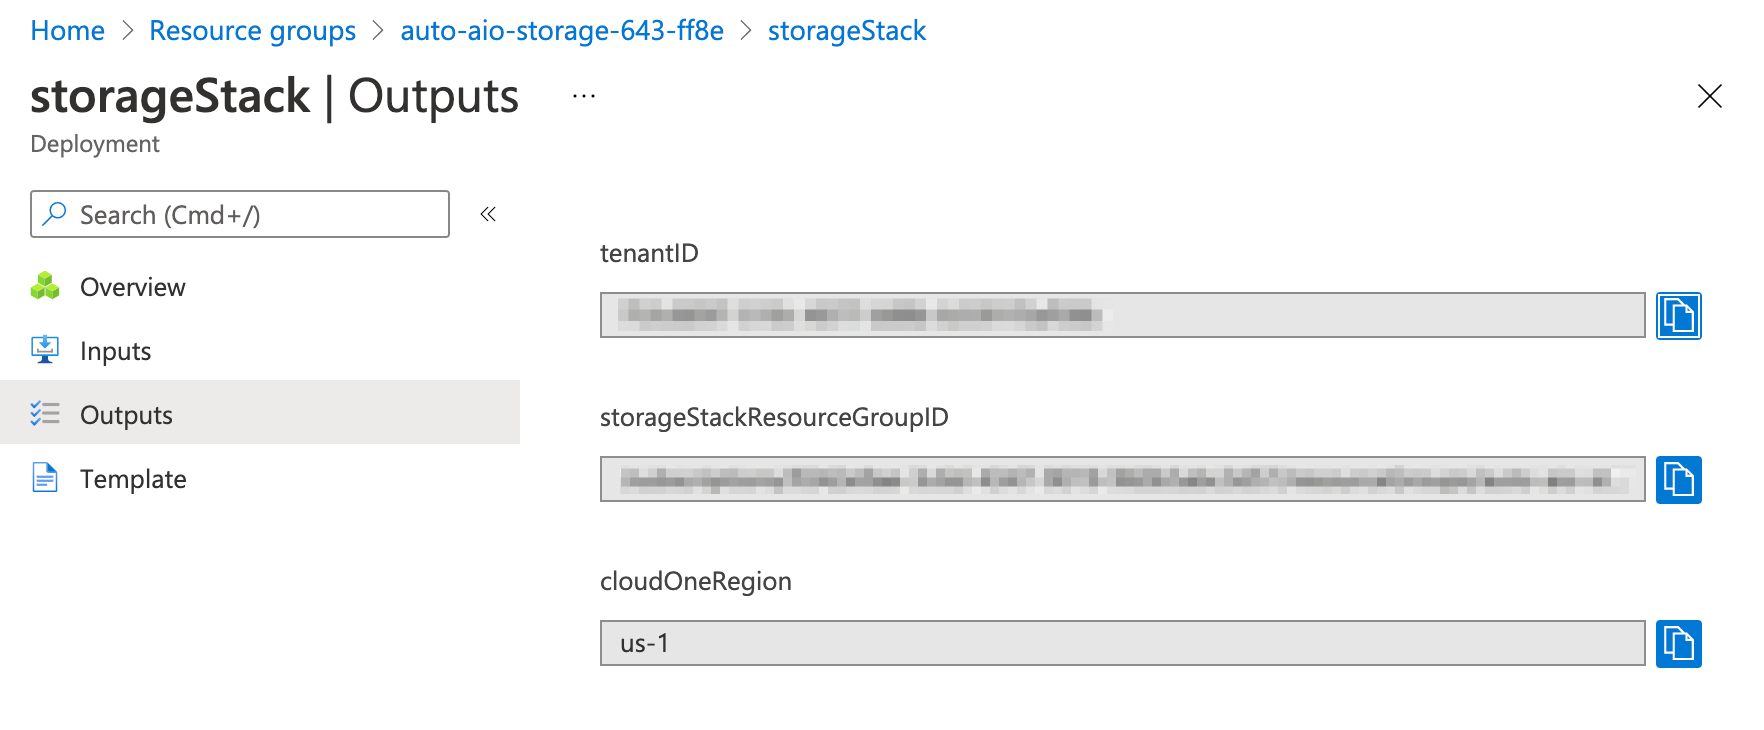
-
Copy and paste the tenantID and storageStackResourceGroupID value into the File Storage Security console.
If the dialog box is not visible, select Add Storage again to see it.
-
Select Submit.
You have now specified the storage stack's Tenant ID and Resource Group ID. The scanner stack is now aware of the storage stack. You are now ready to test the storage stack installation.
Step 3: Test the storage stack installation
To test the storage stack installation, you'll need to generate a malware detection by adding the eicar file to the storage account to scan. For details, see Generate your first detection.