Topics on this page
Add GCP stacks
After deploying File Storage Security, you might want to add more stacks.
Topics:
How many stacks should I add?
Storage stacks
You'll need one storage stack per Protecting bucket.
There is no limit to the number of storage stacks you can add, but keep in mind that costs will go up as the number of stacks increases. If you have a lot of files to scan that are spread across many storage accounts, consider deploying just one storage stack, and transferring files into its associated storage account to scan and then back out after scanning. We provide a sample Google Cloud Function that automates some of this work. See Post-Scan Action: Promote or Quarantine on GitHub for details.
The number of storage stacks you deploy will not affect performance, so deploy as many or as few as you want.
Scanner stacks
Typically, you'll only need one scanner stack for your entire deployment regardless of size. This is because the scanner stack auto-scales to handle increases in load. (For details on performance, see How long do scans take?)
Where can I add stacks?
Unless otherwise noted, you can add stacks anywhere in GCP in separate GCP regions.
How Terraform deploys the stacks under your GCP project
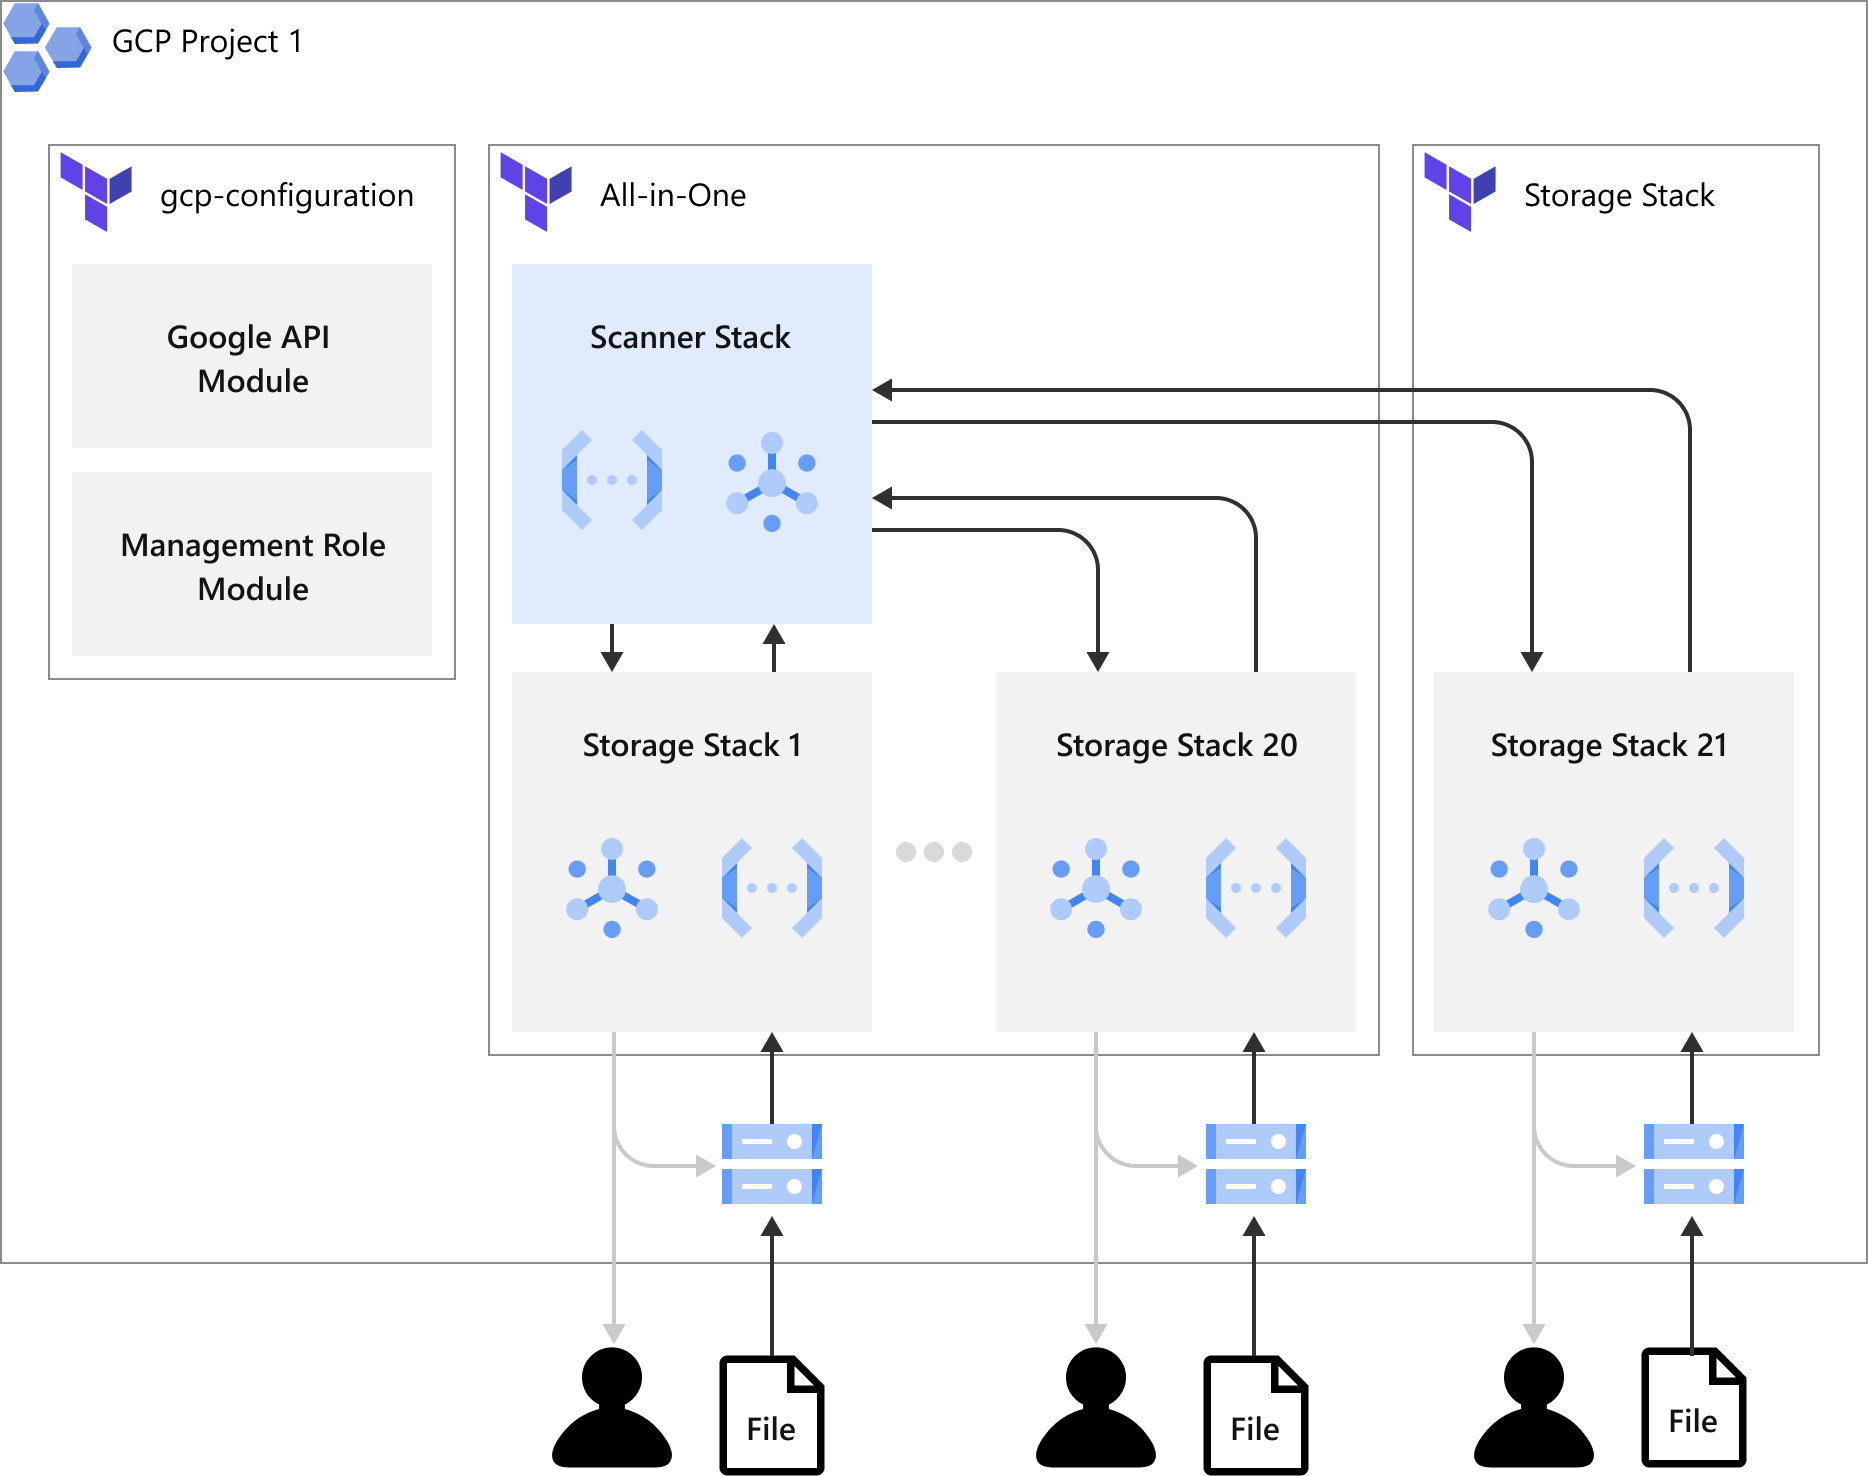
All-in-One Stack Deployment
The illustration below shows how the All-in-One stack is being deployed by Terraform in your GCP project. You would need to apply a GCP configuration deployment once to your GCP project and then apply the All-in-One stack deployment. Each All-in-One stack deployment can have 5 scanner stacks and 20 storage stacks. If the number of stacks exceeds the limit, you would need to create another stack deployment to extend the number of stacks.
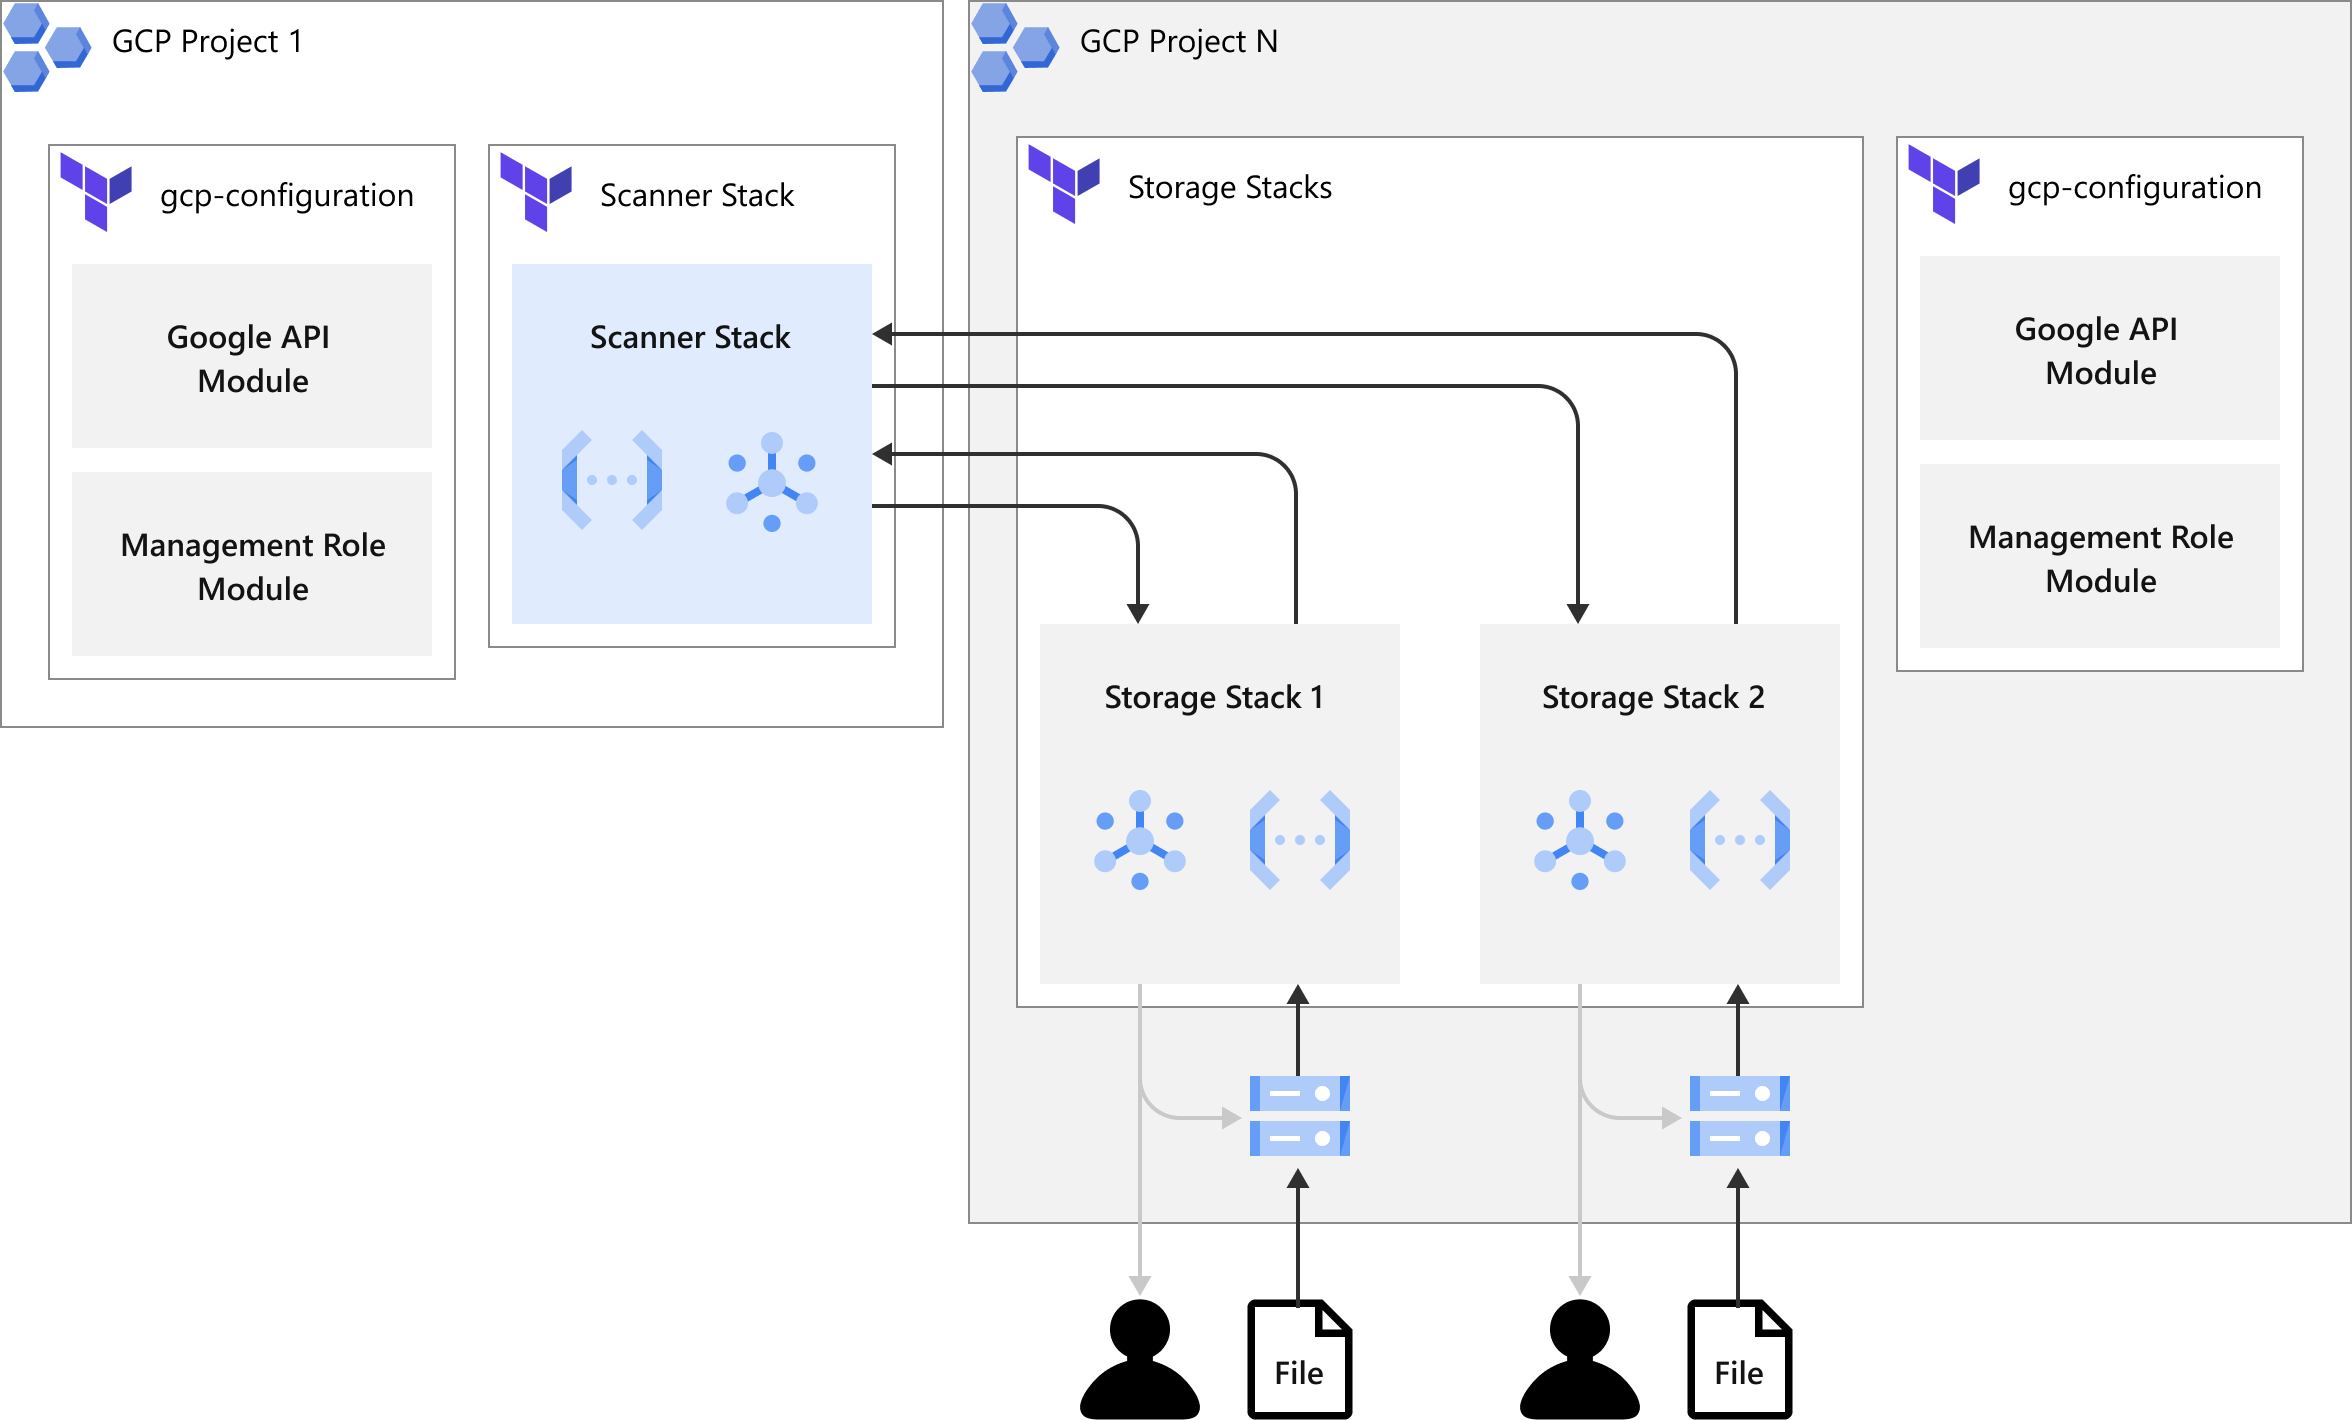
Stack Deployment Cross GCP Projects
The illustration below shows how the stacks is being deployed by Terraform in cross GCP project scenarios. You only need to apply a GCP configuration deployment once in each GCP project and then apply the scanner stack and the storage stack deployment separately. Each scanner stack deployment can have 20 scanner stacks. Each storage stack deployment can have 20 storage stacks. If the number of stacks exceeds the limit, you need to create another stack deployment to extend the number of stacks.
Add an all-in-one stack
For information on deploying a scanner and storage stack, see Deploy scanner and storage stacks on GCP.
Add a scanner stack
Although you can deploy a scanner stack separately, we recommend that you deploy a scanner stack in conjunction with a storage stack.
Add the scanner stack following the instructions below.
-
In the File Storage Security console, go to Stack Management > GCP (Terraform), then select Deploy.
-
To deploy the stacks, select Scanner Stack.
The Deploy Scanner Stack dialog box opens. -
Make sure you're signed in to your GCP account.
The GCP account must be connected in the Cloud One Cloud Provider Account list first. See Connect GCP account to Trend Micro Cloud One.
-
Retrieve your Service Account:
- Type in the GCP project ID.
- Click Get.
Paste this information in the managementServiceAccountProjectID and managementServiceAccountID variables of the Terraform deployment when you launch the stack.
-
Configure and run the Terraform deployment:
-
Click Launch Stack to launch the Terraform deployment in the GCP Cloud Shell.
-
Click the Trust Repo check box to select it..
-
Set up your project:
- Under Project setup, select the project from the drop-down list.
- Execute the script in Cloud Shell.
If you do not have a project ID, you need to create one:
- Under Project setup, click create a new one.
- Create the project.
- Under Project setup, select the project from the drop-down list.
- Execute the script in Cloud Shell.
-
Enable permissions for deployment:
You need to apply the settings and create the custom roles in the project before File Storage Security stack deployment. You only need to apply once on a GCP project for File Storage Security stack deployment:
-
Apply the GCP configuration deployment:
Enable all the needed APIs and create the required custom roles by Terraform.
-
Specify the
projectIDinterraform.tfvars.jsonundergcp-configurationfolder. -
Specify the
customRolePrefixinterraform.tfvars.jsonif the prefix of the roles is needed. -
Apply the Terraform template in the Cloud Shell:
terraform -chdir=gcp-configuration init && terraform -chdir=gcp-configuration apply
-
-
-
Configure and deploy the stacks:
Specify the following fields in
terraform.tfvars.jsonunder thescannersfolder and apply the Terraform template in the Cloud Shell.There could be multiple stacks in the JSON object
scannerStacks. There is a limit of 20 storage stacks per Terraform deployment. Please create another workspace in Terraform to separate the deployment if the number of stacks exceeds the limit.Terraform Input Variables:
- projectID: Specify the project for this deployment.
- functionAutoUpdate: Enable or disable automatic remote code update. The default value is
true. Allow values:true,false. - customRolePrefix: Specify the prefix of the custom roles if needed.
Scanner stack:
- <SCANNER_STACK_NAME>: Specify the name of the scanner stack. The name, as a resource prefix, must be less than 17 characters. Replace the key with the scanner stack name.
- region: Specify the region for the scanner stack. For the list of supported GCP regions, please see Supported GCP Regions.
- managementServiceAccountProjectID: Copy and paste the service account project ID from the File Storage Security console.
- managementServiceAccountID: Copy and paste the service account information from the File Storage Security console.
-
Initialize and deploy in the Cloud Shell
terraform -chdir=scanners init && terraform -chdir=scanners applyPlease save
terraform.tfstateandterraform.tfvars.jsonfor managing the deployment (You will need them for updating and deleting stacks). We recommend that you use remote configuration to keep your tfstate somewhere safe.
-
-
Configure output in the File Storage Security console:
To complete the deployment process, once the stacks are deployed, configure the management role:
- Copy the output content of
scanner_stacks_ouputsfrom the Cloud Shell output of Terraform. - Paste the content into the File Storage Security console.
You can get Terraform output by the command:
terraform output - Copy the output content of
-
Click Submit.
Add a storage stack
You can add additional storage stacks to a scanner stack. You cannot add storage stacks that are not associated with a scanner stack.
If you have already deployed an All-in-One stack in a GCP project and want to keep your scanner and storage stacks in the same project, please add the storage's JSON object to your All-in-One's terraform.tfvars.json for managing the stacks in a single Terraform deployment.
To deploy your scanner and storage in separate GCP projects, use the following deployment.
Add the storage stack:
-
In the File Storage Security console, go to Stack Management > GCP (Terraform), then select Deploy.
-
Select the scanner stack that you want to use.
-
Select Add Storage.
The Add Storage Stack dialog box opens. -
Make sure you're signed in to your GCP account.
-
Retrieve your Service Account:
- Type in the GCP project ID.
- Click Get.
Paste this information in the managementServiceAccountProjectID and managementServiceAccountID variables of the Terraform deployment when you launch the stack.
-
Configure and run the Terraform deployment:
-
Click Launch Stack to launch the Terraform deployment in the GCP Cloud Shell.
-
Click the Trust repo checkbox to select it.
-
Set up your project:
- Under Project setup, select the project from the drop-down list.
- Execute the script in Cloud Shell.
If you do not have a project ID, you need to create one:
- Under Project setup, click create a new one.
- Create the project.
- Under Project setup, select the project from the drop-down list.
- Execute the script in Cloud Shell.
-
Enable permissions for deployment:
You need to apply the settings and create the custom roles in the project before File Storage Security stack deployment. You only need to apply once on a GCP project for File Storage Security stack deployment:
-
Apply the GCP configuration deployment:
Enable all the needed APIs and create the required custom roles by Terraform. - Specify the GCP project ID in
terraform.tfvars.jsonunder thegcp-configurationfolder.-
Specify the
customRolePrefixinterraform.tfvars.jsonif the prefix of the roles is needed. -
Apply the Terraform template in the Cloud Shell:
terraform -chdir=gcp-configuration init && terraform -chdir=gcp-configuration apply
-
-
-
Configure and deploy the stacks:
Specify the following fields in
terraform.tfvars.jsonunder thestoragesfolder and apply the Terraform template in the Cloud Shell.There could be multiple stacks in the JSON object
storageStacks. There is a limit of 20 storage stacks per Terraform deployment. Please create another workspace in Terraform to separate the deployment if the number of stacks number exceeds the limit.Terraform Input Variables:
- projectID: Specify the project for this deployment.
- functionAutoUpdate: Enable or disable automatic remote code update. The default value is
true. Allow values:true,false. - customRolePrefix: Specify the prefix of the custom roles if needed.
Storage stack:
- <STORAGE_STACK_NAME>: Specify the name of the storage stack. The name, as a resource prefix, must be less than 17 characters. Replace the key with the storage stack name.
- scanner: Specify the name of the scanner stack.
- scanningBucketName: Specify the existing bucket name that you wish to protect.
- region: Specify the region of the storage stack. For the list of supported GCP regions, please see Supported GCP Regions.
- managementServiceAccountProjectID: Copy and paste the service account project ID from the File Storage Security console.
- managementServiceAccountID: Copy and paste the service account ID from the File Storage Security console.
- scannerProjectID: Copy and paste the scanner project ID from the File Storage Security console.
- scannerServiceAccountID: Copy and paste the scanner service account information from the File Storage Security console.
- scannerTopic: Copy and paste the scanner's Pub/Sub topic from the File Storage Security console.
- reportObjectKey: Select
trueto report the object keys of the scanned objects to File Storage Security backend services. File Storage Security can then display the object keys of the malicious objects in the response of events API. Allows valuestrue,false. - objectFilterPrefix: Enter the prefix of the objects you want to scan from the bucket. Enter
''to scan without filters.
-
Initialize and apply the deployment in the Cloud Shell
terraform -chdir=storages init && terraform -chdir=storages apply
Please save
terraform.tfstateandterraform.tfvars.jsonfor managing the deployment (You will need them for updating and deleting stacks). We recommend that you use remote configuration to keep your tfstate somewhere safe. -
-
Configure output in the File Storage Security console:
To complete the deployment process, once the stacks are deployed, configure the management role:
- Copy the output content of
storage_stacks_ouputsfrom the Cloud Shell output of Terraform. - Paste the content into the File Storage Security console.
You can get Terraform output by the command:
terraform output - Copy the output content of
-
Click Submit.