Topics on this page
Set up Amazon SNS
Application Security does not support integrating Amazon SNS on AWS GovCloud or in China.
If you have an AWS account, you can take advantage of the Amazon Simple Notification Service (SNS) to publish notifications about Application Security events and deliver them to subscribers. For details about SNS, see https://aws.amazon.com/sns/.
Create a role
- In the Application Security left menu, click
 .
. - Click Add Integration
- Select Amazon SNS.
- Copy the External ID to your clipboard. This ID will be used in step six.
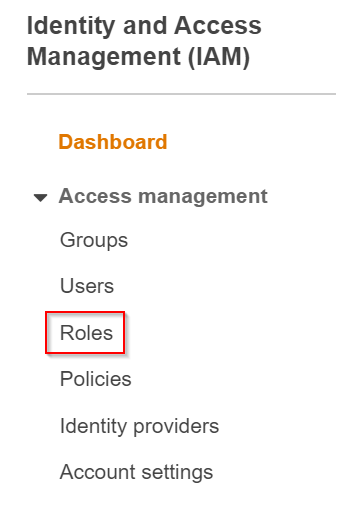
- Go to your AWS console and navigate to the Identity and Access Management (IAM) page.
-
Under Access management, select Roles.
-
Select Create role, then Another AWS account.
- In Account ID, enter: 800880067056.
-
Select Require external ID (Best practice when a third party will assume this role) and paste the ID that you copied above. Make sure you leave Require MFA disabled. Select Next: Permissions when you're finished.

-
Select Create Policy. A new window opens.
-
You can set up a policy through the Visual Editor or JSON
-
To create a policy through the Visual Editor:
- In Choose a Service, select SNS.
-
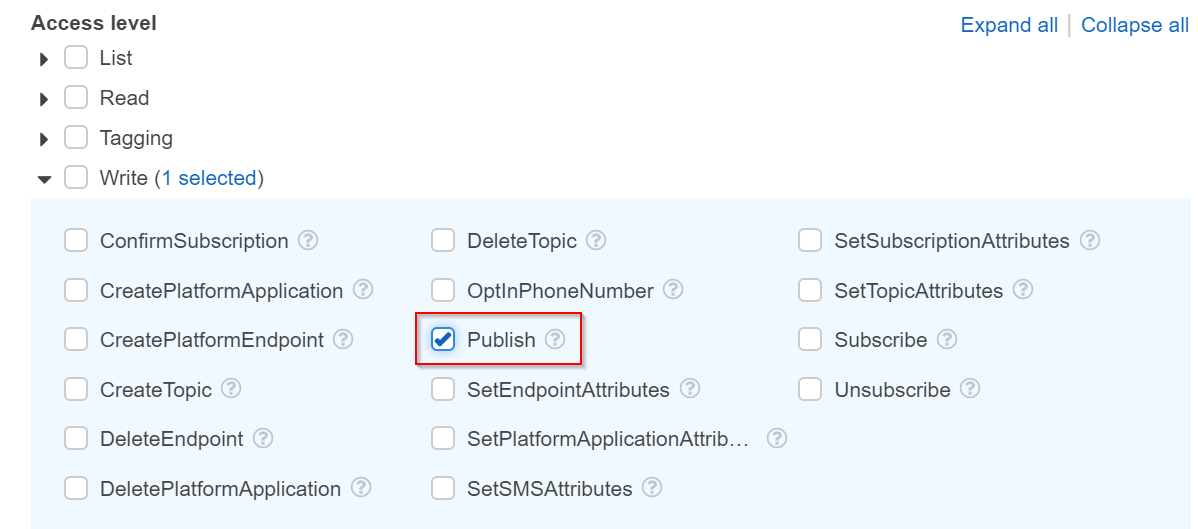
Under Access Level, open the Write section and select Publish.
-
Under Resources, select Specific, then specify the topic resource ARN.
To create a policy through the JSON enter the following, for example:
{
  "Version": "2012-10-17",
  "Statement": [
    {
      "Effect": "Allow",
        "Action": "sns:Publish",
        "Resource": {"Ref": "MySNSTopic"}
    }
  ]
}
-
-
Select Review Policy.
-
Enter a name for the policy, for example CloudOneAppSecAWSIntegrationPolicy, and provide a description. Select Create Policy when you're done.
- Navigate back to the Create role window and refresh the page. Select the policy you created.
- Select Next: Tags and Next: Review.
- Give the role a name (you can use the same name as your policy) and a description, and select Create role.
Integrate with Application Security
- In the Application Security left menu, click .
- Select Add Integration from the top-right corner.
- Select Amazon SNS from the pop-up window.
- In the Configure SNS Integration window, fill in the following fields:
- Account ID: Your personal account ID.
- Role Name: The name of the role you created.
- External ID: The external ID that you used when creating you role.
- Key Hint: A hint you can use to help you remember what External ID was used to integrate Application Security with Amazon SNS.
- Region: The region your SNS topic will be in. Your AWS region can be found in the top-right corner of your AWS console.
- Topic Name: Name of your topic. For more information, see Create a topic.
- Notification Format: Format of the payload sent when there is an alert. The options currently supported are Text or Json, with the default value being Text.
- Minimum Reported Severity: The minimum severity of alerts that you'd like to be posted to your Slack channel. You can choose between low, medium or high.
- Select Add Integration.
To integrate with Application Security, use the following Schema format:
{
  "type": "array",
  "items": {
    "type": "object",
    "properties": {
      "timestamp": {
        "type": "string",
        "format": "date-time"
      },
      "action": {
        "enum": [
          "blocked",
          "detected"
        ],
        "type": "string"
      },
      "event_type": {
        "enum": [
          "file_access",
          "malicious_file_upload",
          "malicious_payload",
          "rce",
          "redirect",
          "sqli"
        ],
        "type": "string"
      },
      "severity": {
        "enum": [
          "high",
          "low",
          "medium"
        ],
        "type": "string"
      },
      "group": {
        "type": "string"
      },
      "dashboard_link": {
        "type": "string"
      }
    },
    "required": [
      "event_type",
      "severity"
    ],
    "additionalProperties": false
  }
}