Topics on this page
About Trend Micro Artifact Scanner (TMAS)
Trend Micro Artifact Scanner (TMAS) performs pre-runtime vulnerability and malware scans on artifacts (see Supported artifacts), enabling you to identify and fix issues before they reach a production environment such as, for example, Kubernetes for container images.
The scanner can detect the following:
- Vulnerabilities: TMAS can perform open source vulnerability scanning. The vulnerability database receives up-to-date threat data from open source vulnerability feeds. TMAS can find vulnerabilities in supported operating systems and programming languages.
- Malware: TMAS can detect all types of malware including trojans, ransomware, spyware, and so on using the latest file reputation and variant protection technologies backed by threat research. TMAS can also detect obfuscated or polymorphic variants of malware based on fragments of previously-encountered malware.
The scanner can find vulnerabilities in the following operating systems:
- Alpine
- Amazon Linux
- BusyBox
- CentOS
- Debian
- Distroless
- Oracle Linux
- Red Hat (RHEL)
- Ubuntu
The scanner can find vulnerabilities in the code written using the following programming languages:
- Ruby (Gems)
- Java (JAR, WAR, EAR, JPI, HPI)
- JavaScript (NPM, Yarn)
- Python (Egg, Wheel, Poetry,
requirements.txtandsetup.pyfiles) - Dotnet (
deps.json) - Golang (
go.mod) - PHP (Composer)
- Rust (Cargo)
How does TMAS fit into a CI/CD pipeline?
TMAS can be integrated into your continuous integration (CI) or continuous delivery (CD) pipeline.
For example, Jenkins projects can automatically build, test, and push Docker images to a Docker registry. Once pushed, the image may be instantly available to run in an orchestration environment. If open source vulnerabilities exist in the image, then they are a risk when the image is run. Since images are intended to be immutable, images should be scanned before they are deployed to a cluster.
TMAS scans artifacts inside your CI/CD pipelines. You can install the TMAS CLI into your CI/CD pipeline to perform scans before artifacts are deployed to production. In the case of vulnerability scans, TMAS takes the artifact that you wish to be scanned and generates a Software Bill of Materials (SBOM). It then uploads the SBOM to Trend Cloud One for processing and returns a vulnerability report.
Examples of artifacts that TMAS can scan include the following:
-
Container images
-
Binary files
-
Directories with source code
-
Open Container Initiative (OCI) archives
System requirements
The following table outlines the minimum system requirements for scanning the majority of the artifacts:
| Hardware | Minimum | Recommended |
|---|---|---|
| Storage | 16 GB | 16 GB |
| Ram | 2 GB | 4 GB |
| vCPU | 1 | 1 |
Your system must have enough storage capacity to accommodate the size of your target artifact. For images, your system must have sufficient space for its uncompressed size.
Memory consumption of the TMAS CLI scales with the number of files an artifact contains. Some artifacts may require additional memory to complete successfully. Performance can be improved by increasing memory resources and CPU cores.
Download and install
Verify that you have the latest version of TMAS using metadata.json.
The following architectures are supported:
- Darwin_arm64 (MacOS - Apple Silicon chipset)
- Darwin_x86_64 (MacOS - Intel chipset)
- Linux_arm64
- Linux_i386
- Linux_x86_64
- Windows_arm64
- Windows_i386
- Windows_x86_64
Upgrade to the latest version of the TMAS CLI
To ensure optimal performance and access to the latest features, upgrade to the most recent version of TMAS on a regular basis, as follows:
-
Download the updated binary. Links to download the latest version of the TMAS CLI are provided in Download and install.
-
Adjust your system's binary path settings by replacing the existing TMAS binary with the updated TMAS binary. For information, see the Add TMAS CLI to your PATH step described in Set up.
Set up
The TMAS CLI requires a valid API key to be stored in the environment variable. Add the API key associated with the Trend Cloud One region that you wish to call as an environment variable TMAS_API_KEY, as follows:
export TMAS_API_KEY=<your_cloud_one_api_key>Note that the TMAS CLI can also be used in Trend Vision One with enhanced capabilities, such as secret scanning. For more information, see About Trend Micro Artifact Scanner in Trend Vision One.
Obtain a Trend Cloud One API key:
- Log in to the Trend Cloud One console.
- Navigate to Container Security > Scanners.
-
Create a new API key through any of the following options:
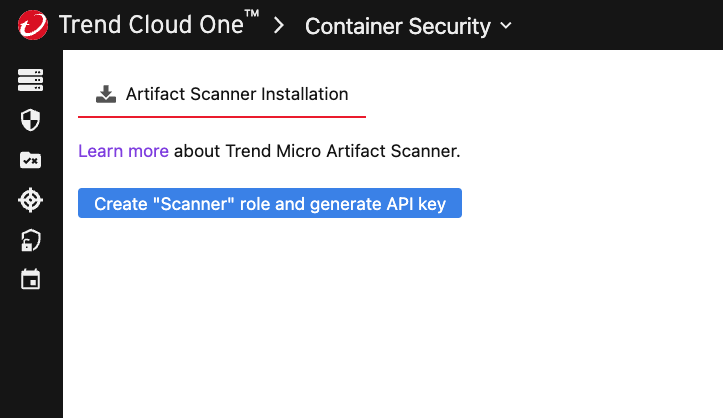
- Generate a new key through the Trend Cloud One Container Security Scanners page, as per the following illustration:
-
Directly configure a new key on the Trend Cloud One API Keys page, as follows:
-
Navigate to the Trend Cloud One Administration page.
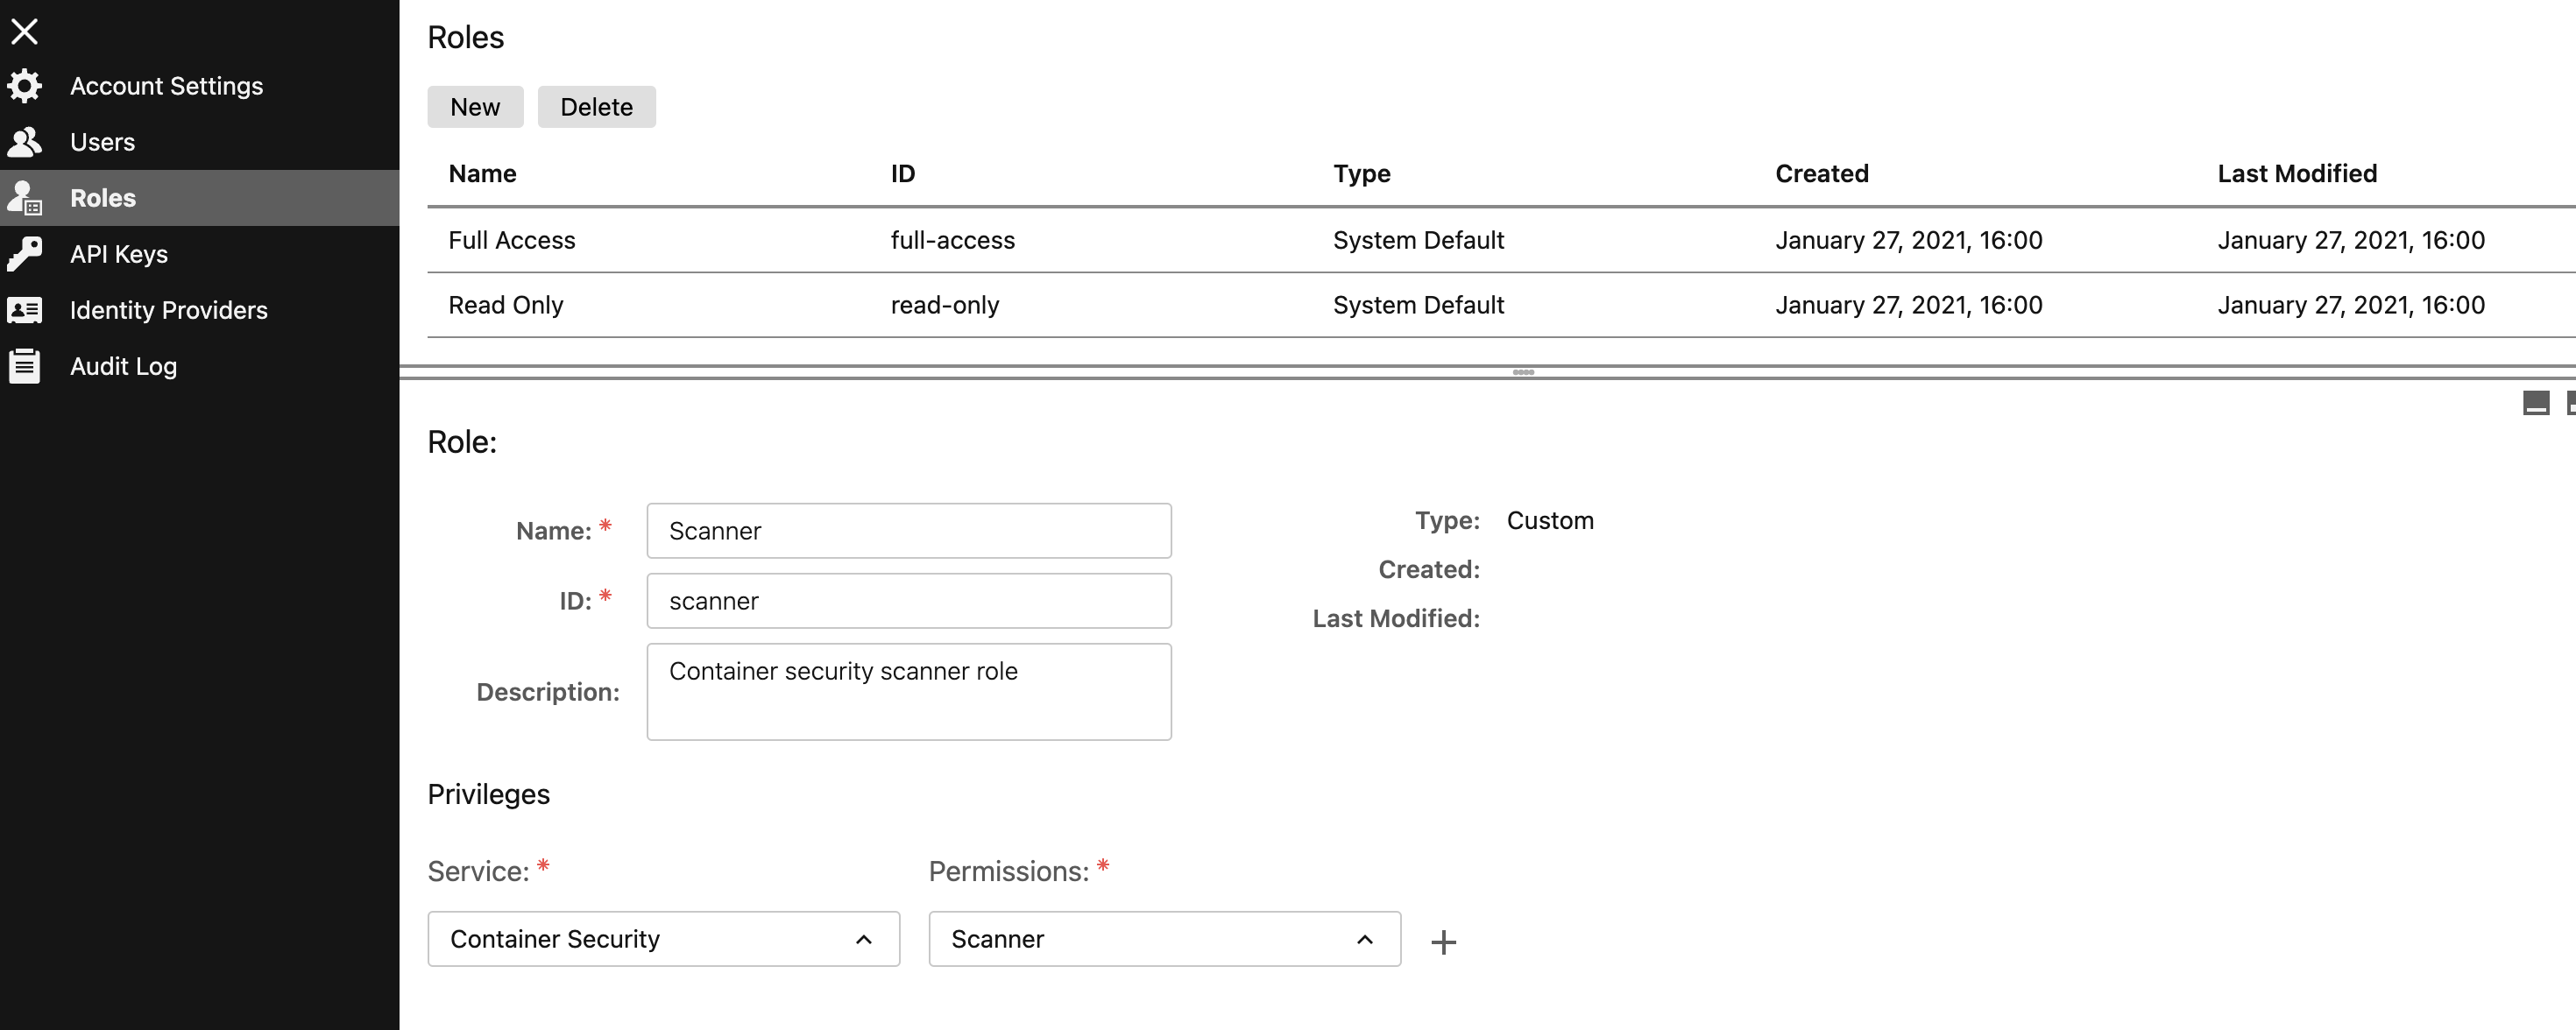
- Verify that the scanner role exists; if not, create a new scanner role, as per the following illustration:
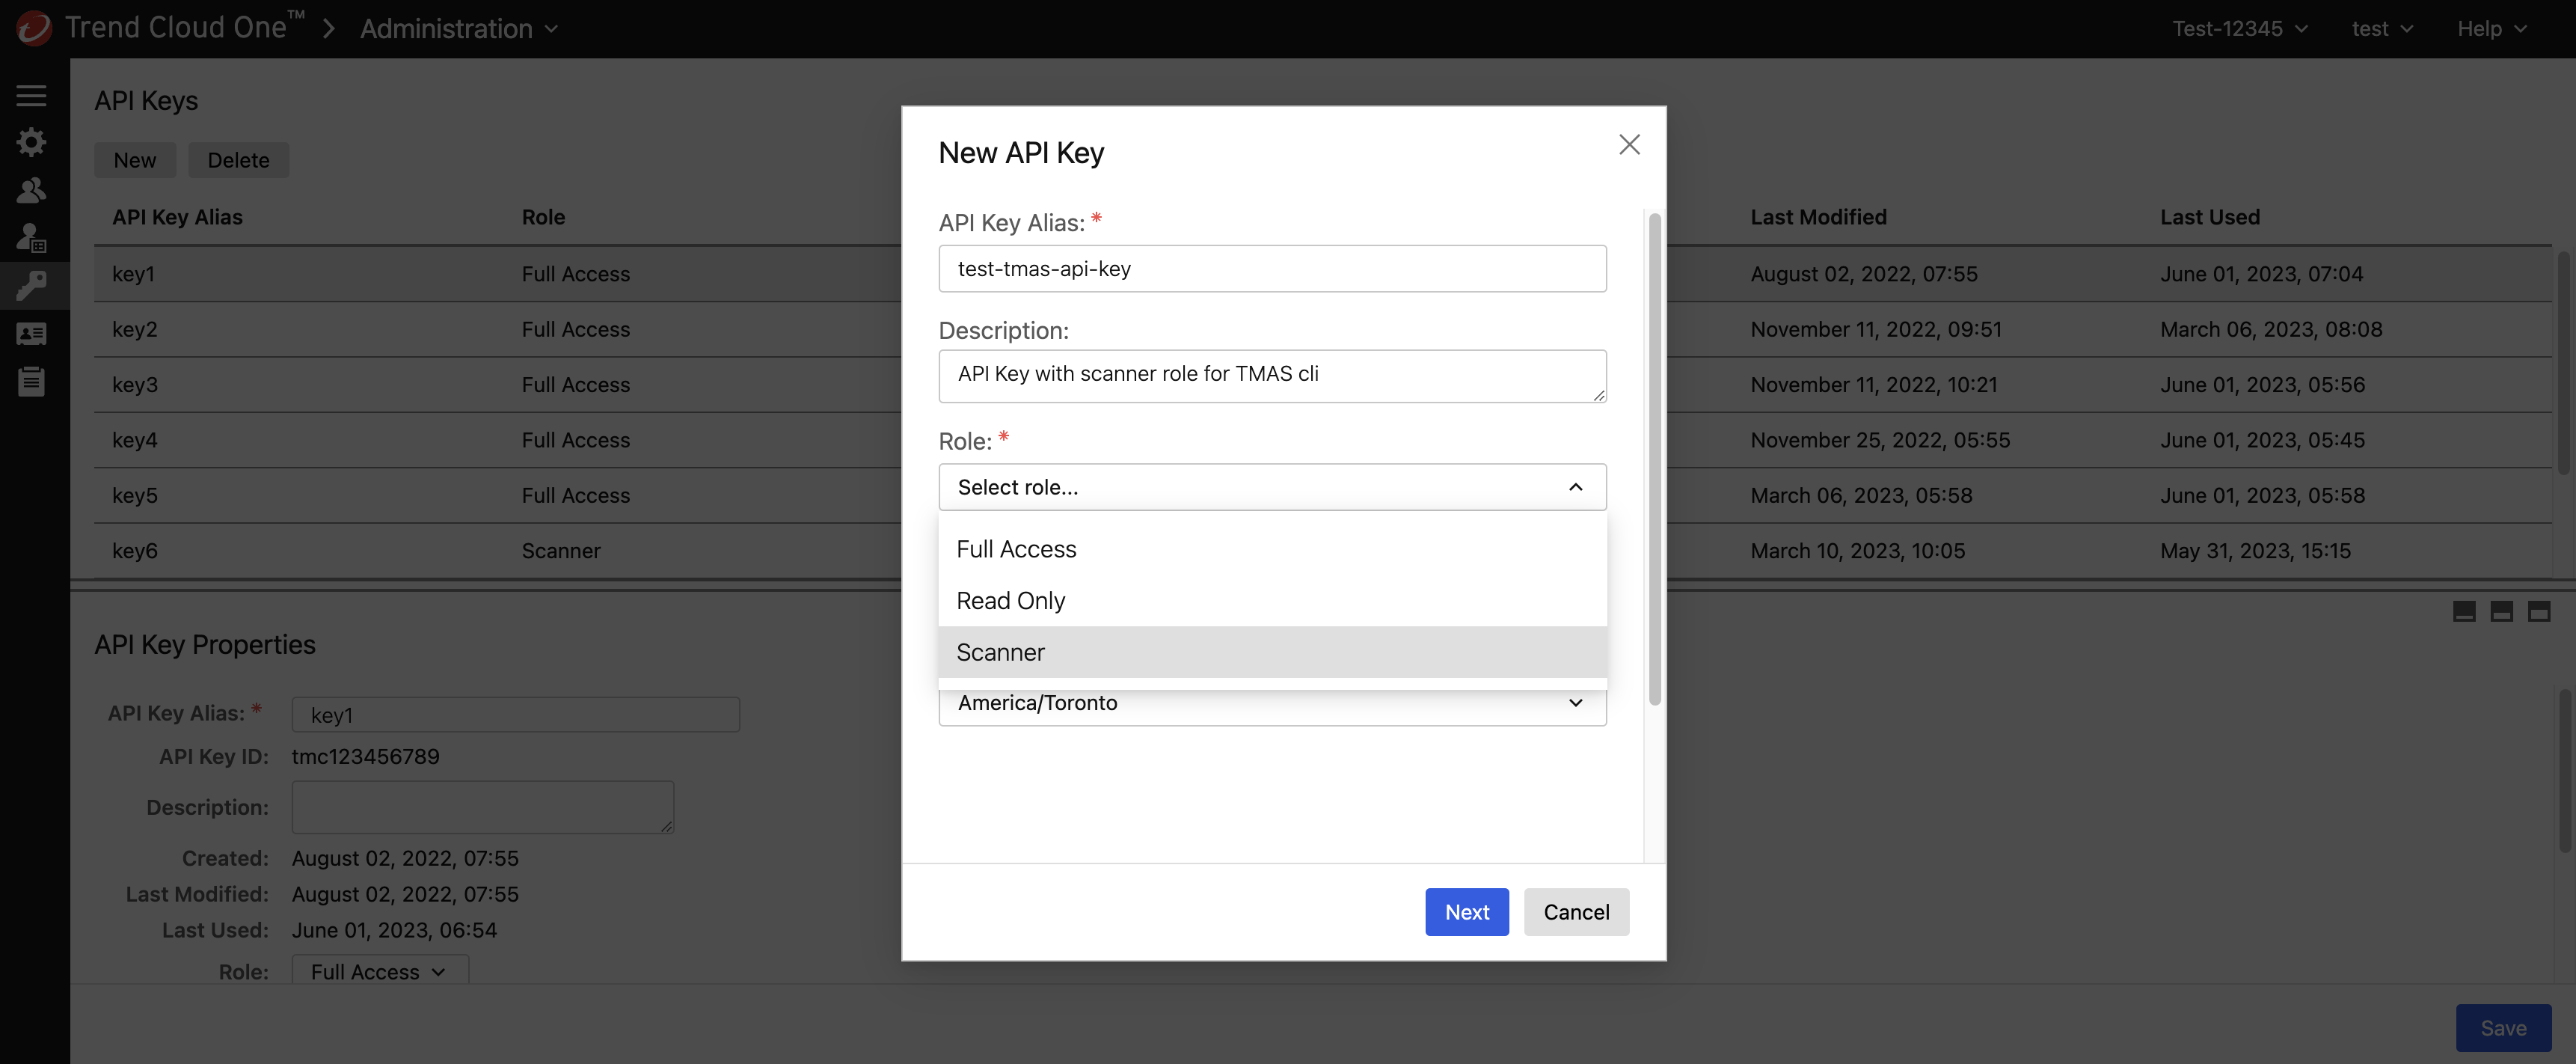
- Configure a new API key using the scanner role, as per the following illustration:
When obtaining the API key, ensure that the API key is associated with the endpoint you are calling. For instance, create an API key in a us-1 account if you are planning to call the us-1 region endpoint to ensure proper authorization.
You manage these keys from the Trend Cloud One Administration console.
Add TMAS CLI to your PATH:
export PATH="/path/to/tmas/binary/directory:$PATH"General usage
tmas [command] [flags]Available commands
| Command | Description |
|---|---|
scan |
Scan an artifact with any combination of scanners (at least one of vulnerabilities or malware). |
version |
Get the current CLI version (long). |
help |
Display help information. |
Global flags
| Flag | Description |
|---|---|
--version |
Get the current CLI version (short). |
-v, --verbose |
Increase verbosity (-v = info, -vv = debug). |
-h, --help |
Display help information. |
Scan command usage
tmas scan [artifact] [flags]Scan command flags
| Flag | Description |
|---|---|
-p, --platform |
Specify platform for multi-platform container image sources (optional). For example, 'linux/arm64', 'linux/arm64/v8', 'arm64', 'linux'. The default is 'linux/amd64'. |
-r, --region |
Trend Cloud One service region (required): [au-1 ca-1 de-1 gb-1 in-1 jp-1 sg-1 us-1] |
-V, --vulnerabilities |
Enable scanning for vulnerabilities (optional). |
-M, --malware |
Enable scanning for malware (optional). Supports docker, docker-archive, oci-archive, oci-dir and registry artifact types. |
--saveSBOM |
Save SBOM in the local directory (optional). |
-o, --override |
Specify the file path to the file containing the vulnerability override rules (optional). For example, /path/to/tmas_overrides.yml |
-v, --verbose |
Increase verbosity (-v = info, -vv = debug). |
-h, --help |
Display help information. |
For more information on available scanners and their flags, see Scan subcommands. Using a scanner-specific flag without enabling the associated scanner does not result in an error, but that flag does have no effect.
Supported artifacts
| Artifact | Description |
|---|---|
docker:yourrepo/yourimage:tag |
Use images from the Docker daemon. |
podman:yourrepo/yourimage:tag |
Use images from the Podman daemon. |
docker-archive:path/to/yourimage.tar |
Use a tarball from disk for archives created from docker save. |
oci-archive:path/to/yourimage.tar |
Use a tarball from disk for OCI archives (from Skopeo or otherwise). |
oci-dir:path/to/yourimage |
Read directly from a path on disk for OCI layout directories (from Skopeo or otherwise). |
singularity:path/to/yourimage.sif |
Read directly from a Singularity Image Format (SIF) container on disk. |
registry:yourrepo/yourimage:tag |
Pull image directly from a registry (no container runtime required). |
dir:path/to/yourproject |
Read directly from a path on disk (any directory). |
file:path/to/yourproject/file |
Read directly from a path on disk (any single file). |
Examples
Scanning an artifact for vulnerabilities and malware
tmas scan <artifact_to_scan> --region us-1 -V -Mor
tmas scan <artifact_to_scan> --region us-1 -VMor
tmas scan <artifact_to_scan> --region us-1 --vulnerabilities --malwareWhen you use the scan command, enable at least one scanner.
Using the required region flag to switch to a different Trend Cloud One region
tmas scan docker:yourrepo/yourimage:tag --region au-1 -VMWhen switching to a different region, ensure that the TMAS_API_KEY, which is stored as an environment variable, is associated with that Trend Cloud One region.
A mismatch causes the scan command to fail with a 403 Forbidden or APIKeyPlatformMismatchError error.
Scanning an image in a remote registry
tmas scan registry:yourrepo/yourimage:tag --region us-1 -VMUsing a registry as an artifact source does not require a container runtime. In addition, scan results from registry artifact sources can be used for policy evaluations in Trend Cloud One Container Security.
Scanning images from private registries requires that you login to the registry using tools such as docker login before attempting the scan. TMAS follows Docker's authentication behavior in order to use Docker's pre-configured credentials. When running malware scans on images from private registries and using Docker credsStore (.docker/config.json), add the credential-helpers=<your credsStore> configuration in the .config/containers/registries.conf file. For example, if Docker credsStore is desktop, add credential-helpers = ["desktop"].
Enabling info logs
tmas scan docker:yourrepo/yourimage:tag --region us-1 -VM -vSaving SBOM used for vulnerability analysis to disk
tmas scan docker:yourrepo/yourimage:tag --region us-1 -VM --saveSBOMWhen the --saveSBOM flag is enabled, the generated SBOM is saved in the local directory before it is sent to Trend Cloud One for scanning.
Using the platform flag to specify platform or architecture of container images
This flag allows you to specify which platform or architecture to use when scanning multiple-architecture container images:
tmas scan registry:yourrepo/yourimage:tag@sha256:<multiple-architecture-digest> --region us-1 -VM --platform=arm64Attempting to specify an architecture for multi-arch registry images without support for that architecture results in an error.
When scanning architecture-specific registry images, the platform flag is ignored:
tmas scan docker:yourrepo/yourimage:tag@sha256:<arm64-specific-digest> --region us-1 -VM --platform=arm64This flag is necessary when attempting to scan images from the Docker or Podman daemon with different architectures than the host that is running TMAS.
Overriding vulnerability findings
tmas scan <artifact_to_scan> --region us-1 -VM --override path/to/tmas_overrides.ymlUse the preceding flag to override false positives or other vulnerability findings you want to ignore. For more information, see Override vulnerability findings.
Overriding malware findings is not supported at this time.
Scan subcommands
tmas scan [subcommand] [artifact] [flags]| Subcommand | Description |
|---|---|
vulnerabilities |
Perform a vulnerability scan on an artifact. |
malware |
Perform a malware scan on an image artifact. |
Vulnerabilities subcommand
tmas scan vulnerabilities <artifact_to_scan>| Flag | Description |
|---|---|
-p, --platform |
Specify platform for multi-platform container image sources. For example, 'linux/arm64', 'linux/arm64/v8', 'arm64', 'linux'. The default is 'linux/amd64'. |
-r, --region |
Trend Cloud One service region (required): [au-1 ca-1 de-1 gb-1 in-1 jp-1 sg-1 us-1] |
--saveSBOM |
Save SBOM in the local directory (optional). |
-o, --override |
Specify the file path to the file containing the vulnerability override rules (optional). For example, /path/to/tmas_overrides.yml |
-v, --verbose |
Increase verbosity (-v = info, -vv = debug). |
-h, --help |
Display help information. |
Vulnerability scans are limited to artifacts for which the generated SBOM data is less than 10 MB.
Malware subcommand
tmas scan malware <artifact_to_scan>| Flag | Description |
|---|---|
-p, --platform |
Specify platform for multi-platform container image sources. For example, 'linux/arm64', 'linux/arm64/v8', 'arm64', 'linux'. The default is 'linux/amd64'. |
-r, --region |
Trend Cloud One service region (required): [au-1 ca-1 de-1 gb-1 in-1 jp-1 sg-1 us-1] |
-v, --verbose |
Increase verbosity (-v = info, -vv = debug). |
-h, --help |
Display help information. |
Note the following:
- Malware scans only support
docker,docker-archive,oci-archive,oci-dir, andregistryartifact types. - The maximum single file size limit is 1 GB. The scan skips files larger than 1 GB.
- The maximum single layer size limit is 512 MB. The scan skips layers larger than 512 MB.
Proxy configuration
The CLI tool loads the proxy configuration from the following set of optional environment variables:
| Environment Variable | Required or Optional | Description |
|---|---|---|
NO_PROXY |
Optional | Add the Artifact Scanning as a Service and Malware Scanning as a Service endpoints to the comma-separated list of host names if you want to skip proxy settings for the CLI tool. Note that only an asterisk '*' matches all hosts. |
HTTP_PROXY |
Optional | http://proxy.example.com |
HTTPS_PROXY |
Optional | https://proxy.example.comIf the proxy server is a SOCKS5 proxy, you must specify the SOCKS5 protocol in the URL as socks5://socks_proxy.example.com |
PROXY_USER |
Optional | Optional username for authentication header used in Proxy-Authorization |
PROXY_PASS |
Optional | Optional password for authentication header used in Proxy-Authorization, used only when PROXY_USER is configured. |
Clean up temporary files
Each scan initiated against a registry image using the Trend Micro Artifact Scanner generates a new temporary directory under $TMPDIR to download and analyze the image.
For version 1.35.0 and later, this tool automatically removes those temporary files after scan execution. To clean up existing temporary files that were generated with prior versions or by an interrupted scan, use the following commands (or its platform equivalent) under your discretion:
echo $TMPDIR
ls $TMPDIR | grep "stereoscope-"
cd $TMPDIR && rm -rf ./stereoscope-*
ls $TMPDIR | grep "stereoscope-"
Override vulnerability findings
If TMAS reports a vulnerability which has been determined to be a false positive or any other finding you wish to ignore, you may instruct TMAS to override these findings by defining one or more rules in an override configuration file (for example, ~/tmas_overrides.yml). Overriding malware findings is not supported at this time.
You can execute a scan using these rules by providing TMAS with a path to the override file using the --override flag:
tmas scan <artifact_to_scan> --region us-1 -VM --override path/to/tmas_overrides.ymlThe override file uses a YAML structure, with rules defined under each scan type, such asvulnerabilities.
The vulnerability overrides are structured as a list of rules. Each rule can specify any combination of the following criteria:
- Vulnerability ID (for example,
"CVE-2008-4318") - Fix state (allowed values:
"fixed","not-fixed","wont-fix", or"unknown") - Package name (for example,
"libcurl") - Package version (for example,
"1.5.1") - Package type (for example,
"npm","go-package","rpm", or any package type appearing in the TMAS JSON vulnerability report) - Package location (for example,
"/usr/local/lib/node_modules/**"; supports glob patterns)
Each rule must also be accompanied by a reason indicating why the rule was implemented. For example, false positive, mitigated, vulnerable package function is not called, and so on:
vulnerabilities:
  # This is the full set of supported rule fields:
  - rule:
      vulnerability: CVE-0000-0000
      fixState: unknown
      package:
        name: libcurl
        version: 1.5.1
        type: npm
        location: "/usr/local/lib/node_modules/**"
    reason: A descriptor specifying why the override rule implemented
A given vulnerability finding is overridden if any of the rules specified in the override file apply to the finding. A rule is considered to apply to a finding only if all the fields in the rule match those found in the vulnerability finding:
vulnerabilities:
  # Override vulnerability findings whose CVE-ID is CVE-0000-0000
  - rule:
      vulnerability: CVE-0000-0000
    reason: Not executed

  # Override vulnerability findings detected on libcurl version 1.5.1
  - rule:
      package:
        name: libcurl
        version: 1.5.1
    reason: Dev dependency
Any vulnerability finding that matches a rule is presented in the JSON report in an "Overridden" section, rather than classified under its severity:
{
  "vulnerabilities": {
    "totalVulnCount": 1,
    "criticalCount": 0,
    "highCount": 0,
    "mediumCount": 0,
    "lowCount": 0,
    "negligibleCount": 0,
    "unknownCount": 0,
    "overriddenCount": 1,
    "findings": {
      "High": [],
      "Low": [],
      "Medium": [],
      "Negligible": [],
      "Overridden": [
        {
          "name": "libcurl",
          "type": "npm",
          "version": "1.5.1",
          "id": "CVE-0000-0000",
          "source": "https://nvd.nist.gov/vuln/detail/CVE-0000-0000",
          "severity": "Low",
          "fix": "not-fixed",
          "locations": ["/usr/local/lib/node_modules/**"],
          "cvssSummaries": [],
          "relatedVulnerabilities": []
        }
      ]
    }
  }
}